---
title: "Using the PayPal Button Module (Recurring Payments, Donations) - Smile Pack"
description: "The Smile Pack - PayPal Button Module cuts through the complexity of e-commerce solutions, letting you accept PayPal payments in Joomla. Forget the ha"
url: "https://www.tassos.gr/docs/smile-pack/modules/paypal-button"
date: "2026-05-13T23:51:18+00:00"
language: "en-GB"
---
[ Home ](https://www.tassos.gr/index.php?option=com_content&view=category&layout=blog&id=24&Itemid=1088) / [ Smile Pack ](https://www.tassos.gr/index.php?option=com_content&view=category&id=36) / [ Modules ](https://www.tassos.gr/index.php?option=com_content&view=category&id=56)
# Using the PayPal Button Module (Recurring Payments, Donations)
The Smile Pack - PayPal Button Module cuts through the complexity of e-commerce solutions, letting you [accept PayPal payments in Joomla](https://www.tassos.gr/blog/accept-paypal-payments-joomla). Forget the hassle of setting up a full online store – for those who don't need a complete e-commerce solution and want to skip days of configuration, this module is a lifesaver.
It empowers you to create buttons for selling your products or services, from basic "Buy Now" options for one-time purchases to buttons for donations, recurring payments, and even "Pay Later" functionalities, all supported by PayPal. Plus, it accepts payments from both PayPal users and credit card holders, all without leaving your Joomla site's familiar environment. This streamlined approach keeps your customers happy and engaged, boosting your sales potential.
## [How to add a PayPal module in Joomla](#how_to_add_paypal_module)
Follow our simple guide to set up your PayPal button and start accepting payments today:
### [1. Setup PayPal API Keys](#setup_paypal_api_keys)
Go to your PayPal Developer Dashboard: , click on **Apps & Credentials**, select **Live** and click on **Create App**.
[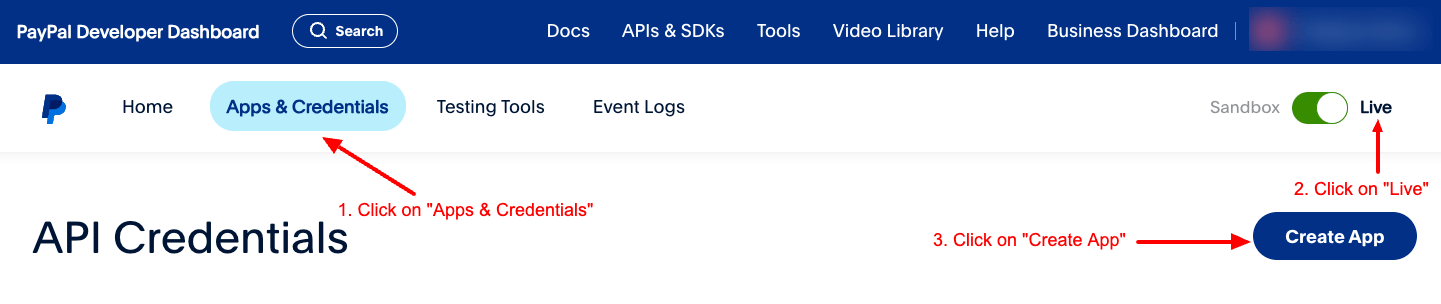](https://www.tassos.gr/images/2024/04/smile-pack-paypal-button-module-live-create-app.png)
Once you've clicked on "Create App", a modal will appear asking you to fill in the application name and click on the **Create App** button.
[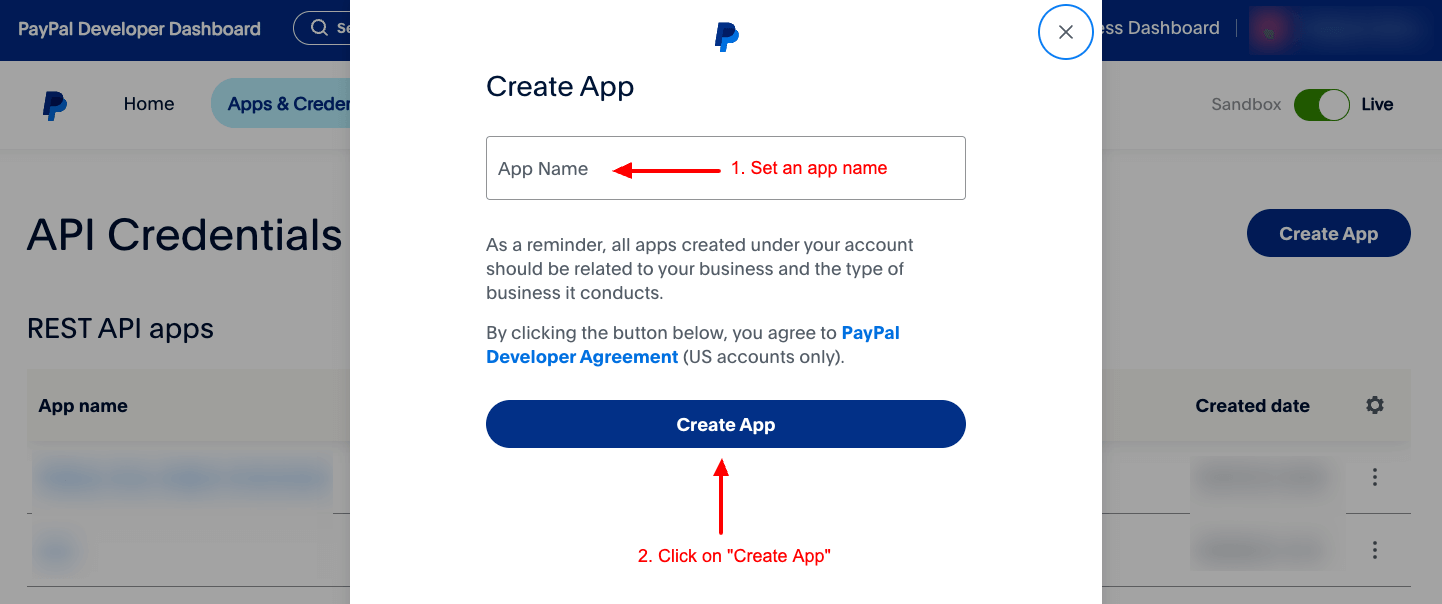](https://www.tassos.gr/images/2024/04/smile-pack-paypal-button-module-live-finalize-app.png)
Once you've created your app, you can now copy the Client ID and Client Secret keys
[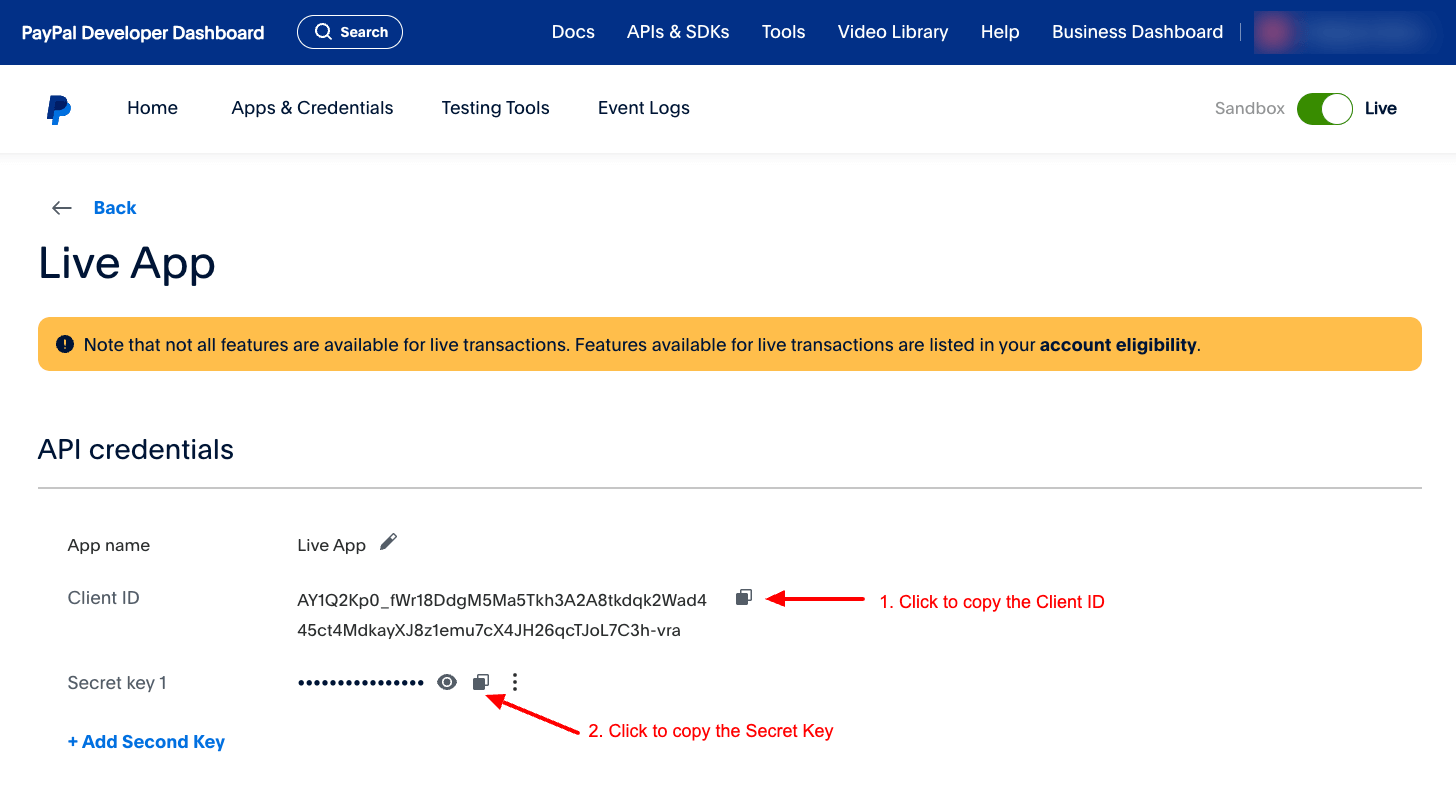](https://www.tassos.gr/images/2024/04/smile-pack-paypal-button-module-live-keys.png)
Go into your site > System > Global Configuration > Smile Pack > click on the Keys tabs > find the PayPal section > Live > fill in both keys, and click **Save**.
[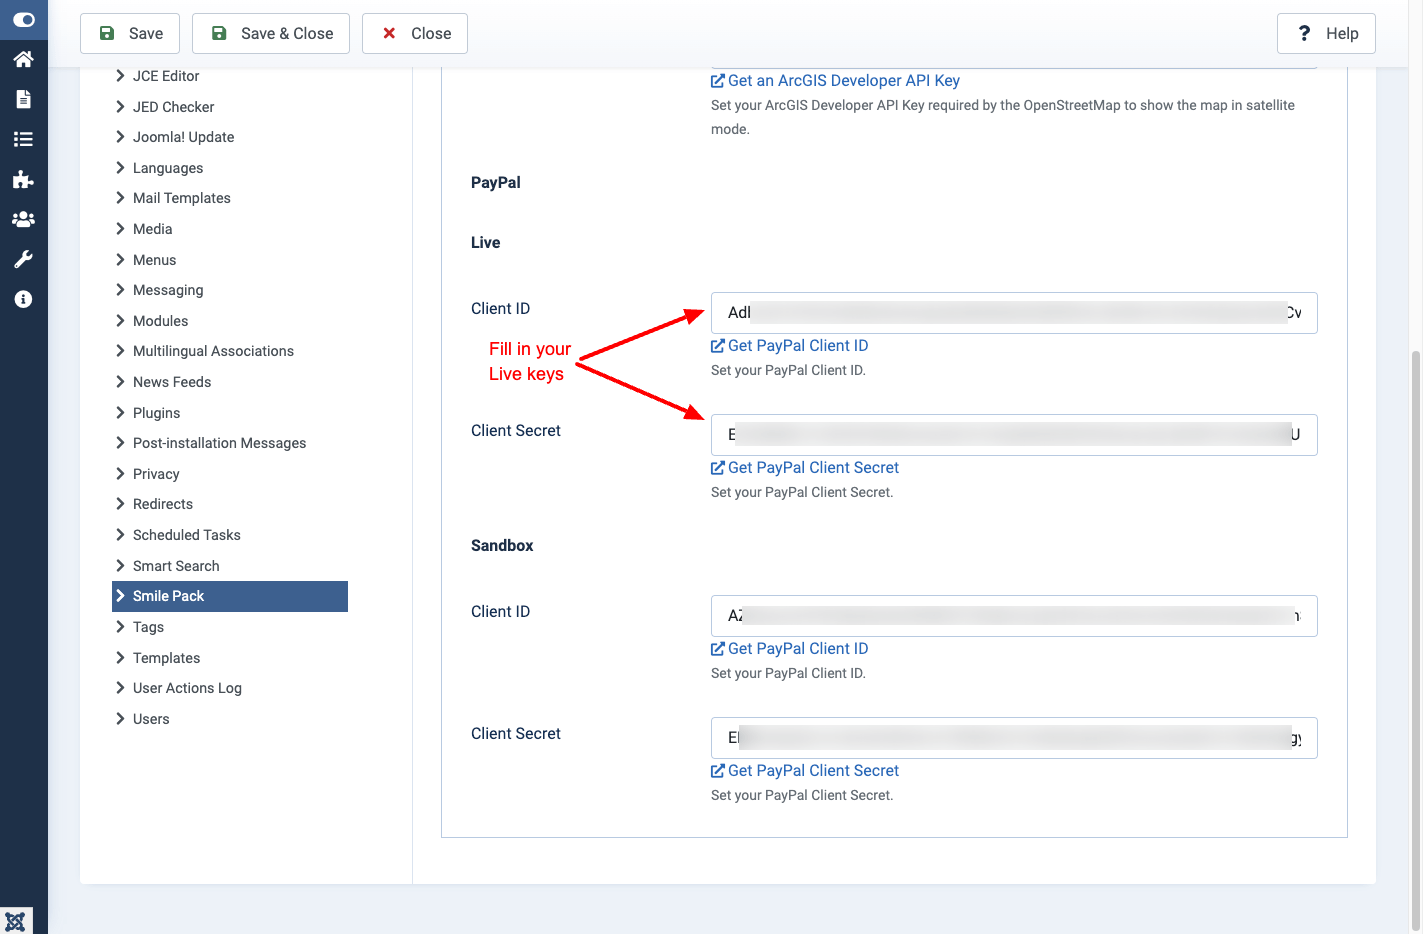](https://www.tassos.gr/images/2024/04/smile-pack-paypal-button-module-live-keys-set.png)
You can follow the same steps to create sandbox PayPal API Keys for testing purposes.
The **Client Secret** setting is only available to Pro Smile Pack customers, which allows you to start accepting recurring payments.
Are you looking into accepting recurring payments? [Upgrade to Smile Pack Pro](https://www.tassos.gr/joomla-extensions/smile-pack/subscribe)
Create the Smile Pack - PayPal Button Module by heading to Content > Site Modules and pressing the **New** button. Search for "Smile Pack" on that page, and select the *Smile Pack - PayPal Button Module*.

### [2. Style Your Button](#style_your_button)
Customize how the PayPal button will appear on your site by selecting the button's color, layout, corner style, and width.
[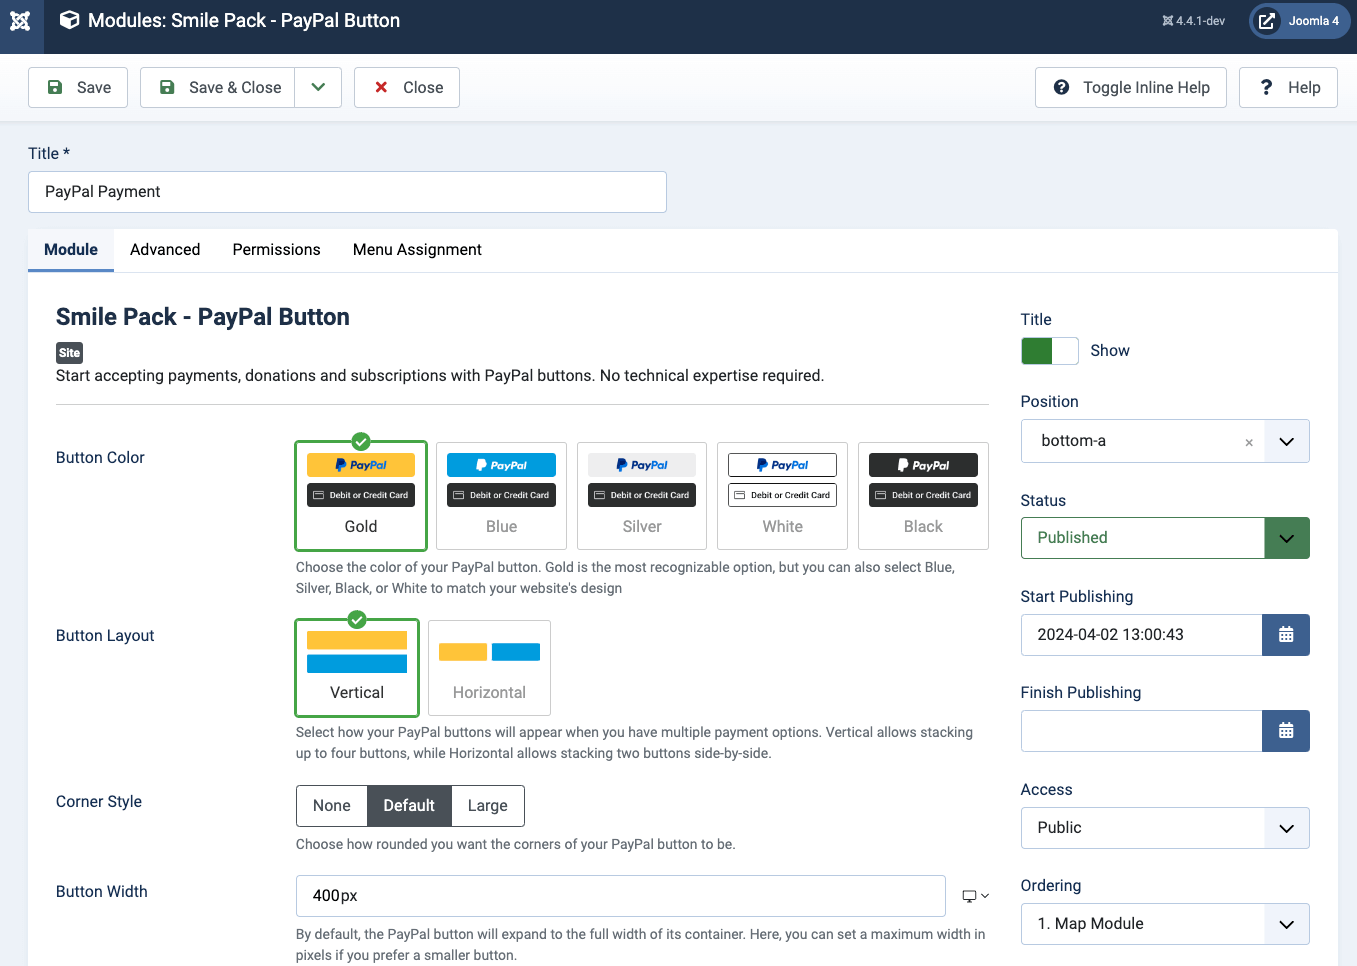](https://www.tassos.gr/images/2024/04/smile-pack-paypal-button-module-style-button.png)
### [3. Setup Product and Payment Details](#setup_product_and_payment_details)
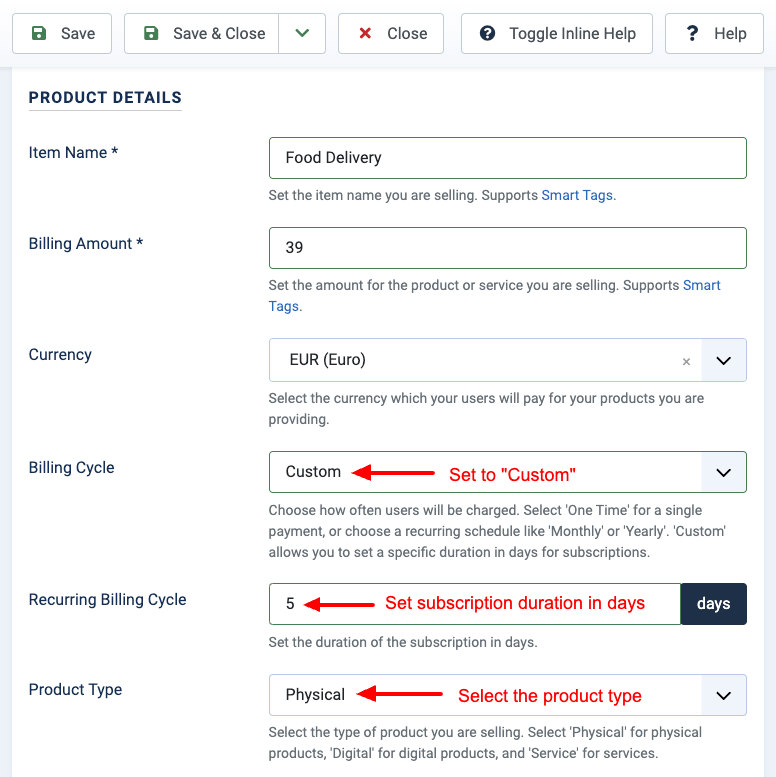
This step lets you define the item name (product/service), billing amount, currency, billing cycle, and product type.
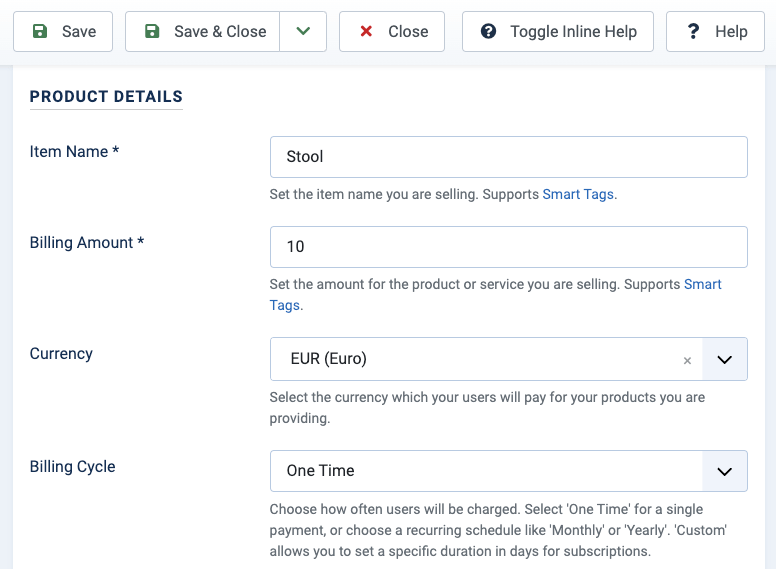
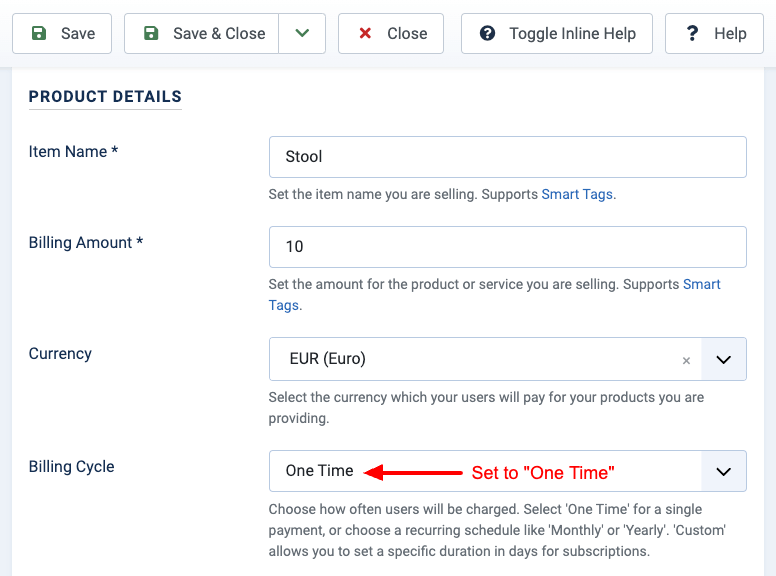
#### [Accept One-Time Payments](#accept-one-time-payments)
To accept one-time payments using PayPal on your Joomla site, set **Billing Cycle** to "One Time".
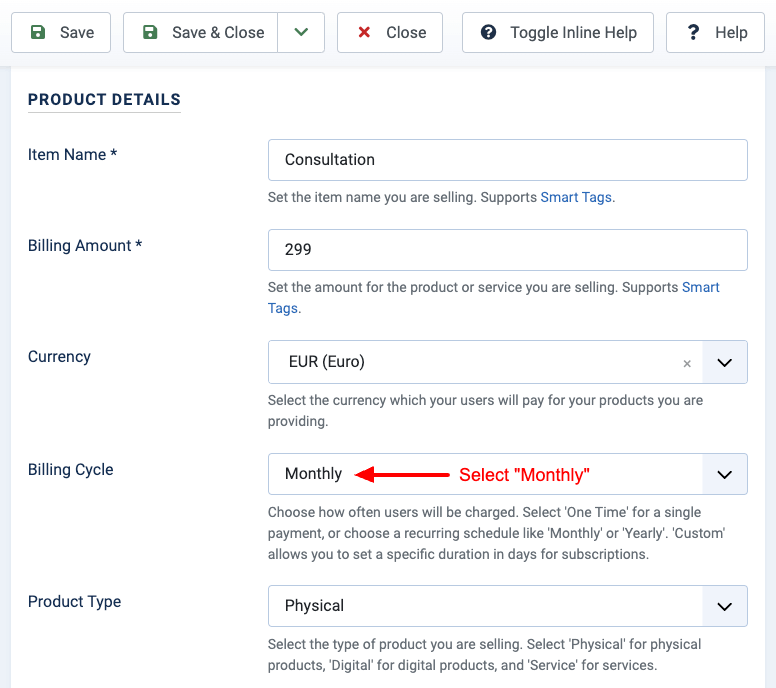
#### [Accept Recurring Payments](#accept-recurring-payments)
To accept recurring payments using PayPal on your Joomla site, set **Billing Cycle** to "Weekly", "Monthly", or "Yearly" to accept weekly, monthly, or yearly payments, respectively, as well as select the subscription **Product Type**.
**Accept Monthly Payments**
**Accept Custom Recurring Payments**
To accept recurring payments with a custom subscription duration, set **Billing Cycle** to "Custom" for a custom subscription duration. Once you've set it to "Custom", then set the **Recurring Billing Cycle** to the duration of the subscription in days.
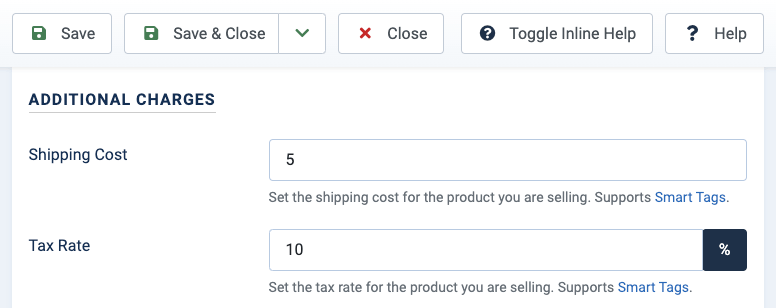
### [4. Setup Additional Charges](#setup_addotional_charges)
Apart from setting a billing amount, you can define a shipping cost and a tax rate. To do so, go into your PayPal Module settings > Additional Charges section and fill in the fields.
### [5. After Payment Actions](#after_payment_actions)
Personalize your checkout experience! The Smile Pack - PayPal Button Module enhances your Joomla site's payment process with After Payment Actions. Go beyond simple transactions and send customized "Thank You" messages or direct customers to targeted post-purchase pages. Keep your customers happy, engaged, and boost your sales!
#### [Display a Message After Payment](#display-a-message-after-payment)
Show compelling messages that confirm successful purchases and offer additional information, express gratitude, or even promote further engagement with your website.
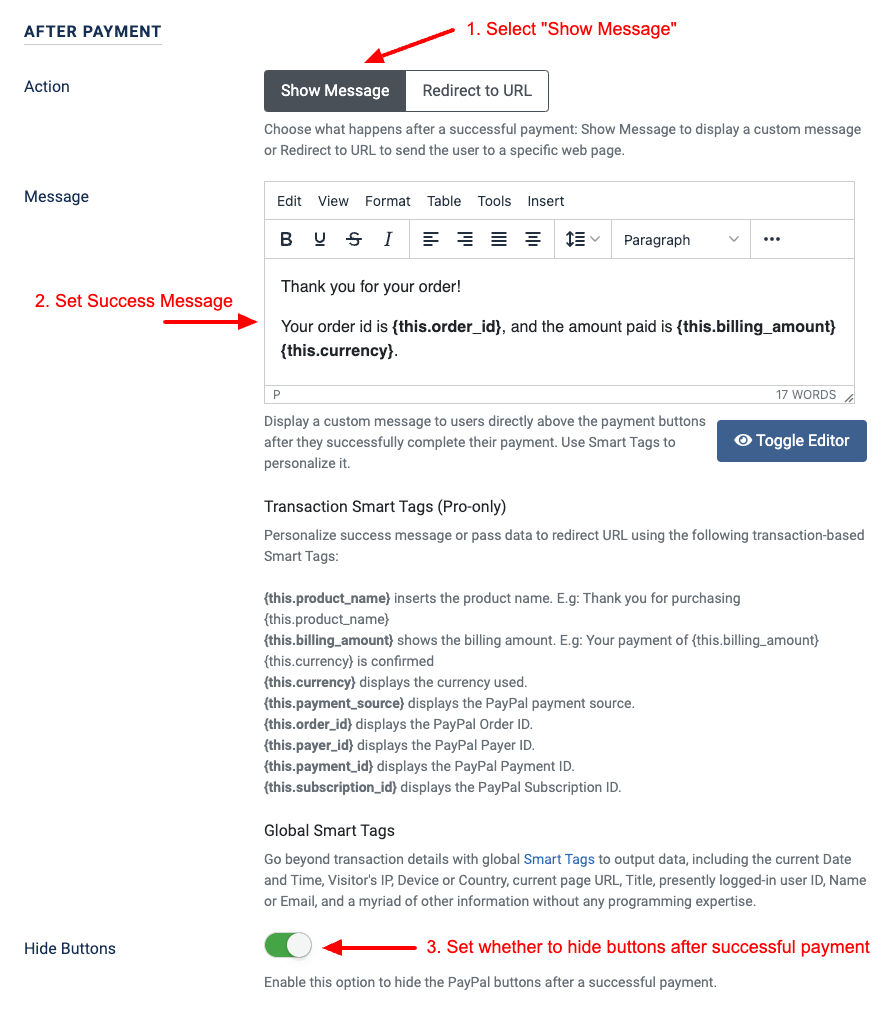
To set up the message that appears after the payment, go into your Smile Pack - PayPal Button Module settings > under the section "After Payment", select "Show Message" under **Action**, type in your message under **Success Message**, and set whether to hide the PayPal buttons after a successful payment under **Hide Buttons**.
[](https://www.tassos.gr/images/2024/04/smile-pack-paypal-button-module-success-message-config.png)
Whenever the PayPal button is used, and the transaction is successful, the message will appear to your customers.
#### [Redirect To a Page After Payment](#redirect-to-a-page-after-payment)
Set a specific web page on your Joomla site – a "Thank You" page, download access, or upsell opportunity – and customers automatically land there after a successful purchase.
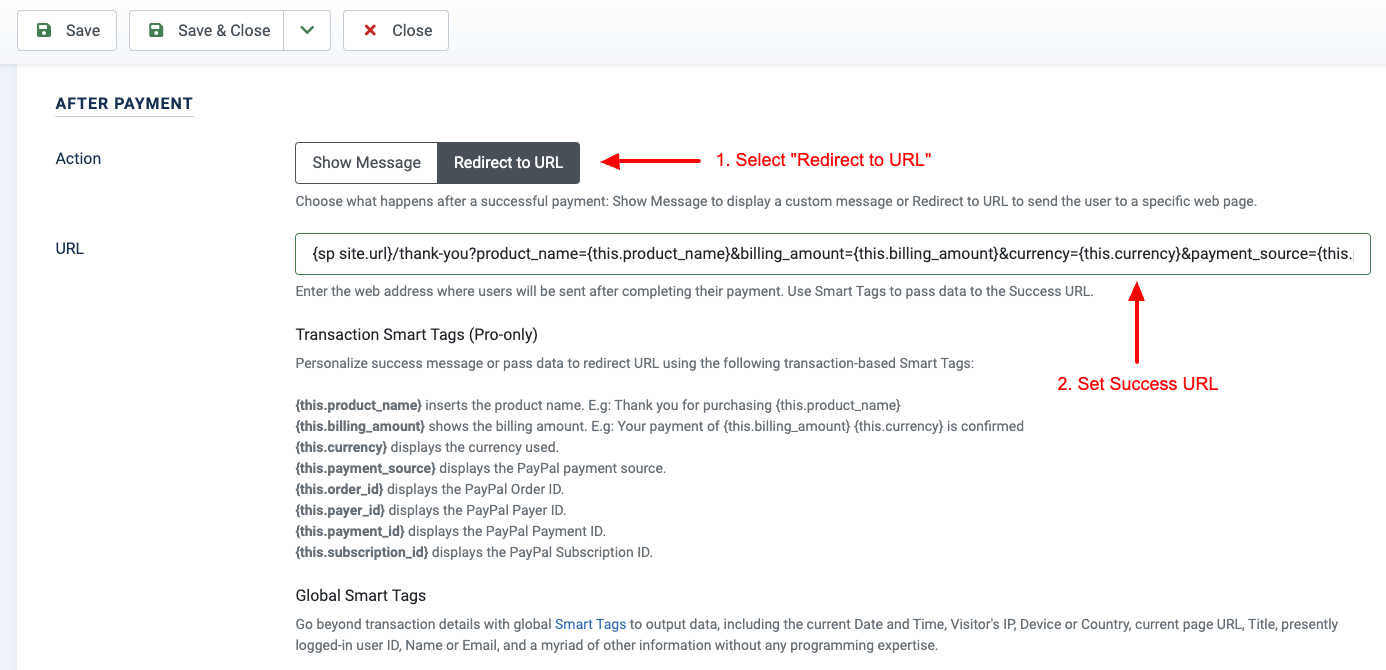
To set up the redirect URL that appears after the payment, go into your Smile Pack - PayPal Button Module settings > under the section "After Payment", select "Redirect to URL" under **Action**, and set the URL under **Success URL**.
[](https://www.tassos.gr/images/2024/04/smile-pack-paypal-button-module-redirect-config.png)
The customer will be redirected to the set URL whenever the PayPal button is used and the transaction is successful.
#### [Using Smart Tags](#using-smart-tags)
Both Success Message and Success URL support our generic [Smart Tags](https://www.tassos.gr/joomla-extensions/smile-pack/docs/smart-tags-sp), as well as some custom ones, which can be found below:
| Name | Description |
|---|---|
| {this.product\_name} | Returns the product name. |
| {this.billing\_amount} | Returns the billing amount. |
| {this.currency} | Returns the currency used. |
| {this.payment\_source} | Returns the PayPal payment source (card, PayPal, Venmo, etc...). |
| {this.order\_id} | Returns the PayPal Order ID. |
| One-Time Payments |
| {this.payer\_id} | Returns the PayPal Payer ID. |
| {this.payment\_id} | Returns the PayPal Payment ID. |
| Recurring Payments |
| {this.subscription\_id} | Returns the PayPal Subscription ID. |
### [6. Disable / Enable Payment Methods](#disabled_enable_payment_methods)
PayPal will automatically handle the part of which payment methods to display to the visitor based on various factors; however, The Smile Pack - PayPal Module allows you to influence this behavior and enable or disable specific payment methods, curating the perfect payment selection for your customers.
To disable or enable specific payment methods from your Joomla PayPal button, go into your Smile Pack - PayPal Button Module settings > under the section "Other Settings", select "Custom" under **Payment Methods**, under **Include Payment Methods** specify which payment methods to include, and under **Exclude Payment Methods** select any methods you'd like to exclude.
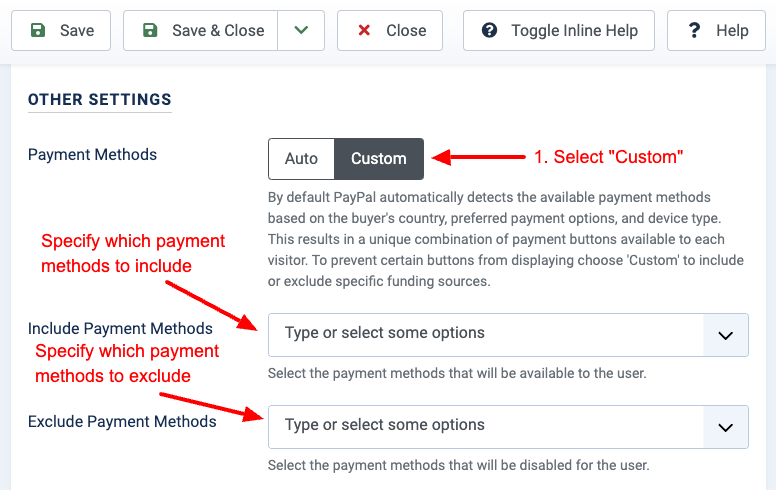
PayPal will disable or enable the set payment methods based on its criteria and the visitor's device/configuration.
#### [Accept pay later payments](#how_to_add_accept_pay_later_payments)
The Pay Later option lets your customers split purchases into easy installments, potentially increasing sales and conversions.
To enable the "Pay Later" option, go into your Smile Pack - PayPal Button Module settings > under the section "Other Settings", select "Custom" under **Payment Methods**, select "Pay Later" under **Include Payment Methods**, and click the **Save** button.

If your PayPal account supports the Pay Later option, you should be able to see the Pay Later button, similar to what's displayed below.

#### [Accept Venmo payments](#accept-venmo-payments)
Venmo is a popular payment app, and integrating it into your PayPal button will help your customers pay quickly and conveniently using their existing Venmo accounts, potentially increasing your sales and conversions. Let's see how you can integrate Venmo payments directly into your Joomla! website!
To enable the "Venmo" option, go into your Smile Pack - PayPal Button Module settings > under the section "Other Settings", select "Custom" under **Payment Methods**, select "Venmo" under **Include Payment Methods**, and click the **Save** button.
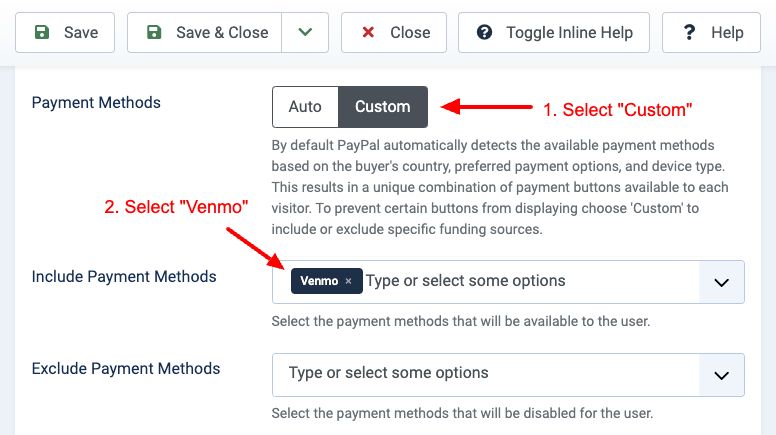
If your PayPal account supports Venmo, you should be able to see the Pay Later button, similar to what's displayed below.

### [7. Save Your PayPal button](#7-save-your-paypal-button)
Your PayPal button is ready! Save it to start accepting PayPal payments across your Joomla! Website.

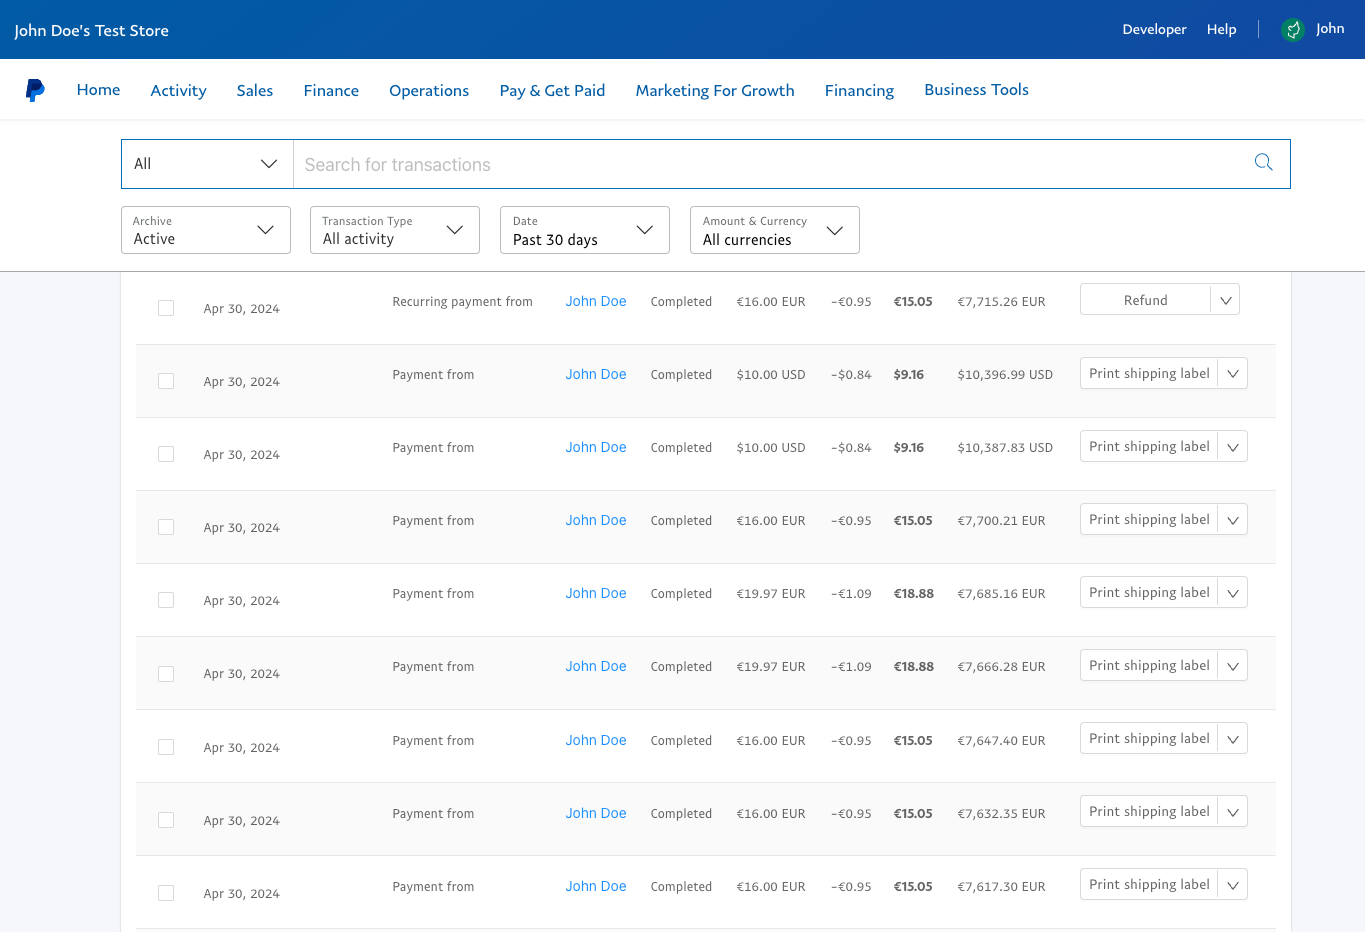
## [How to Manage Payments and Customers](#how-to-manage-payments-and-customers)
While the Button Module simplifies adding secure payment buttons to your Joomla site, the actual management of your transactions and customer information resides within your trusted PayPal dashboard. Log in to your [PayPal Dashboard](https://www.paypal.com/mep/dashboard) to access a comprehensive overview of all your transactions. There, you can view purchase details, download reports, manage refunds, and access valuable customer data – all within the familiar environment you know and trust.
[](https://www.tassos.gr/images/2024/04/smile-pack-paypal-button-paypal-activity.png)
## [How to Accept Donations with PayPal in Joomla](#how-to-accept-donations-with-paypal-in-joomla)
The Smile Pack - PayPal button module also allows you to accept one-time or recurring donations. Creating a donation PayPal button for your Joomla website works like you'd do when creating a normal PayPal Button module. There's no extra setup required. Below, you can find instructions on how to implement both donation buttons.
To get started accepting one-time donations, click here: [How to accept PayPal donations on your Joomla site](#how_to_add_paypal_module).
To get started accepting recurring donations, click here: [How to accept recurring PayPal donations on your Joomla site](#accept_recurring_payments).
## [How to Create a Custom Landing Page](#how-to-create-a-custom-landing-page)
Elevate your customer experience with custom landing pages! The Smile Pack - PayPal button lets you go beyond the basic "thank you" message by creating dedicated landing pages for your customers after they purchase. These pages confirm their successful transaction by displaying all their essential order details in one place. You can even include helpful FAQs or guide them through the next steps to avoid confusion.
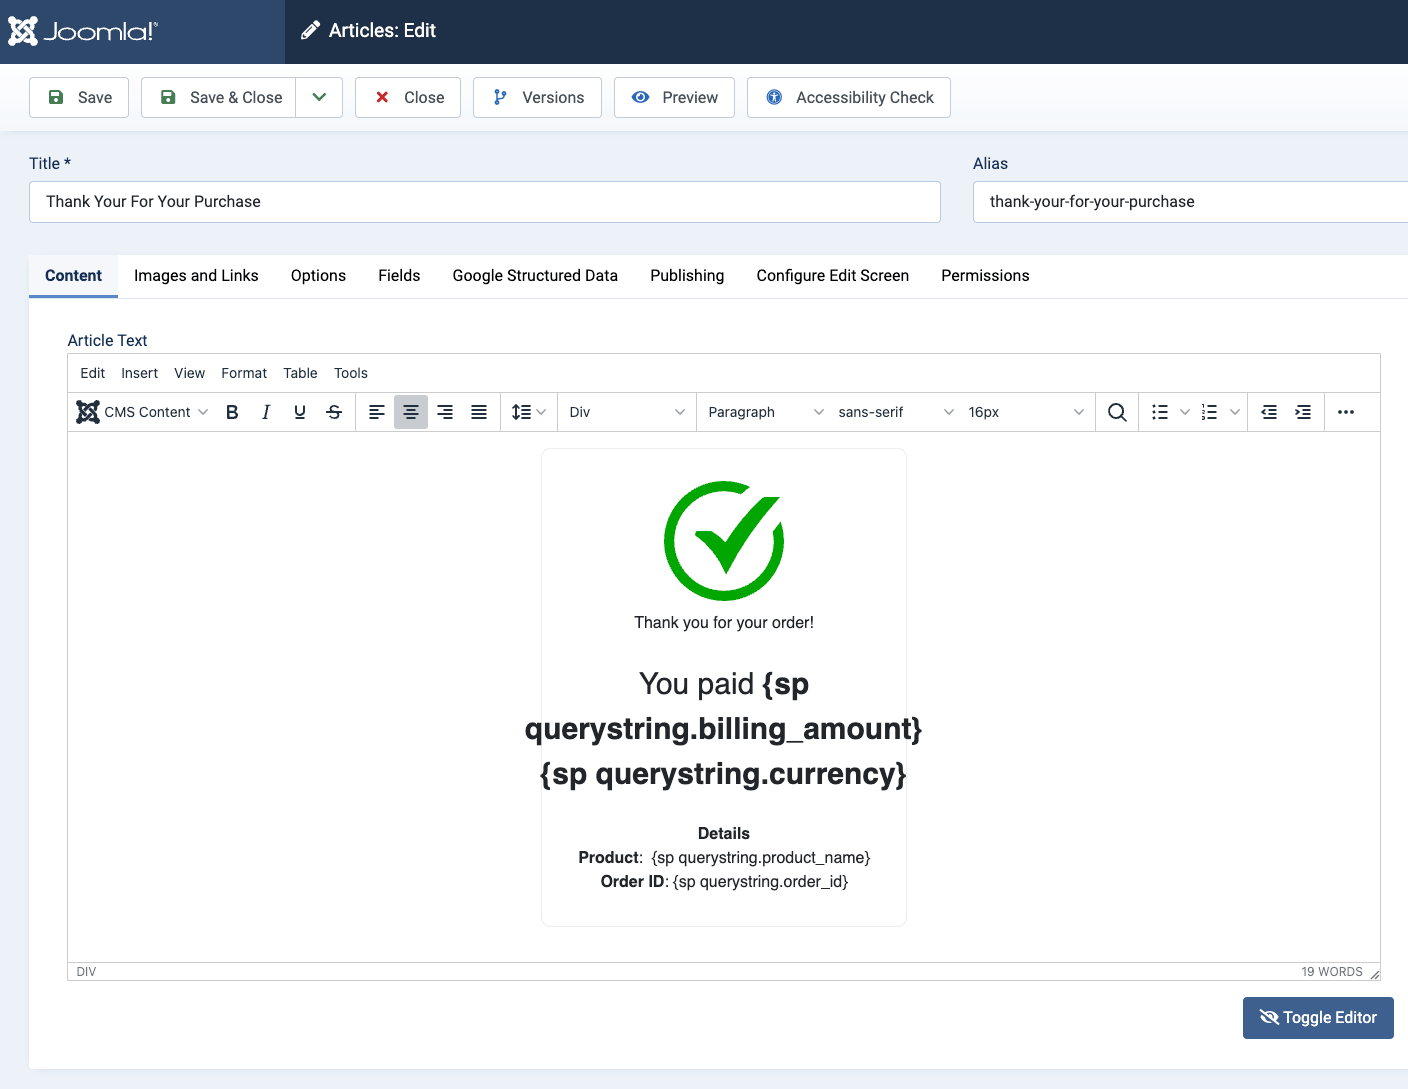
Let's create a new Joomla article as our custom landing page. For this example, we'll assume that we're selling a product so that the success URL will display a success checkmark with the amount paid, the product name, and the order ID.
To create this behavior, we're utilizing the [Smile Pack Smart Tags](https://www.tassos.gr/joomla-extensions/smile-pack/docs/smart-tags-sp) and more specifically, the Smart Tag. The Success URL will contain all the necessary payment information we need to display on the success page, and using this Smart Tag, we can grab the data from the URL and print them into the success page.
[](https://www.tassos.gr/images/2024/04/smile-pack-paypal-button-module-success-article-edit.png)
The article template can be found below:
```
Thank you for your order!
You paid {sp querystring.billing_amount} {sp querystring.currency}
Details
Product: {sp querystring.product_name}
Order ID: {sp querystring.order_id}
```
Once you've created the custom landing page, it's time to set up your PayPal button to redirect to this page. The redirect URL must contain information related to the PayPal button and payment order details. The Success URL should look like this:
```
{sp site.url}thank-you?product_name={this.product_name}&billing_amount={this.billing_amount}¤cy={this.currency}&order_id={this.order_id}
```
Replace **thank-you** with the path to your success page.
You must now set your PayPal button to redirect to the newly created custom page and, more specifically, to the above URL. To do so, you can read more [here](#redirect_to_a_page_after_payment)
As seen from the video above, the custom landing page includes all the necessary order details for the customer.
## [How to Sell Digital Downloads with PayPal in Joomla](#how-to-sell-digital-downloads-with-paypal-in-joomla)
The Smile Pack - PayPal button can also be used to sell your digital downloads without needing 3rd-party extensions and provide the customer with a way to access your digital product using the success message.
To do so, you must first set up your PayPal button. You can read more [here](#how_to_add_paypal_module).
Once you've set up your PayPal button, you can set the success message with a confirmation about the order and include a link where they can download/access their purchased digital product.
Smile Pack - PayPal button will soon support sending confirmation emails (both to the admin and customer), which will help streamline the process and ensure a smooth experience for the customer.
## [How to pull the product name and product price from Joomla custom fields](#how-to-pull-the-product-name-and-product-price-from-joomla-custom-fields)
The Smile Pack - PayPal Button Module offers exceptional flexibility when managing your products or services. This section explores leveraging Joomla custom fields to populate product names and prices dynamically within your payment buttons.
Imagine this: you have custom fields named "Product Name" and "Product Price" assigned to various product pages. Instead of manually creating a Smile Pack - PayPal Button module for each page, you can achieve the same result with a single PayPal button!
Here's the magic: we'll introduce you to [Smart Tags](https://www.tassos.gr/joomla-extensions/smile-pack/docs/smart-tags-sp), a powerful feature that lets you pull product information directly from your custom fields. This eliminates the need for manual configuration each time you add a new product, saving you time and ensuring accuracy.
Let's explore using Smart Tags with custom fields to unlock the dynamic potential of your Smile Pack buttons!
The key Smart Tag used in this example is the Smart Tag.
Assuming you've created the aforementioned custom fields and have populated them within your products (Joomla articles), you can then edit your Smile Pack - PayPal button module and configure both "Item Name" and "Billing Amount" to pull the data from these custom fields.
To do so, go to the "Product Details" section > and set "Item Name" and "Billing Amount" to and respectively.

Now, on every product page that includes this PayPal button, the module will automatically grab the product name and price from these fields.
## [How to Display a PayPal Button with a Shortcode](#how-to-display-a-paypal-button-with-a-shortcode)
Smile Pack will support, in a future release, custom shortcodes that will allow you to display multiple PayPal buttons anywhere on your site without the need to create a PayPal module first.
In the meantime, you can use the Joomla built-in shortcodes to render an existing module anywhere on your site. You can read more by clicking [here](https://docs.joomla.org/How_do_you_put_a_module_inside_an_article%3F).
## [How to Display a PayPal Button in a Popup](#how-to-display-a-paypal-button-in-a-popup)
To create a popup that embeds a PayPal button, you can use [EngageBox](https://www.tassos.gr/joomla-extensions/engagebox), which helps you create high-converting popups that help you increase your sales. There are a variety of ways to embed a PayPal button in your popup:
**Method #1:** Do you have an existing PayPal module? Click [here](#how_to_add_paypal_module) to create a PayPal module. You can include it in your EngageBox popup using the Joomla! built-in shortcode {loadmoduleid ID}. Replace the ID with the Module ID.
**Method #3:** Use shortcode (Coming Soon).
## [Developer's Guide](#developer-s-guide)
The Smile Pack - PayPal button module is developer-friendly, providing ways to interact with the PayPal module by listening to specific events, and modifying properties, such as the billing amount, shipping amount, tax rate, etc...
### [Javascript API](#javascript-api)
#### [Get Instance](#get-instance)
To get the HTML Element & PayPal button instance use the following Javascript snippet:
```
let paypalButton = document.querySelector('.sp-paypal-button');
let paypalButtonInstance = paypalButton.instance;
```
Have multiple Smile Pack - PayPal button modules on your page? You can then find a specific PayPal button HTML Element and PayPal instance given its Module ID. Instead, use the following snippet:
```
let paypalButton = document.querySelector('.sp-paypal-button.id-123');
let paypalButtonInstance = paypalButton.instance;
```
Replace **123** with your Module ID.
#### [Hook to Events](#hook-to-events)
The PayPal button currently provides a success and cancel event to hook into. Below, you can find information about each event and example codes that you can use to get started listening to them and execute your code.
##### [Success Event](#success-event)
This event is helpful as it ensures your code will execute only after a successful payment. Grab the PayPal HTML element from the [Get Instance](#get_instance) section and use the code below:
```
paypalButton.addEventListener('SPPayPalPaymentSuccess', function(e) {
// Execute when payment is successful
});
```
##### [Cancel Event](#cancel-event)
This event is helpful as it ensures your code will execute when a user has canceled their payment (such as closing the popup window or continued and canceled just before paying for the product/service).
```
paypalButton.addEventListener('SPPayPalPaymentCancelled', function(e) {
// Execute when payment is canceled
});
```
#### [Modify Properties](#modify-properties)
Modifying properties allows you to create more dynamic PayPal buttons, such as by manipulating the product name, billing amount, shipping amount, tax rate, etc...
Once you've retrieved the PayPal Button instance, you can access the **config** property, which helps you customize the PayPal button settings.
| Property Name | Property Description | Expected Value |
|---|---|---|
| item\_name | The Product/Service Name. | String |
| billing\_amount | The billing amount. | Float |
| shipping\_amount | The shipping amount. | Float |
| tax\_rate | The tax rate in % | Float |
| action | The action after a successful payment. Can be either "message" or "redirect". | String |
| success\_message | The success message that appears after a successful payment. | String |
| success\_url | The success URL where the customer will be redirected to after a successful payment. | String |
| success\_hide\_payment\_buttons | Set whether to hide the PayPal payment buttons after a successful payment. | Boolean |
**Example:** Setting the billing amount
```
paypalButtonInstance.config.billing_amount = 100;
```
## [Module settings table](#module-settings-table)
Below, you can find all settings available in the PayPal Module.
| Name | Description |
|---|---|
| Style Your Button |
| Button Color | Choose the color of your PayPal button. Gold is the most recognizable option, but you can select Blue, Silver, Black, or White to match your website's design. |
| Button Layout | Select how your PayPal buttons will appear when you have multiple payment options. Vertical allows stacking up to four buttons, while Horizontal allows stacking two buttons side-by-side. |
| Corner Style | Choose how rounded you want the corners of your PayPal button to be. |
| Button Width | By default, the PayPal button will expand to the full width of its container. Here, you can set a maximum width in pixels if you prefer a smaller button. |
| Show Button Tagline | Choose whether to display the 'The safer, easier way to pay' tagline text below the button. This gives users additional trust and reassurance, but you may prefer a cleaner look by hiding it. |
| Product Details |
| Item Name | Set the item name you are selling. Supports [Smart Tags](https://www.tassos.gr/joomla-extensions/smile-pack/docs/smart-tags-sp). |
| Billing Amount | Set the amount for your product or service. Supports [Smart Tags](https://www.tassos.gr/joomla-extensions/smile-pack/docs/smart-tags-sp). |
| Currency | Select the currency your users will pay for the products you provide. |
| Billing Cycle | Choose how often users will be charged. Select 'One Time' for a single payment, or choose a recurring schedule like 'Monthly' or 'Yearly'. 'Custom' allows you to set a specific duration in days for subscriptions. |
| Recurring Billing Cycle | Set the duration of the subscription in days. |
| Product Type | Select the type of product you are selling. Select 'Physical' for physical products, 'Digital' for digital products, and 'Service' for services. |
| Additional Charges |
| Shipping Cost | Set the shipping cost for the product you are selling. Supports [Smart Tags](https://www.tassos.gr/joomla-extensions/smile-pack/docs/smart-tags-sp). |
| Tax Rate | Set the tax rate for the product you are selling. Supports [Smart Tags](https://www.tassos.gr/joomla-extensions/smile-pack/docs/smart-tags-sp). |
| After Payment |
| Action | Choose what happens after successful payment: Show a Message to display a custom message or Redirect to the URL to send the user to a specific web page. |
| Success Message | Enter the web address where users will be sent after payment. Personalize it based on the transaction details using the following Smart Tags (Pro Only): - {this.product\_name} inserts the product name. E.g: Thank you for purchasing {this.product\_name} - {this.billing\_amount} shows the billing amount (including shipping cost + tax rate). E.g: Your payment of {this.billing\_amount} {this.currency} is confirmed - {this.currency} displays the currency used. - {this.payment\_source} displays the PayPal payment source. - {this.order\_id} displays the PayPal Order ID. One-Time Payments - {this.payer\_id} displays the PayPal Payer ID. - {this.payment\_id} displays the PayPal Payment ID. Recurring Payments - {this.subscription\_id} displays the PayPal Subscription ID. |
| Success URL | Display a custom message to users directly above the payment buttons after they complete their payment. Personalize it based on the transaction details using the following Smart Tags (Pro Only): - {this.product\_name} inserts the product name. E.g: Thank you for purchasing {this.product\_name} - {this.billing\_amount} shows the billing amount (including shipping cost + tax rate). E.g: Your payment of {this.billing\_amount} {this.currency} is confirmed - {this.currency} displays the currency used. - {this.payment\_source} displays the PayPal payment source. - {this.order\_id} displays the PayPal Order ID. One-Time Payments - {this.payer\_id} displays the PayPal Payer ID. - {this.payment\_id} displays the PayPal Payment ID. Recurring Payments - {this.subscription\_id} displays the PayPal Subscription ID. |
| Hide Buttons | Enable this option to hide the PayPal buttons after a successful payment. |
| Other Settings |
| Payment Methods | By default, PayPal automatically detects the available payment methods based on the buyer's country, preferred payment options, and device type. This results in a unique combination of payment buttons available to each visitor. To prevent certain buttons from displaying, choose 'Custom' to include or exclude specific funding sources. |
| Include Payment Methods | Select the payment methods available to the user. |
| Exclude Payment Methods | Select the payment methods that will be disabled for the user. |
| Show Shipping Address | Enable this option to show the shipping address on the PayPal checkout page. |
| Language | Set the language of the PayPal button. Select 'Use Visitor Browser Language' to use the visitor's browser language, 'Use Site Language' to use your site's language, or select a specific language. |
| Test Mode | Enable this option to test the PayPal button in sandbox mode. You must also set up your PayPal sandbox Client ID and Secret under the Global Configuration > Smile Pack > Keys > PayPal section. |
## [Frequently asked questions](#faq)
### [Can I have multiple PayPal buttons on the same page?](#can-i-have-multiple-paypal-buttons-on-the-same-page)
You can have as many Smile Pack - PayPal Buttons on the same as you desire. However, there are a few limitations outlined below:
- All PayPal Buttons that appear on the same page must use the same currency.
- All PayPal Buttons that appear on the same page must be of the same type, either one-time payments or recurring payments. This means that you cannot mix one-time and recurring payment buttons.
### [How can I cancel a subscription?](#how-can-i-cancel-a-subscription)
Since the management of your payments and subscriptions happens from within your PayPal dashboard, this is also the place to cancel a subscription.
### [How can I set the quantity?](#how-can-i-set-the-quantity)
While you cannot define a quantity at the moment (defaults to 1), this will be possible in the future.
### [How do I send confirmation emails?](#how-do-i-send-confirmation-emails)
Sending confirmation emails to both the administrator as well as the customer is one of our priorities for upcoming releases.
Last updated on Apr 3rd 2025 10:04
## Schema
```json
{
"@context": "https://schema.org",
"@type": "BreadcrumbList",
"itemListElement": [
{
"@type": "ListItem",
"position": 1,
"name": "Home",
"item": "https://www.tassos.gr"
},
{
"@type": "ListItem",
"position": 2,
"name": "Home",
"item": "https://www.tassos.gr/docs"
},
{
"@type": "ListItem",
"position": 3,
"name": "Smile Pack",
"item": "https://www.tassos.gr/docs/smile-pack"
},
{
"@type": "ListItem",
"position": 4,
"name": "Modules",
"item": "https://www.tassos.gr/docs/smile-pack/modules"
},
{
"@type": "ListItem",
"position": 5,
"name": "Using the PayPal Button Module (Recurring Payments, Donations)",
"item": "https://www.tassos.gr/docs/smile-pack/modules/paypal-button"
}
]
}
```
```json
{
"@context": "https://schema.org",
"@type": "Article",
"mainEntityOfPage": {
"@type": "WebPage",
"@id": "https://www.tassos.gr/docs/smile-pack/modules/paypal-button"
},
"headline": "Using the PayPal Button Module (Recurring Payments, Donations)",
"image": {
"@type": "ImageObject",
"url": "https://www.tassos.gr/"
},
"publisher": {
"@type": "Organization",
"name": "Tassos",
"logo": {
"@type": "ImageObject",
"url": "https://www.tassos.gr/https://www.tassos.gr/media/brand/logo-text.png"
}
},
"author": {
"@type": "Person",
"name": "Stergos Zamagias",
"url": "https://www.tassos.gr/docs/smile-pack/modules/paypal-button"
},
"datePublished": "2024-02-26T14:58:41+02:00",
"dateCreated": "2024-04-29T09:30:00+03:00",
"dateModified": "2025-04-03T10:04:11+03:00"
}
```