The "ACF - Map" custom field enables creating interactive maps on your website. It offers seamless integration with OpenStreetMap, Google Maps, and Bing Maps, allowing you to incorporate location-based information effortlessly. This custom field provides flexibility regarding map markers, and customization options for info windows, dimensions, and map types. With the "ACF - Map" custom field, you can enhance your website by incorporating dynamic and engaging maps to showcase relevant geographical data.
TABLE OF CONTENTS
- Setting up Map Field
- Manipulate Markers
- API Keys
- Use Cases
- To-do list
- Frequently Asked Questions
- Troubleshooting
Setting up Map Field
To get started using the Map Field, create a new custom field and select ACF - Map.
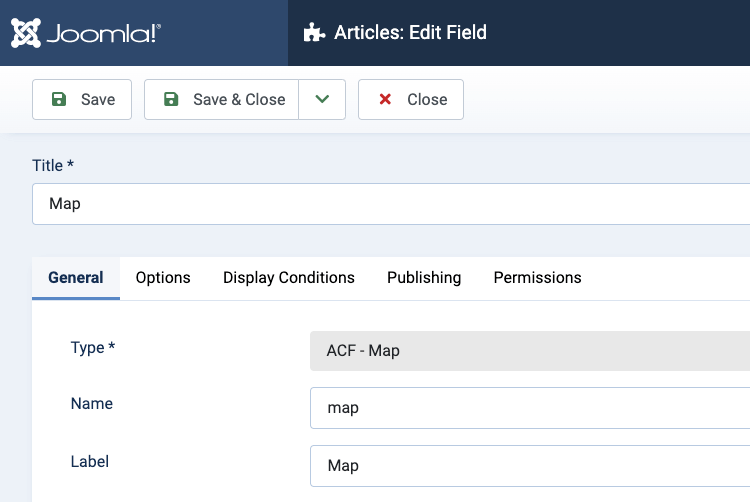
Once you have selected the ACF - Map Field, you will be presented with all available options to configure the custom field.
General
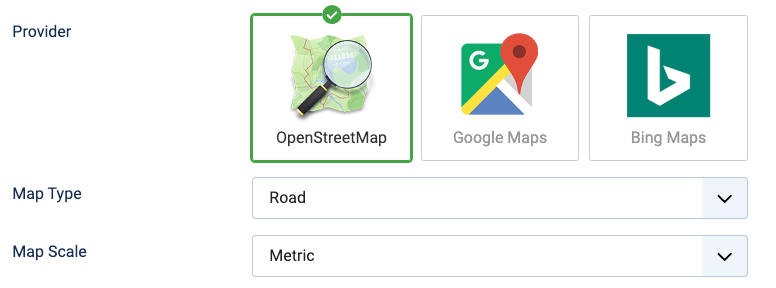
Provider
Select which provider will display the map on the front end. The available providers are:
- OpenStreetMap
- Google Maps
- Bing Maps
OpenStreetMap ArcGIS Key
If you desire to use the satellite map type of the OpenStreetMap provider, you must set your OpenStreetMap ArcGIS Key within the Fields - ACF Map system plugin.
Google Maps Key
To use the Google Maps provider, you must set your Google Maps API Key within the Fields - ACF Map system plugin.
Bing Maps Key
To use the Bing Maps provider, you must set your Bing Maps API Key within the Fields - ACF Map system plugin.
Map Type
Select the map type to use. Options vary from Road, to Satellite, to Light, and Dark modes, depending on the selected provider.
Map Scale
Select whether to show a scale on the map and which scale to use. The available options re:
- Metric
- Imperial
Front-end
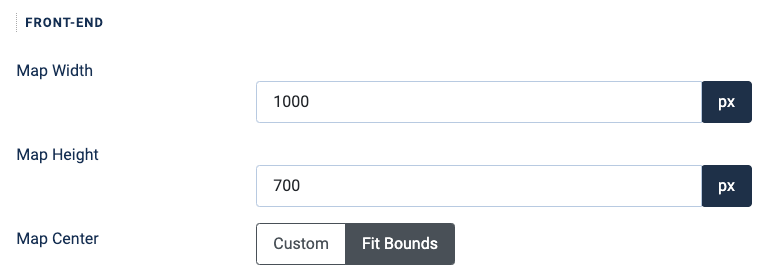
Map Width
Set the map width for desktop/tablet/mobile devices.
Map Height
Set the map height for desktop/tablet/mobile devices.
Map Center
Select how to center the map. The available options are:
- Custom: Define a custom zoom level.
- Fit Bounds: Center around the map markers.
Set Map Center
If a custom map center is selected, we define a custom location, which will be used as the map center.
Zoom Level
Define the map zoom level.
Enable Info Window
Set whether to enable map marker info windows to appear when clicking a marker. By default, the selected map marker address will appear. However, you can customize both the label and description of each map marker.
Maximum Markers
Define the maximum allowed markers to be added on the map.
Marker Image
Override the default marker image and select a custom image.
Back-end
Show Sidebar
Set whether to display the sidebar on the map.
Default Map Coordinates
Set the default map coordinates used when editing an empty map. This is rather useful when you always want to focus around a specific area on the map to add your markers so you won't have to find the same map location again and again.
Conditional Logic
Using Conditional logic, you can fine-tune when your custom field appears on your site, by specifying some criteria, such as when the user is viewing your site from a mobile device, whether they are viewing a specific page if Google referred them, and more! The possibilities are endless.
When editing a custom field, you can configure when your custom field will appear by going into the Display Conditions tab.
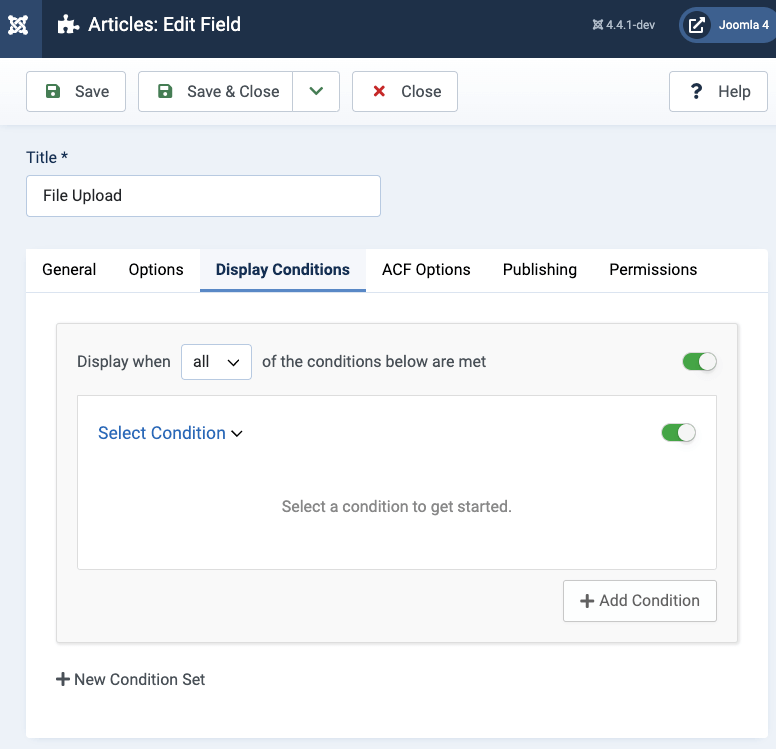
Once on the Display Conditions tab, you can configure when your custom field appears. Leaving the condition logic empty, tells Advanced Custom Fields to display the custom field site-wide.
Manipulate Markers
In this section, you will read on how to add, edit, delete, and import/export markers.
Add Markers
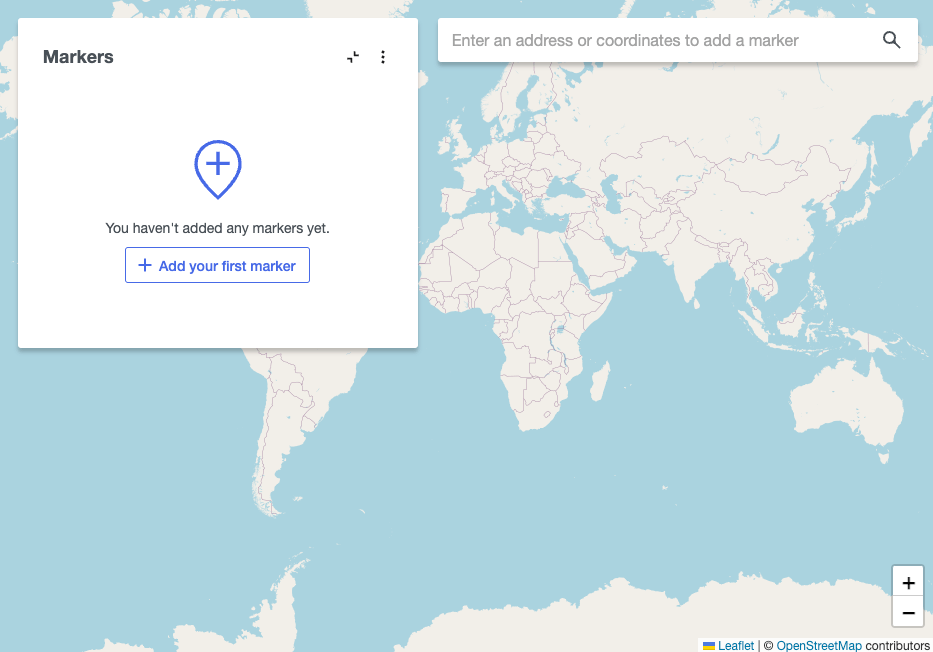
The first thing you'll need to do on the map editor is to add your own markers on specific locations on the map. ACF - Map provides multiple ways to add markers.
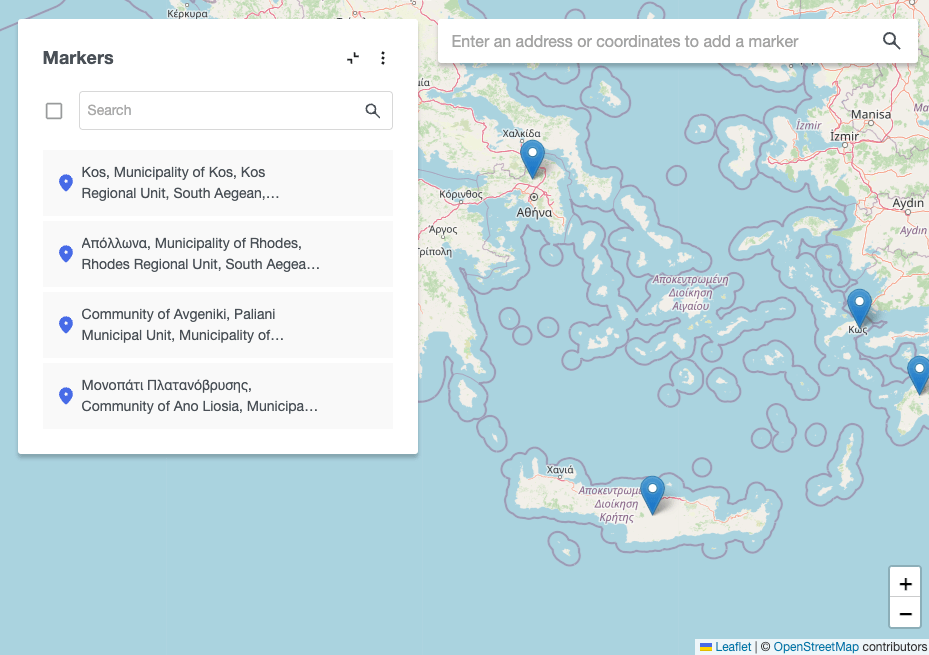
Using the sidebar
If your map is empty, you can add your first marker by going into the sidebar and clicking the Add your first marker button.
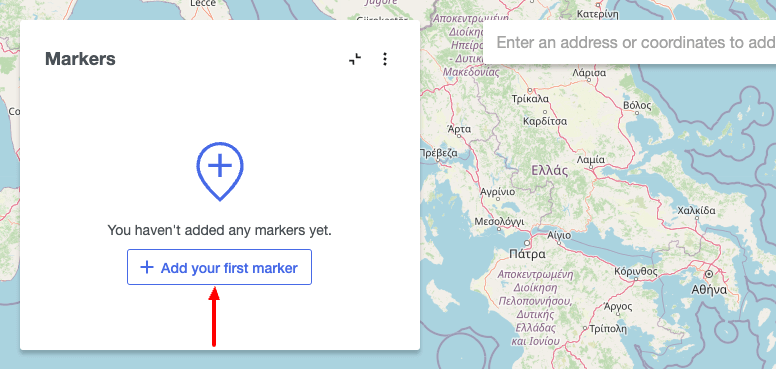
Once the button is clicked, you will be presented with a modal to enter a new map location.
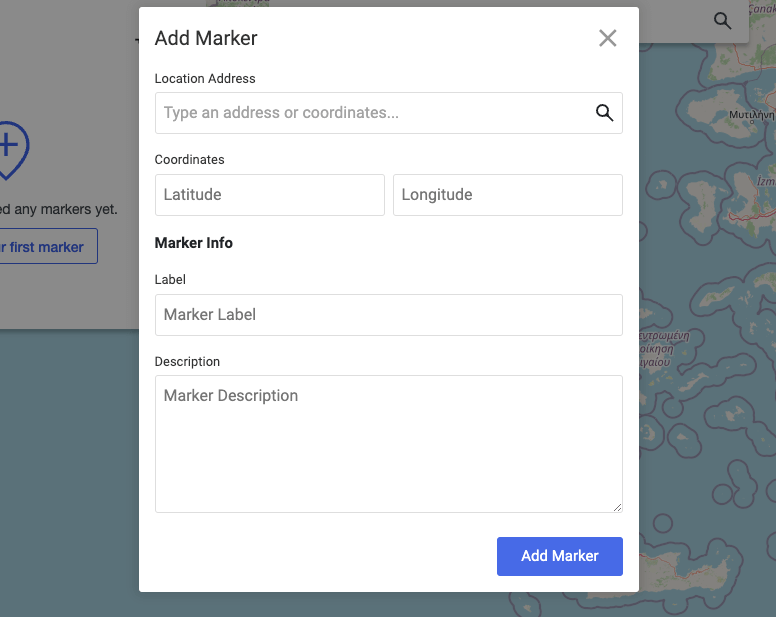
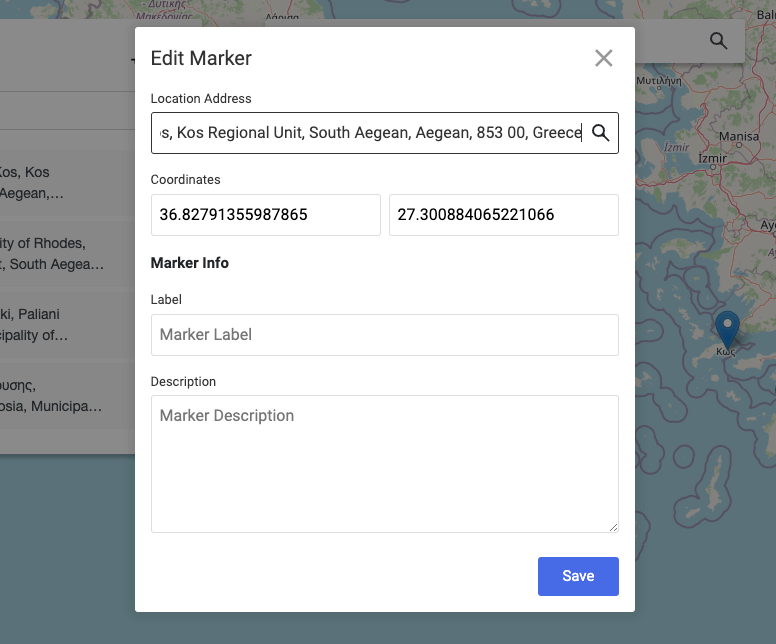
You can now add a new marker by filling in the form details:
- Location Address
- Type an address or coordinates (latitude, longitude).
- Coordinates
- You can customize the address latitude and longitude.
- Marker Title
- Set the marker title.
- Marker Description
- Set the marker description.
Using the Search bar
Another way to add a map marker is by typing an address or coordinates in the search bar found at the top of the map editor.
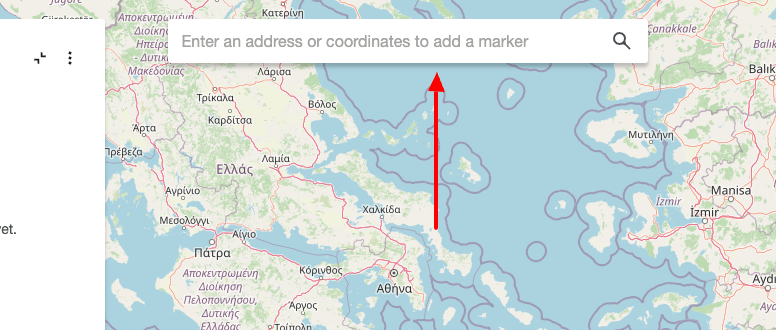
Once you have typed in an address or coordinates, it will autocomplete and display the available locations to choose from.
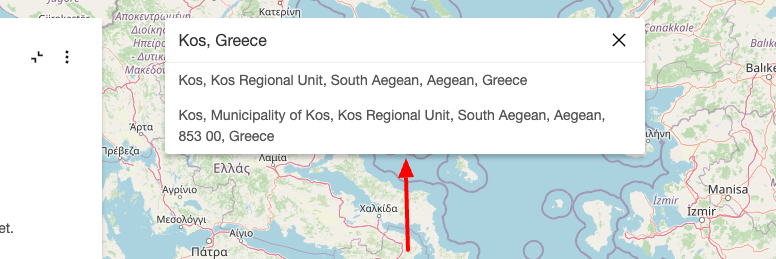
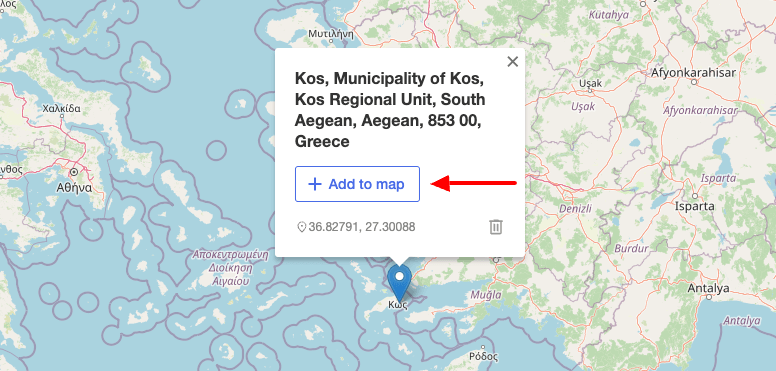
You can now select which location to add to your map as a marker. Note that the added marker is temporarily added on the map and you'll need to save it.
To save it, click on the Add to Map button within the marker tooltip.
Using the mouse right-click
The last method of adding a new map marker is the mouse right-click. Locate where you'd like to add a marker on the map, right-click your mouse and click on Add Marker.
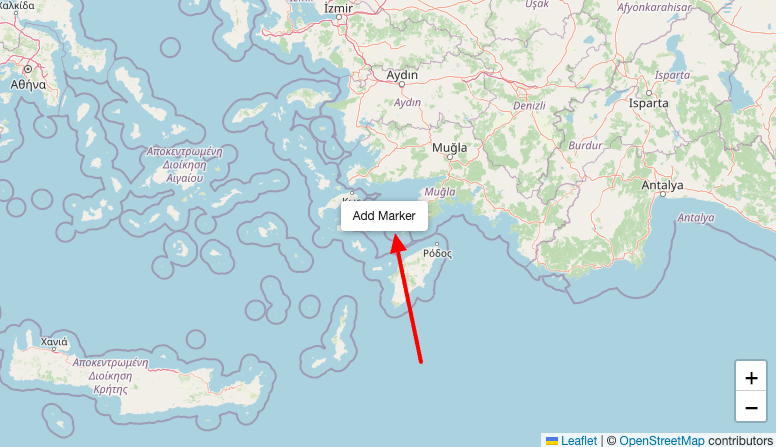
The marker is now visible on the map. Note that the added marker is temporarily added on the map and you'll need to save it.
To save it, click on the Add to Map button within the marker tooltip.
Edit Markers
Once you have added your markers, you may need to customize their address/location or marker label and description. To do so, you can use two different ways.
Using the Sidebar
To edit a marker, hover over the marker you're interested in and click the edit icon on the right.
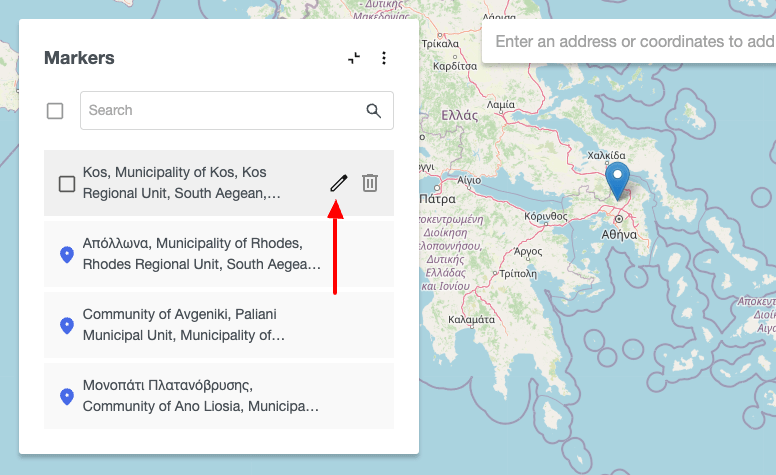
You should now see the modal to customize the marker. Once you have customized your marker, you can save it by clicking the Save button.
Using the Marker Tooltip
You may edit a marker by locating it on the map, clicking it to reveal the tooltip and finally click on the edit icon.
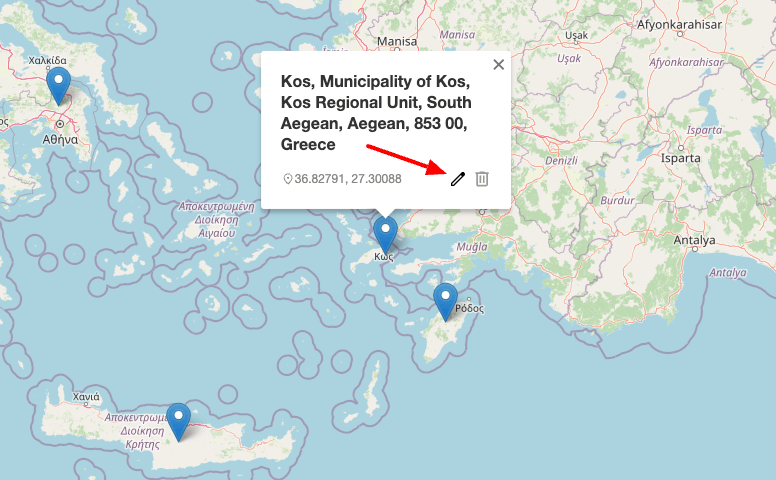
You should now see the modal to customize the marker. Once you have customized your marker, you can save it by clicking the Save button.
Delete Markers
Delete all markers
To delete all markers you've added on the map, go to the sidebar > click on the checkbox next to the search bar. This willich will select all markers.
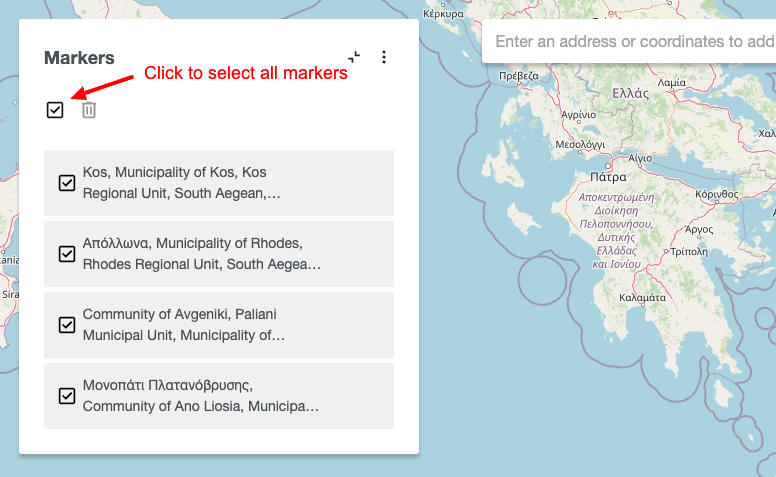
Then, click on the trash icon next to it, allowing you to confirm the deletion of all markers.
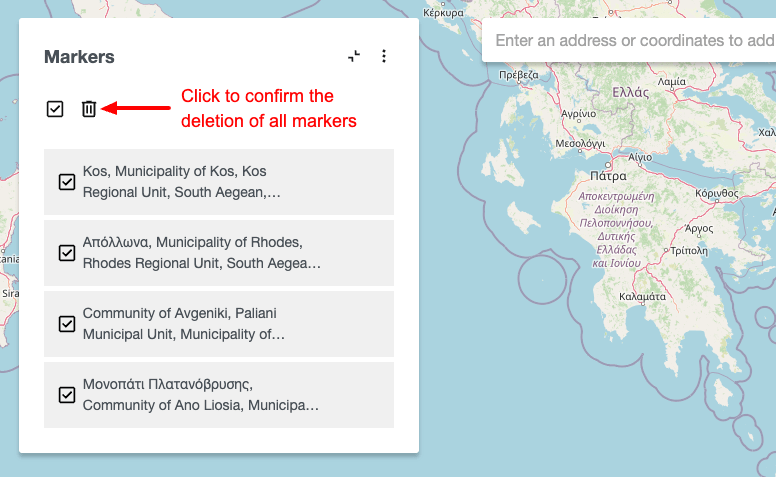
Your map should now be empty.
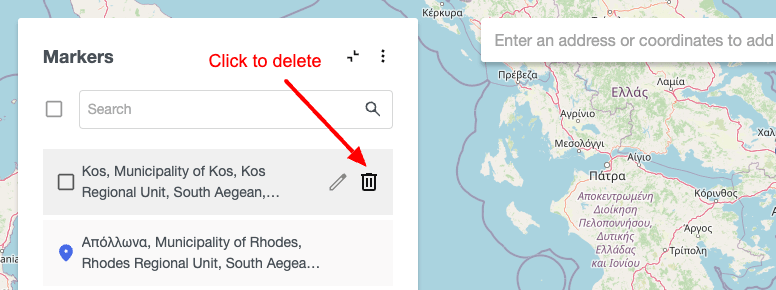
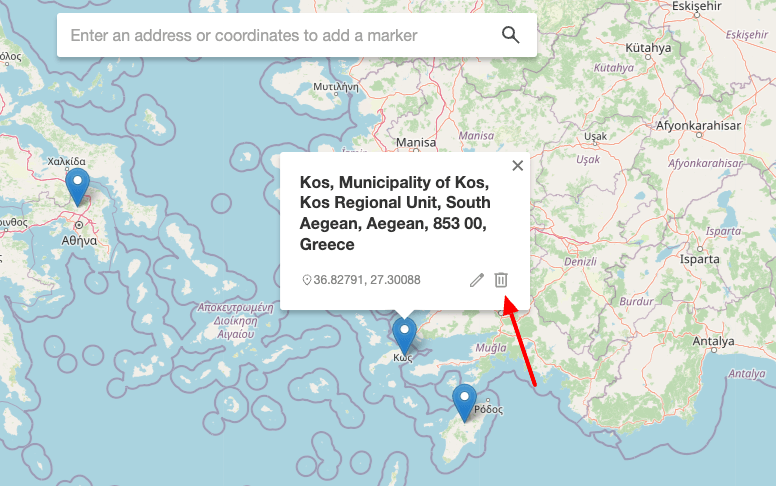
Delete a specific marker
To delete a specific marker, you may use either the sidebar or the marker tooltip.
To delete a marker via the sidebar, locate the marker you'd like to delete from the list, hover over the right side of the marker, and click the trash icon.
To delete a marker from the marker tooltip, find the marker you'd like to delete from the map, click on it and then click on the trash icon.
Import/Export Markers
Importing Markers
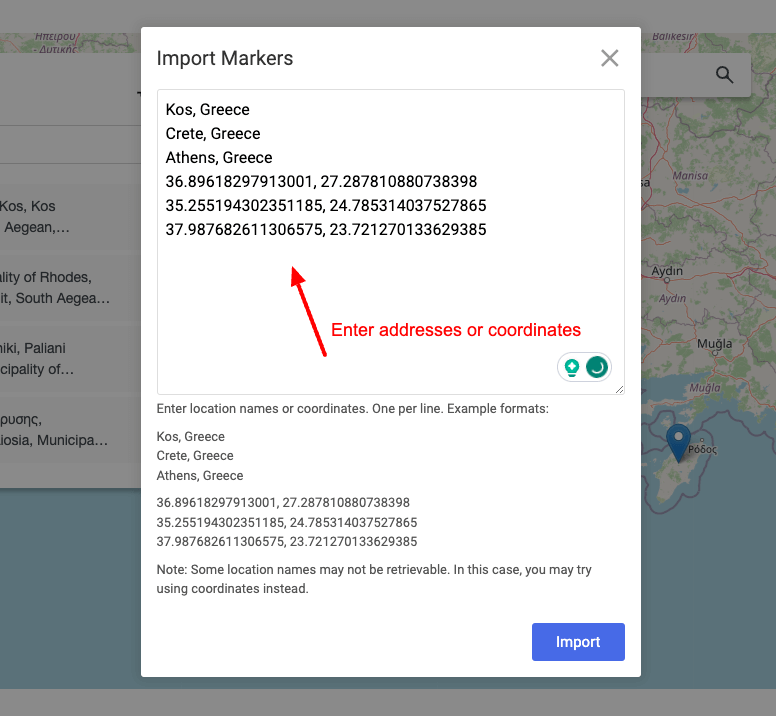
ACF - Map makes importing markers into your map easy using either an address name or coordinates.
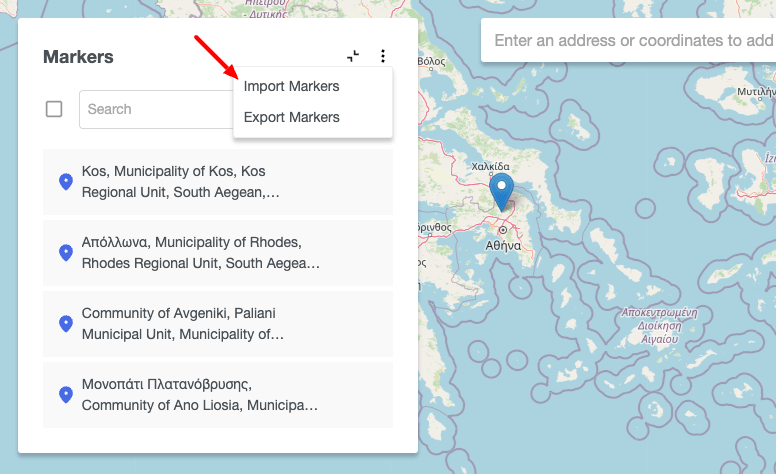
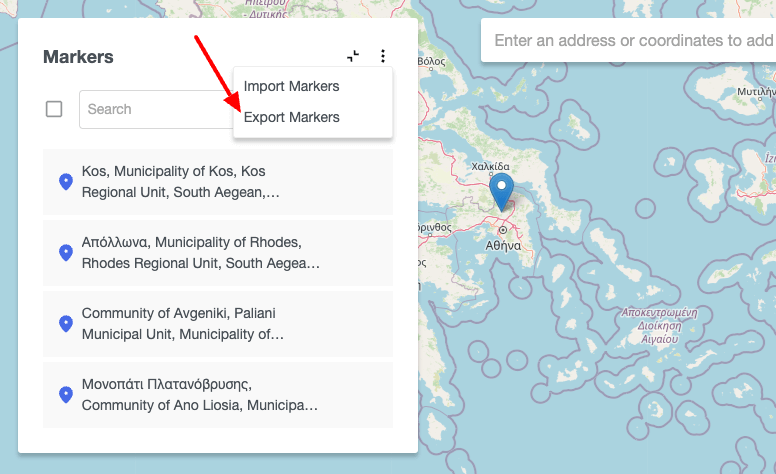
To get started, click on the three dots on the sidebar and click "Import Markers".
You can now type in an address or coordinates, one per line, and click the Import button to import them into your map.
Exporting Markers
Similarly with importing markers, ACF - Map provides an easy way to export your markers and later import them into another ACF - Map custom field.
To export your markers, go into the sidebar > click on the three dots > Click on Export Markers.
You will now have a modal containing all markers' coordinates.
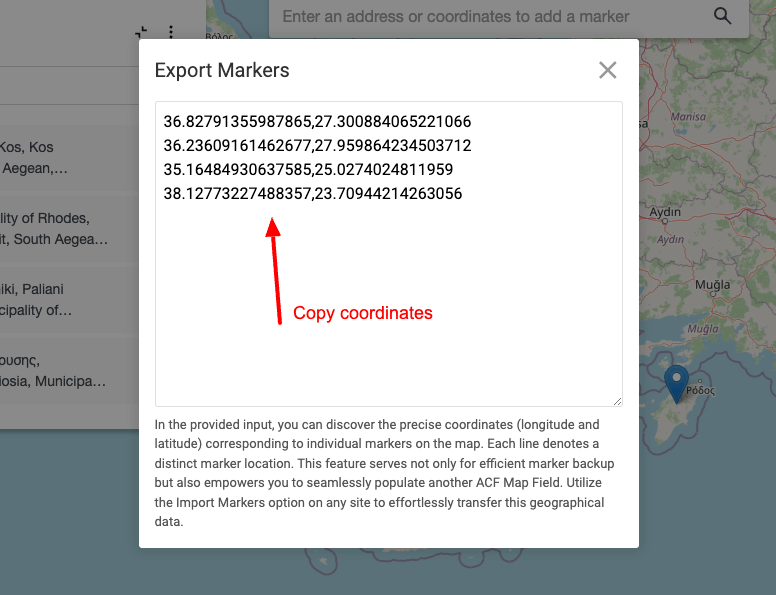
You can copy the coordinates later to import them into another ACF - Map instance.
API Keys
Some providers and map types require an API Key for the map to appear on your site. Below, we will see how to grab an API key for each option.
Get OpenStreetMap Satellite API Key
To use the Satellite map type when using the OpenStreetMap provider, you must first grab a free API Key from ArcGIS.
Go to the ArcGIS Developer Dashboard by first logging in.
Upon logging in, you should be presented with your API Key in the middle of the screen.
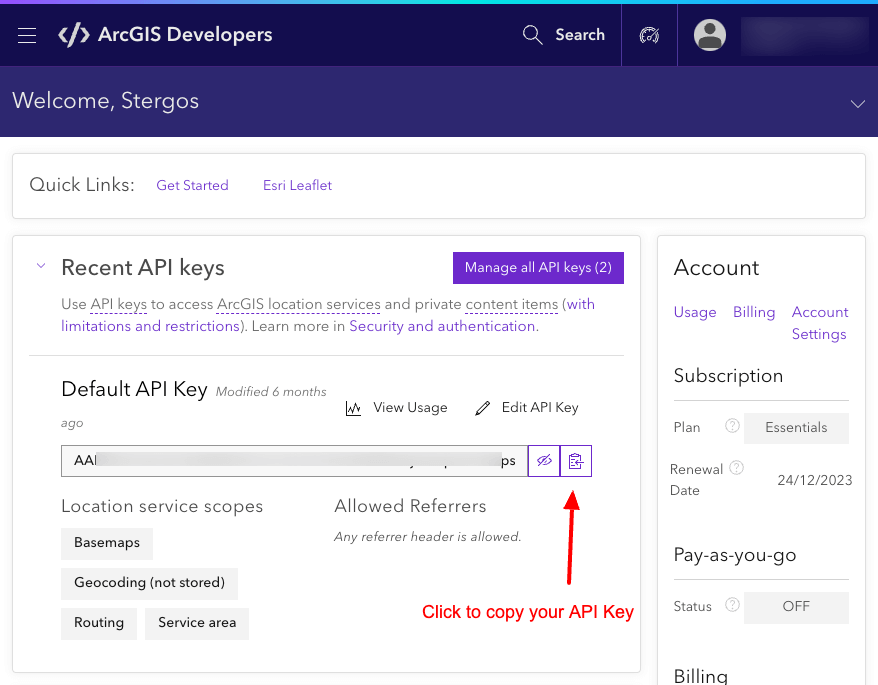
You can now copy and paste the API Key into the ACF Map plugin > OpenStreetMap ArcGIS API Key field.
Get Google Map API Key
To use the Google Maps provider, you must first grab a Google Maps API Key. To do so read Google's documentation: Get a Google Maps API Key
Get Bing Map API Key
To use the Bing Map provider, you'll need to get an API key. To do so read more on Bing Map documentation: Get a Bing Map API Key
Use Cases
The Map Field can be used with any component that supports the Joomla! Fields such as the Articles (com_content), User (com_user), and the Contact (com_contact) component. Now that we've seen how to create an ACF - Map custom field, let's see a use case.
How to add a Map Custom Field to Joomla! Articles
In this use case, our website provides business listings, and we'd like to display a map with all branches for each business on our Joomla articles. To do so, we need to add all business branches to the ACF - Map field on the article's editing page in the backend, and website visitors can see our map on the front end.
Step 1: Create a new Map field
Click to save the field to return to the same page where, now, you can see two new setting groups.
Step 2: Set the map provider
We must first select which provider to use to display our map. The default one is OpenStreetMap. However, you may also use Google Maps and Bing Maps. Furthermore, you can also specify the map type (road, satellite) and the map scale (imperial or metrics).
Step 3: Set the map dimensions
Next, we need to define the map dimensions. We can specify the map dimensions for desktop, tablet, and mobile devices. Also, we can define whether to center all markers around a specific area on the map or center the map around our markers.
Step 4: Add markers to the map
After properly configuring our Map field, we should go to the article's editing page and add markers. Head over to Joomla Content and click to edit the article you want to attach to the map. In most cases, the Map Field should be in the Fields tab. Once there, you can start adding markers.
If you haven't added any markers, yet, you can read more on adding markers here: Add markers.
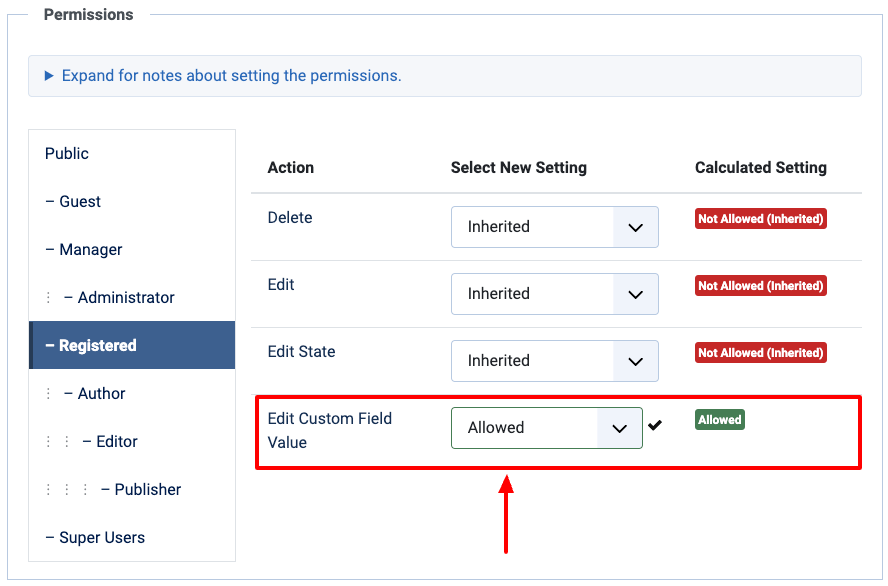
If the field is displayed disabled in the form, and you're not allowed to upload files, you probably don't have the right permissions to edit the field's content. To fix it, you must set the Edit Custom Field Value option to Allowed in the Permissions tab in the Field settings and the Content component configuration page.
You’re now done! Once you’ve finished adding your markers, save the article and go to the front end to enjoy your new map.
To-do list
Advanced Custom Fields is regularly updated with new features and bug fixes. The roadmap is quite packed with new features, and enhancements. Find out the upcoming new features by visiting the Roadmap page.
Frequently Asked Questions
Can I hide the sidebar?
How do I search for a specific marker?