Would you like to be able to auto-fill a text field based on the link a user clicked? What about saving your users time by passing Form Data from one form to another? Have you ever considered associating form submissions with the Google Analytics referring source automatically?
All these these scenarios can easily be handled with the help of Query String and Convert Forms Smart Tags. Let's see how.
- What is a Query String?
- How to Use Query Strings to Auto-Fill Fields with Convert Forms
- How to Pass Form Data from One Form to Another
- Notes
What is a Query String?
A query string is a part of the URL. It is an additional information that is appended onto the URL address creating specific queries to the server they are addressing. A Query String has the following main schema:
?key=valueKey/value pair creates a query containing the relevant information. More than one queries strings can be appended using the symbol ‘&’.
?key1=value1&key2=value2With reference to the following URL address:
https://www.tassos.gr/search?q=convertformsThe first part (https://www.tassos.gr/search) of the address indicates a specific page (search page) of the site www.tassos.gr. The second part(?q=convertforms) indicates that a request is sent to the server using "q" as the key and "convertforms" as the key value".
How to Use Query Strings to Auto-Fill Fields with Convert Forms
Let’s suppose that we have created a form with two fields (email address and postal code), and these fields must be automatically populated using query string values. Let’s see how we can do it using Convert Forms.
For this example, we create a two-field form using “Ruby inline 3” template. From the main Joomla menu choose Components -> Convert Forms -> Forms
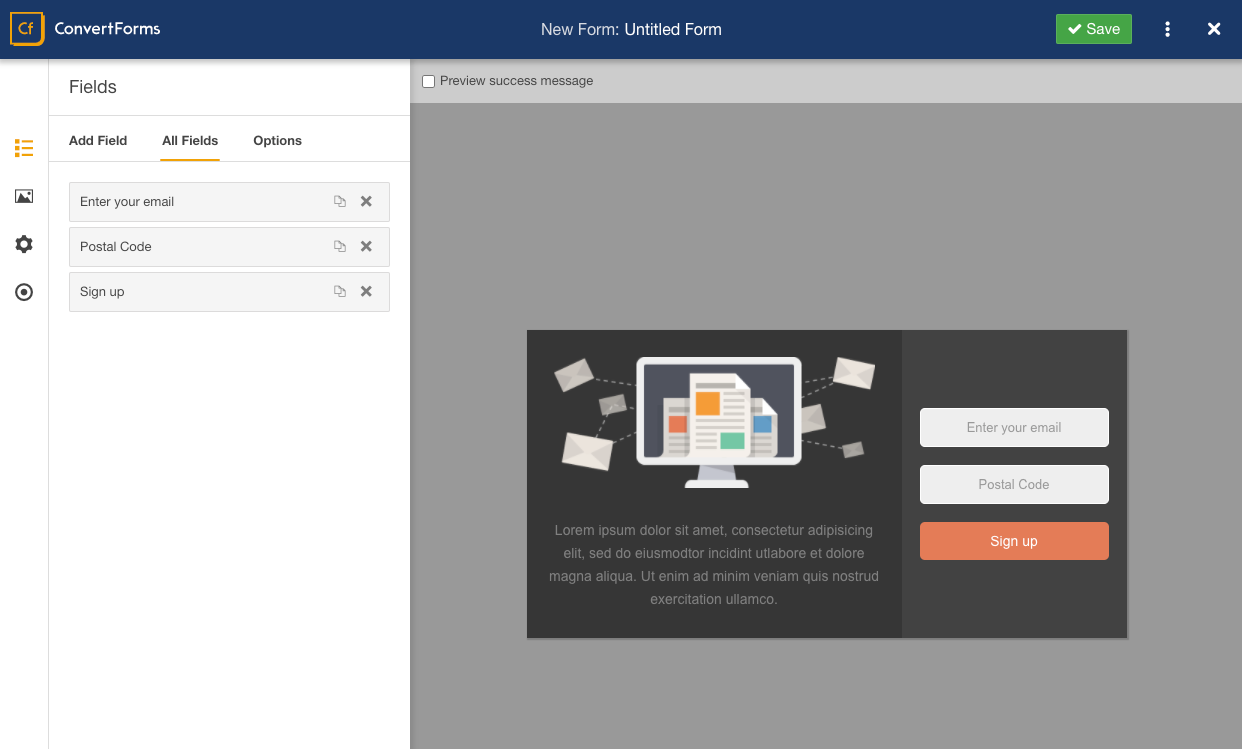
Then, the basic attributes are given to the fields (Field key, Field label, Placeholder Text). You can add and edit fields the way you want.
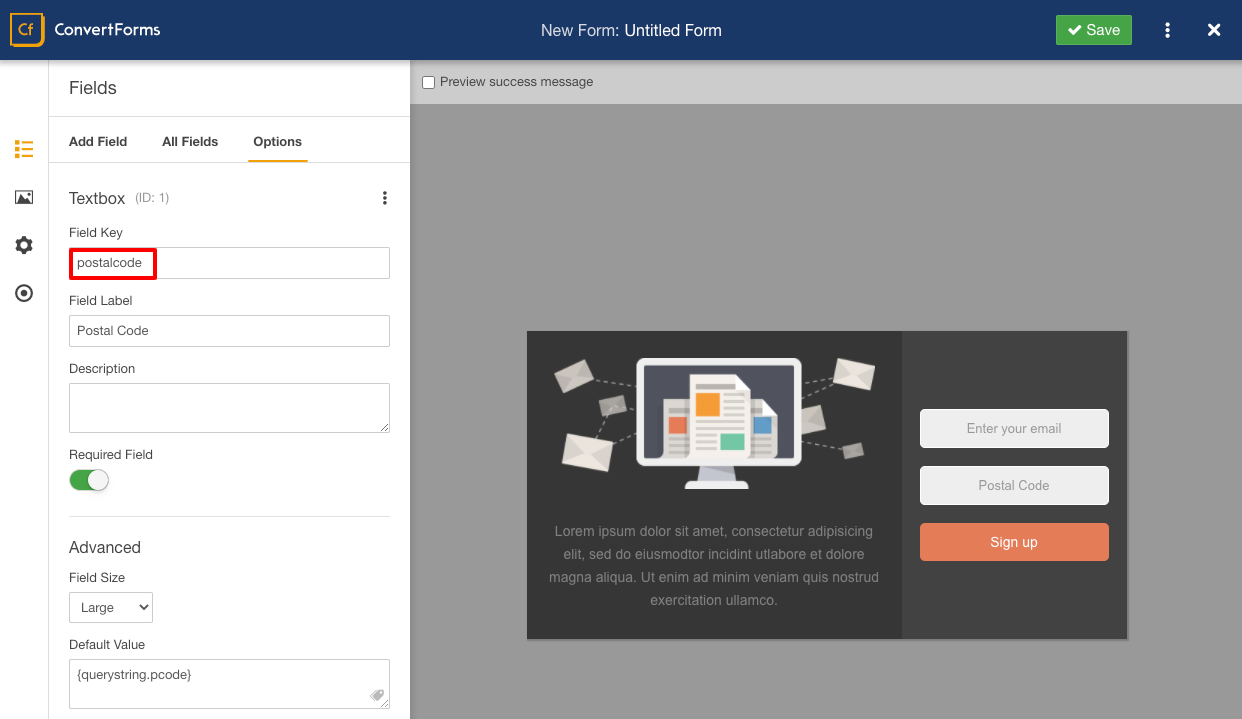
In order to auto-populate a field with the value of a query string parameter, for example at the Postal Code field, we have to specify the respective Smart Tag in the “Default Value” option of the field.
From the Fields section of your form, choose the desired field you want to edit. At the Advanced options you have to define the Query String Smart Tag with this type:
{querystring.YOUR_KEY}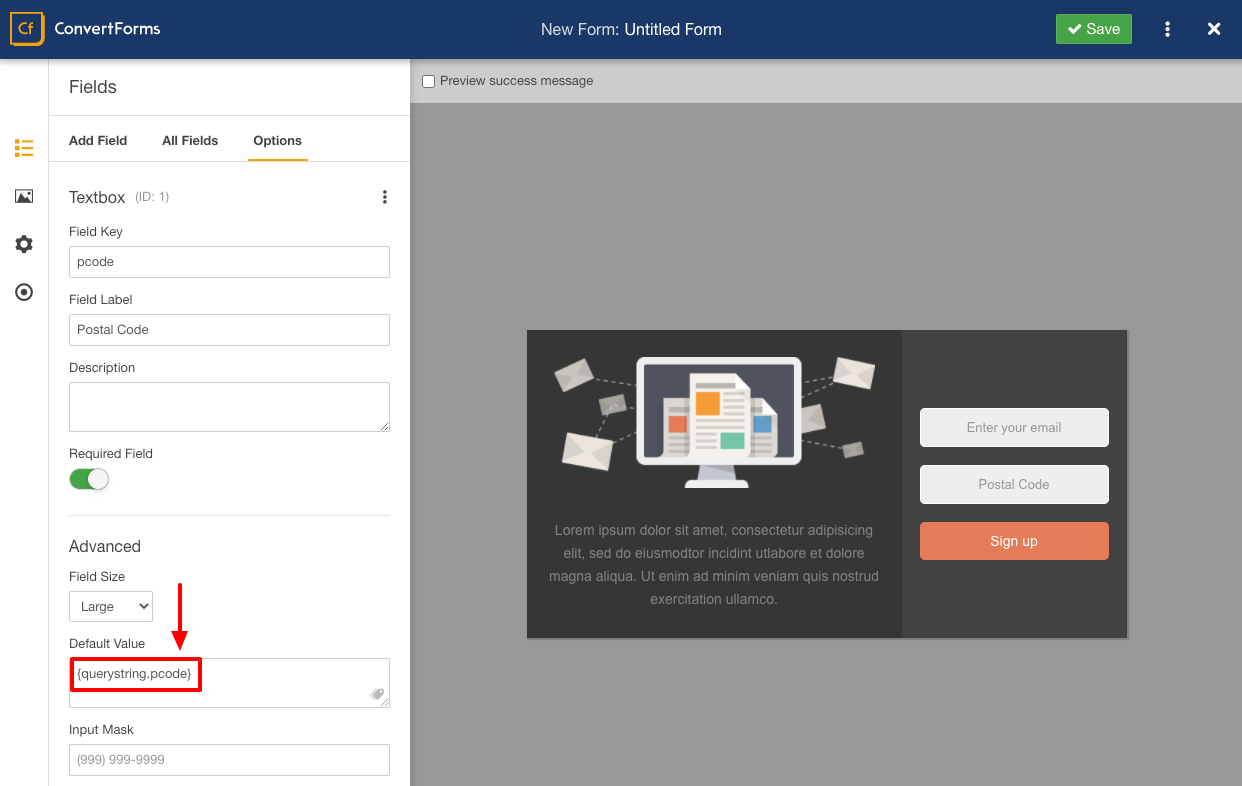
Where YOUR_KEY is the query string parameter key as appears in the URL. In our case, we’re going to use “pcode” as the query string key.
Now it’s time to check if the field is auto-populated successfully. Let’s say we want to give the value 12345 in the postal code field. At the end of the URL address type: ?pcode=12345
Sample URL:
https://www.site.com/page1?pcode=12345
If you see the value 12345 in the Zip Code field, you’re done! You've successfully auto-populated the form using with the "pcode" query string parameter.
How to Pass Form Data from One Form to Another
Here's a fact. Forms in your site must be functional and user-friendly. Complicated and time-consuming forms make users to leave your website. In case you have more than one form in your site with similar fields, it’s very important to make them manageable quickly with the feature of auto-completed fields. Let’s see how Convert Forms can help us make that happen too.
Let’s suppose there are two different forms in two different pages.
Form A (of the previous example) in the page1

and form B in the page2.
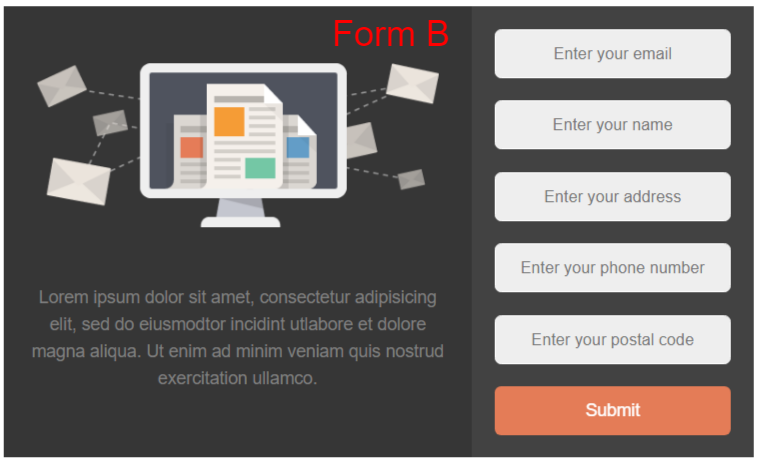
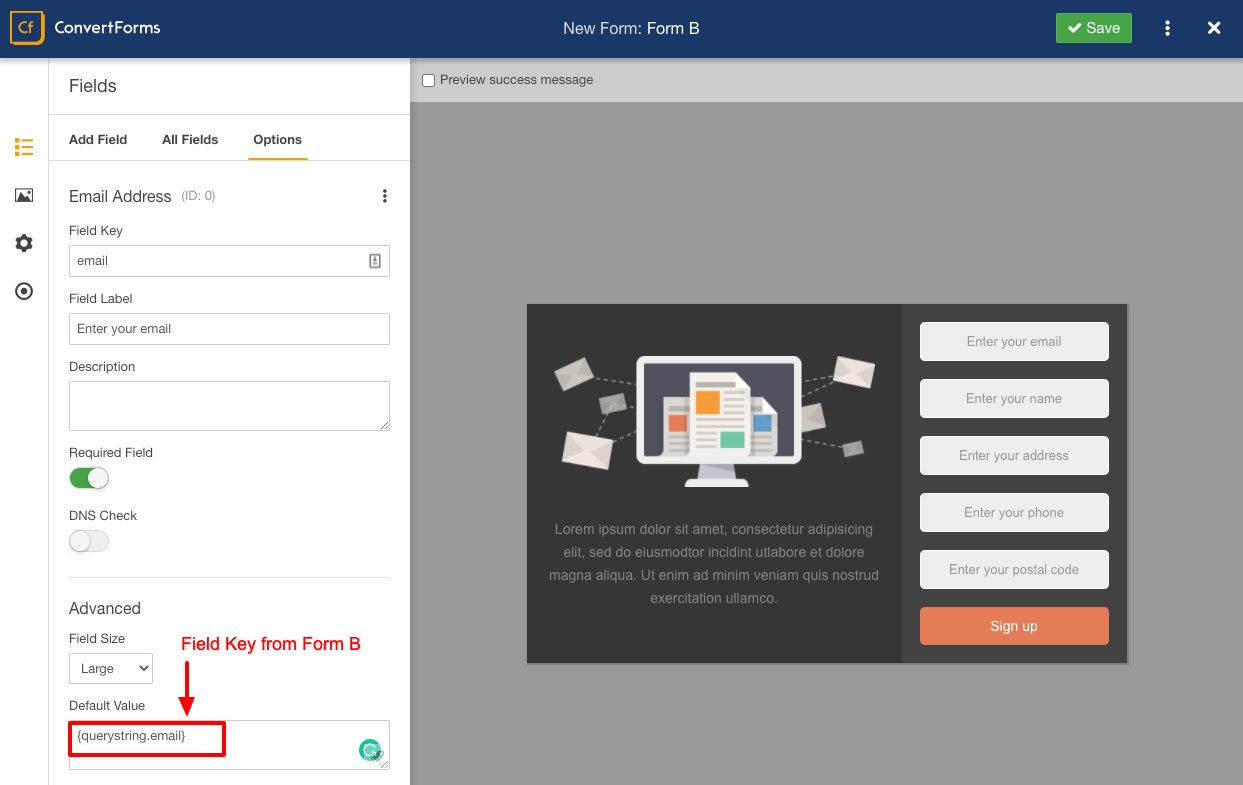
“Email” and “Postal Code” fields of Form A are included in Form B also. What we have to do is to pass automatically the values into the Form B from the Form A.
Initially, we have to declare the appropriate Field Keys in Form A. Edit your Form A and select the desired field. In the case of this example, "email" field is selected and we give the appropriate Field Key (email).
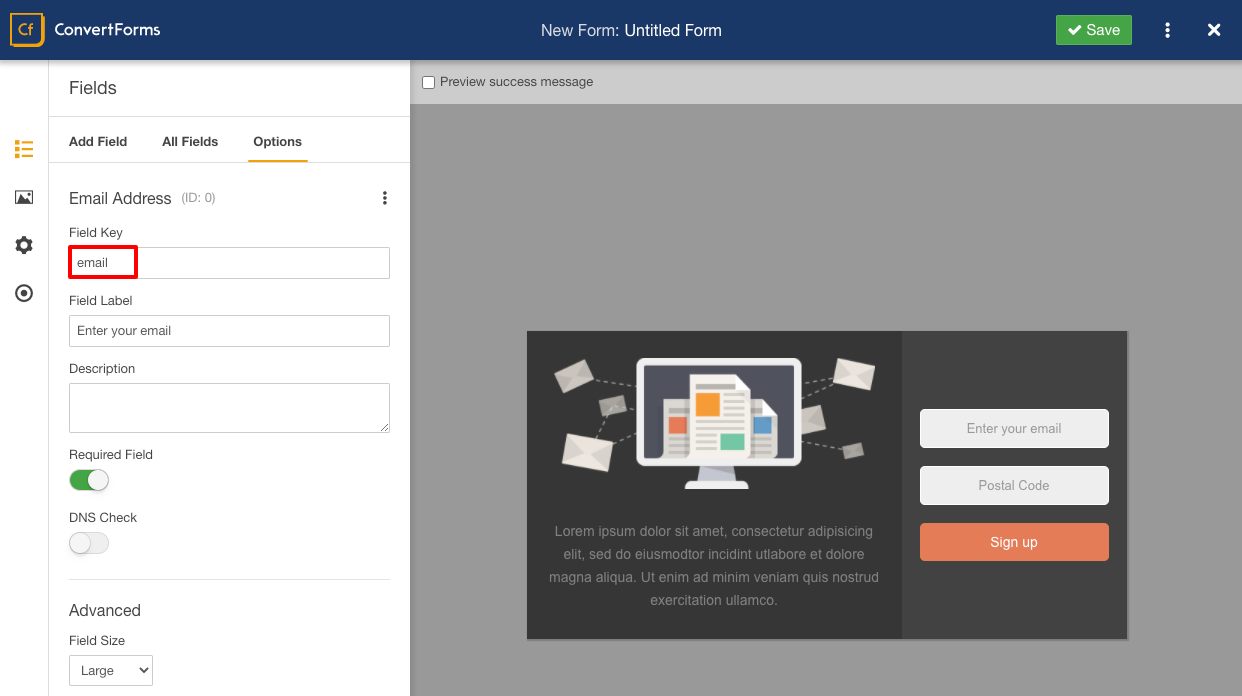
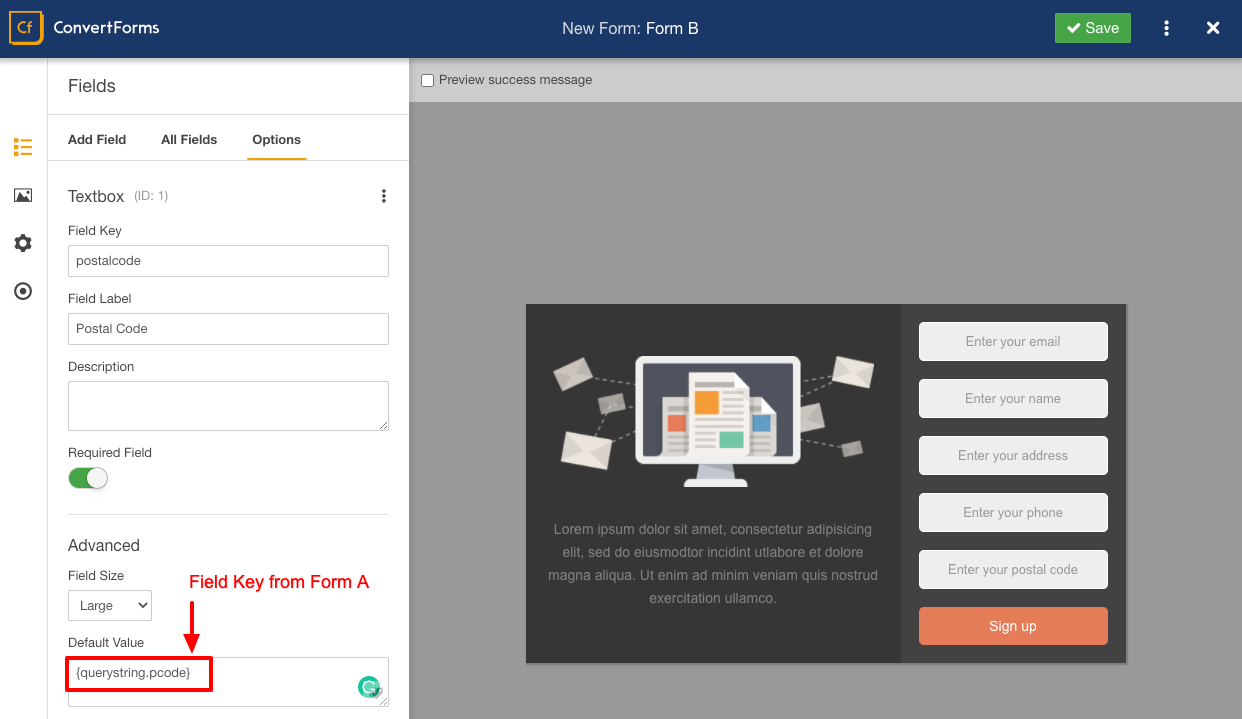
The same procedure must be done for all the fields we need to define. "Postal code" field of the example is defined too.
Now, we need to configure Form A to redirect the user upon a successful submission to the Form B transferring at the same time the input data in the query string
Go to the Submission tab, in the area "Successful Submission Action" choose "Redirect user" and enter the URL of the Form B in the "Redirect URL" option.
The last yet important step is to set the “Pass Lead Data To Redirect URL” to Yes. This option permits all the contents of the fields (that user has entered) of the current Form to be transferred to the redirected URL. In fact, the contents of these fields are inserted in Query Strings that can be read from another Form in the defined redirected URL. In our case, fields from Form A are redirected to page2 where Form B read them using Smart Tags.

Let’s move on to Form B. Form B must know which of the fields of Form A is going to inherit (email and postal code). Select Form B and choose the desired field, for this example “email” field. Ιn the Default Value of Advanced options, you have to define the appropriate Query String Smart Tag according to the Field Key that you defined in Form A.
The same definition must be done for the field “postal code”.
Save your work and let’s see how it works.
Visit the page1 where Form A is located. Complete the two fields and press "Submit". The button redirects you to the page2 where Form B is located and you can see the two fields "email" and "postal code" already completed!.
After a successful submission of Form A, notice that the submitted data appear at the end of the URL address. For example, after completing the Form A typing the email “[email protected]” and the postal code “12345”, the URL in page2 already contains these data in the query string.
http://www.site.com/[email protected]&postalcode=12345&form_id=3Notes
In case you don’t want to redirect user transferring all the input data from a form to another one or you need to pass a few extra parameters, you can select "No" at the area "Pass Lead Data To Redirect URL". In this case, you have to input manually the key strings at the end of "Redirect URL" using the respective Smart Tags.
For example:
https://www.site.com/page2?email={field.email}&postalcode={field.postalcode}&my_extra_param1=50&my_extra_param2=10Beware of the syntax that has described in 2nd paragraph and don’t hesitate to advise an online URL encoder/decoder.