Using the Map Module (Google Maps, OpenStreetMap, Bing Maps)
Help visitors find your business with an interactive map. Choose between Google Maps, OpenStreetMaps and Bing Maps.
The Smile Pack Map Widget is the all-in-one mapping solution for Joomla that seamlessly integrates with Google Maps, OpenStreetMap, and Bing Maps. Create single or multiple marker maps easily. Display interactive maps via standard modules, shortcodes, custom fields, or popups for enhanced conversions. Manage markers with a modern UI. Automatically populate markers via ACF Map Field integration. Enjoy the advantage of reducing the number of map extensions on your site – no need for separate solutions for different map types.
This article provides insights into the functionality of the Smile Pack Map Widget and guides you through integrating a map module into your Joomla! site.
How to add a Map Module to Joomla
To start creating a map module, and add it to your Joomla Website, follow the steps listed below:
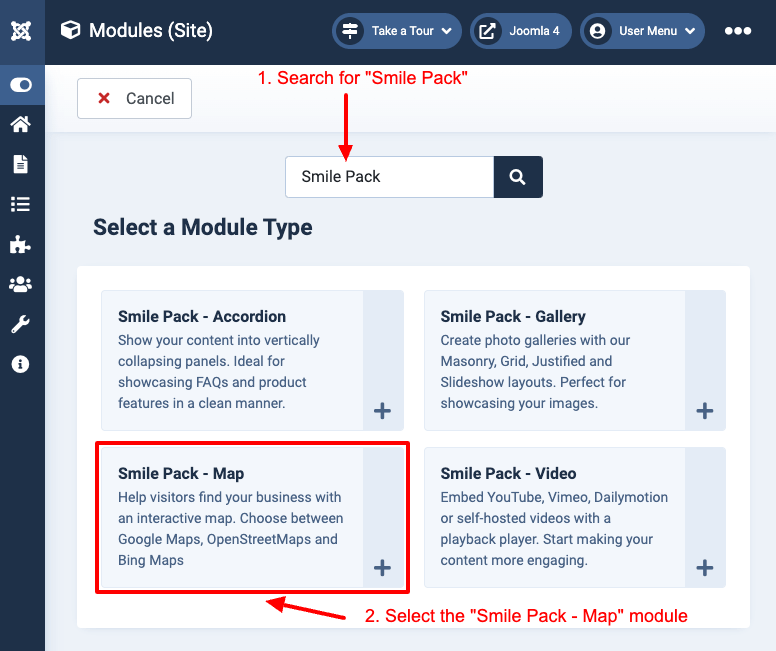
Step 1: Head over to Content > Site Modules and press the New button. On that page, search for "Smile Pack", and select the Smile Pack - Map Module.
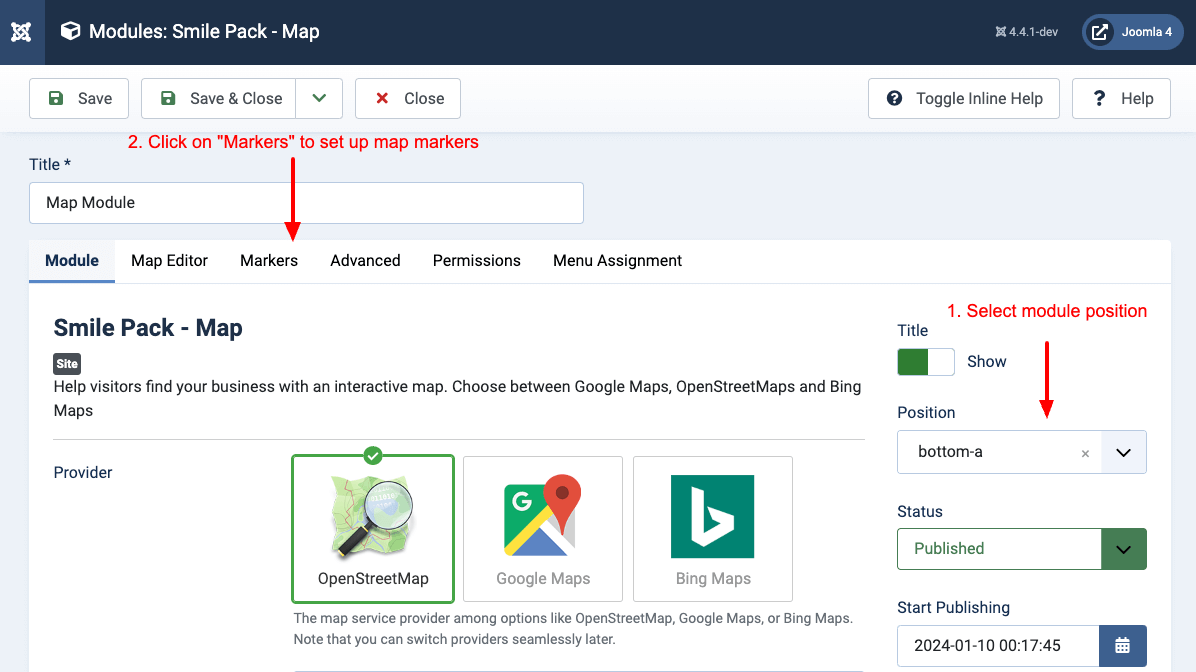
Step 2: Select the module position and click on the Markers tab to start adding your locations.
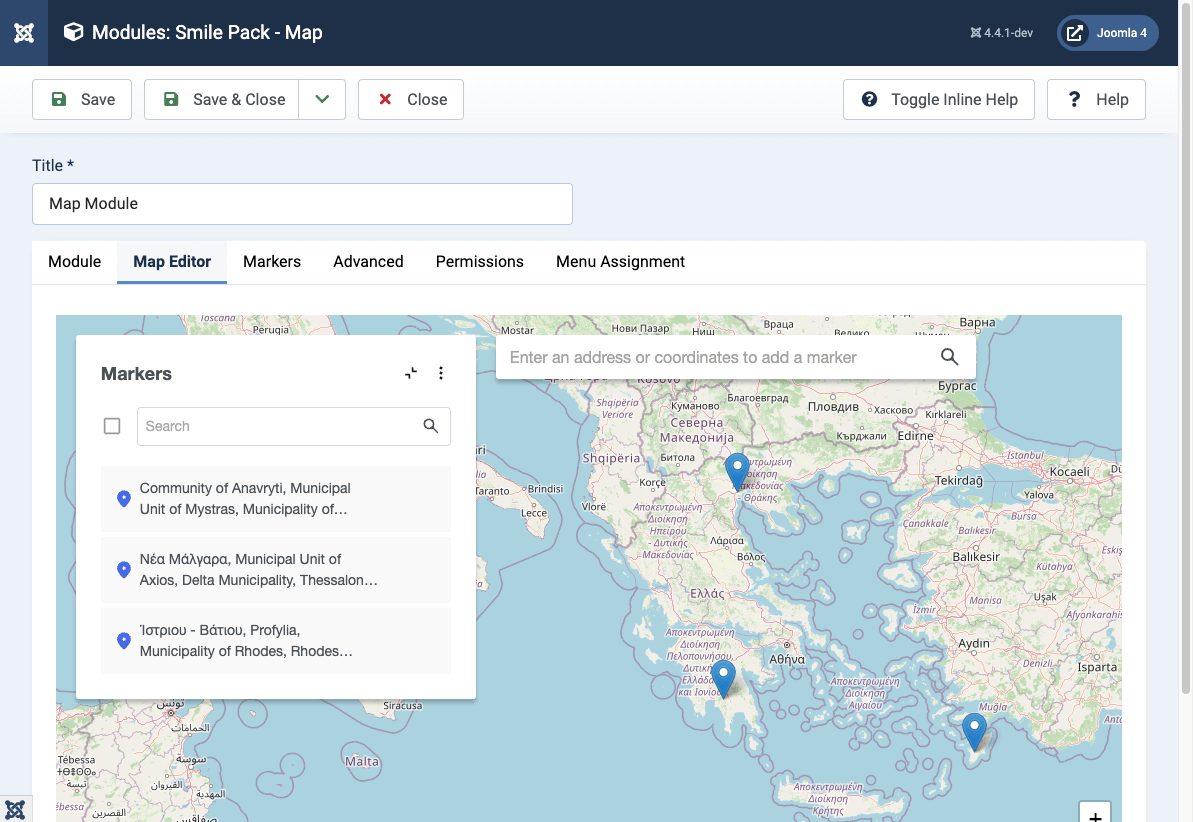
Step 3: Once on the Markers tab, start populating your map with your desired locations. Once your map is ready, hit the Save button.
Step 4: Your map module is ready! View it on your site.

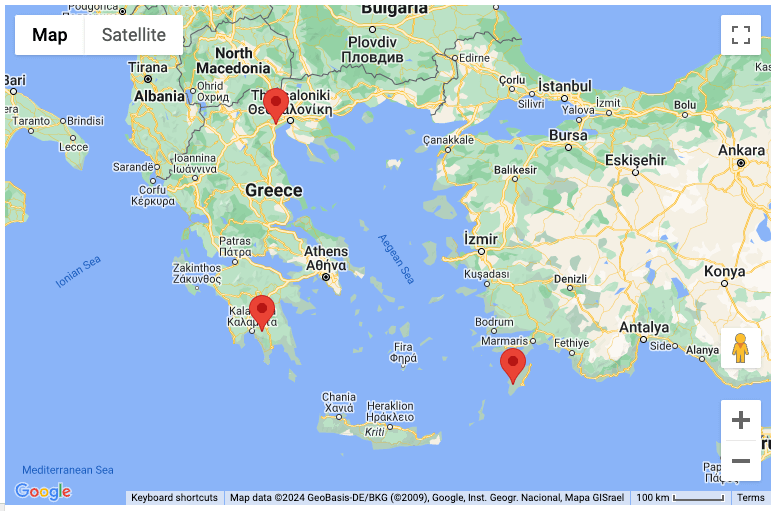
How to add a Google Maps module to Joomla
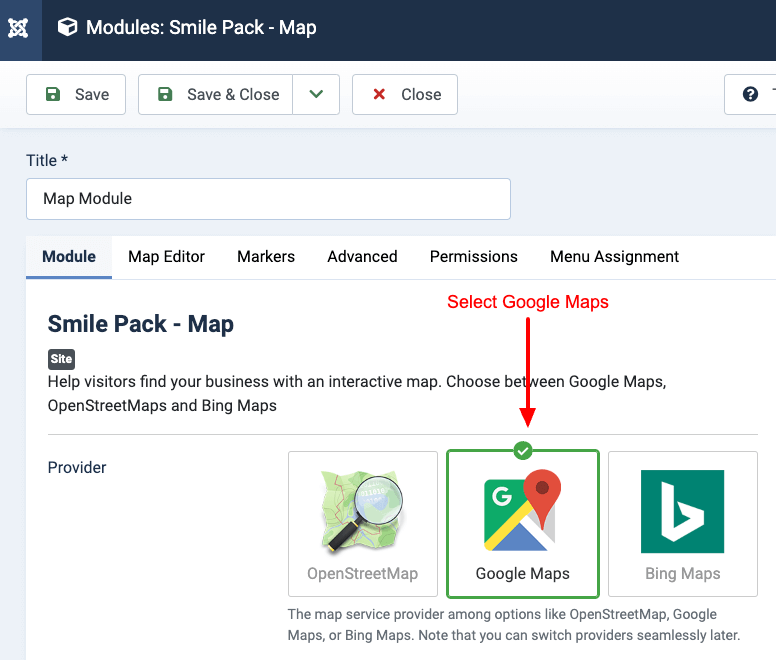
To add a Google Maps module, follow the steps listed in How to add a Map module to Joomla, and on Step 2, set the Provider to Google Maps, and click on the Save button.
Your map will now appear using Google Maps.
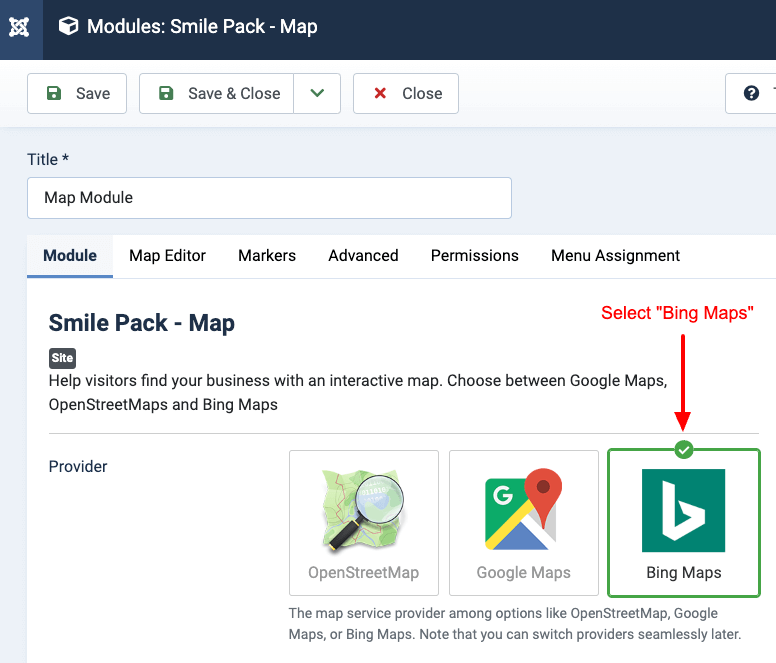
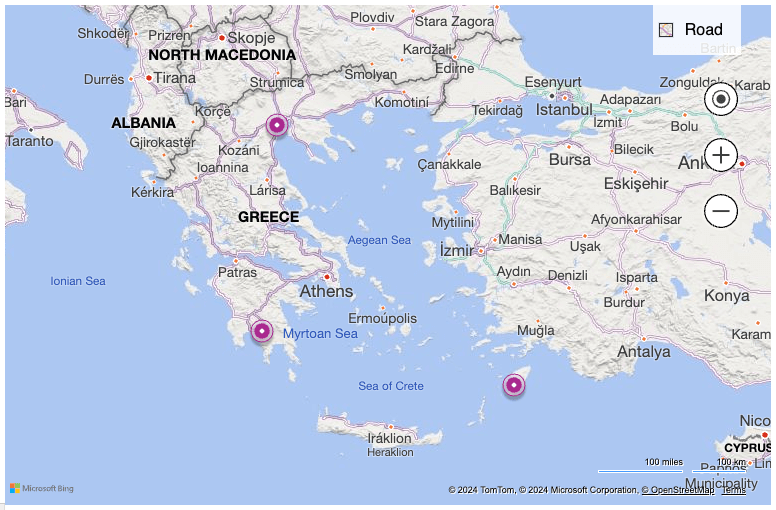
How to add a Bing Maps module to Joomla
To add a Bing Maps module, follow the steps listed in How to add a Map module to Joomla, and on Step 2, set the Provider to Bing Maps, and click on the Save button.
Your map will now appear using Google Maps.
How to add an OpenStreetMap module to Joomla
To add a OpenStreetMap module, follow the steps listed in How to add a Map module to Joomla, and on Step 2, set the Provider to OpenStreetMap, and click on the Save button.
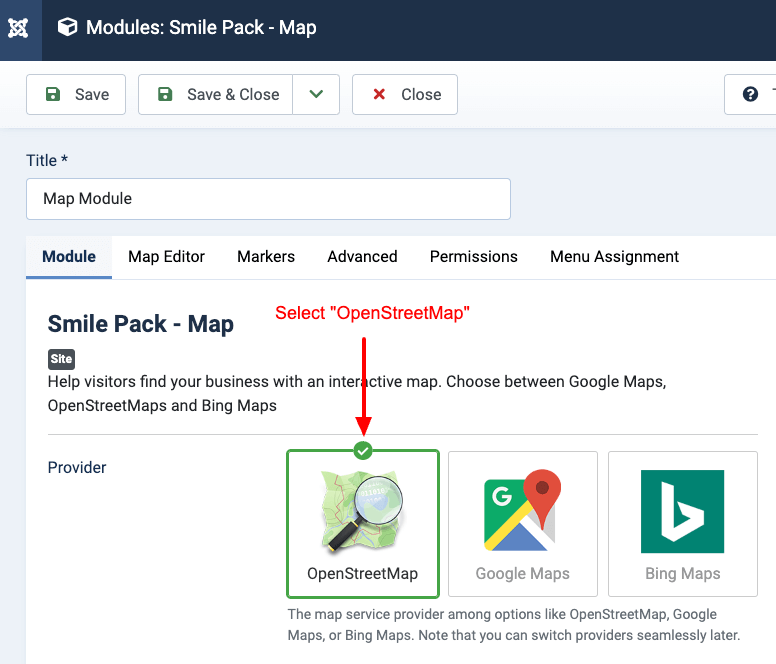
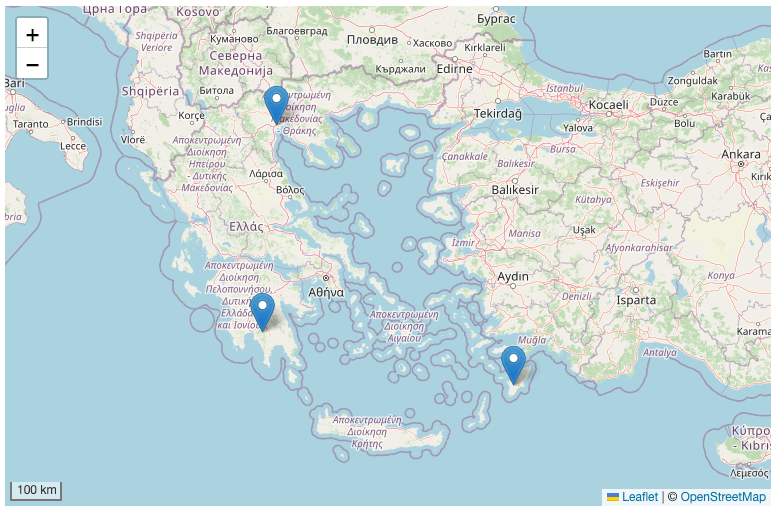
Your map will now appear using OpenStreetMap.
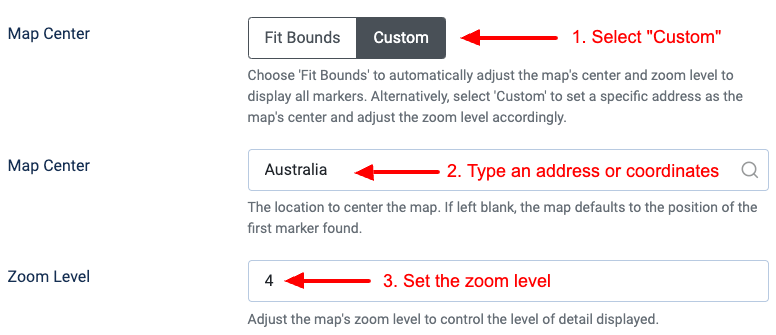
Customize the center of the map
The map by default will automatically set both the map center and zoom based on the number of markers added to the map, and how far they are between each other. This means that no map center or zoom is required to be set. We call this feature Fit Bounds, and it can be found within the map module settings > Module > Map Center setting.
However, you can change this behavior, center the map around a specific address, and even set the map zoom as desired. To do this, enter your module settings > Module > Map Center and put it to Custom. You can type a custom address or coordinates and set the map zoom.
Using the map module editor
In this section, you will read how to add, edit, delete, and import/export markers.
Add Markers
The first thing you'll need to do in the map editor is add markers to specific locations. Smile Pack - Map Module provides multiple ways to add markers.
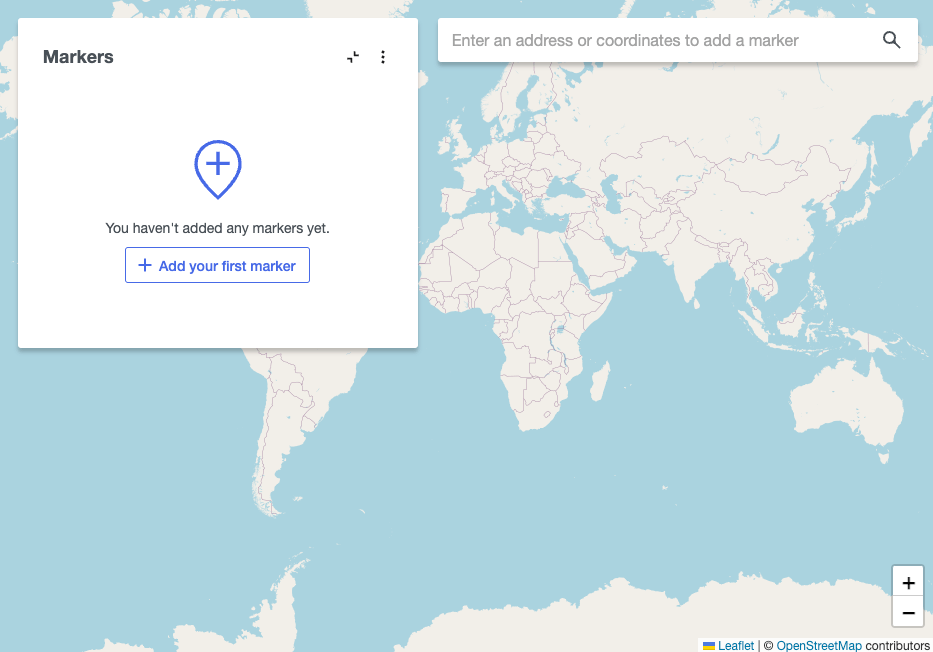
Method 1: Using the sidebar
If your map is empty, you can add your first marker by going into the sidebar and clicking the Add your first marker button.
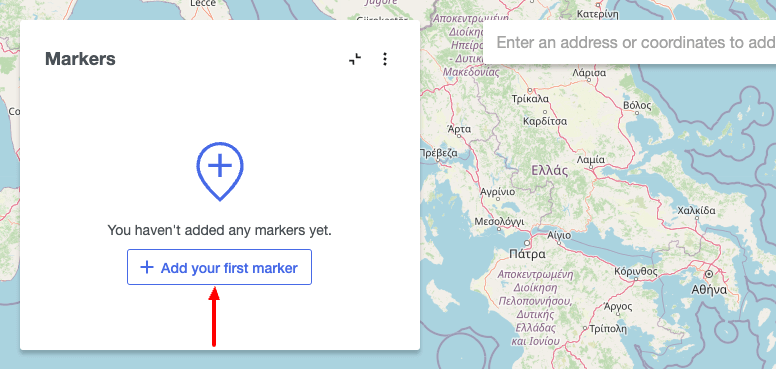
Once the button is clicked, you will be presented with a modal to enter a new map location.
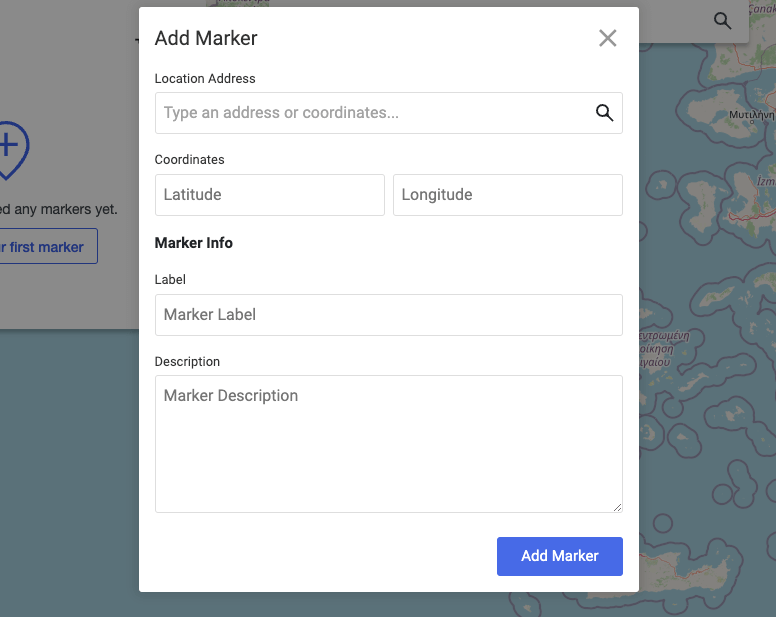
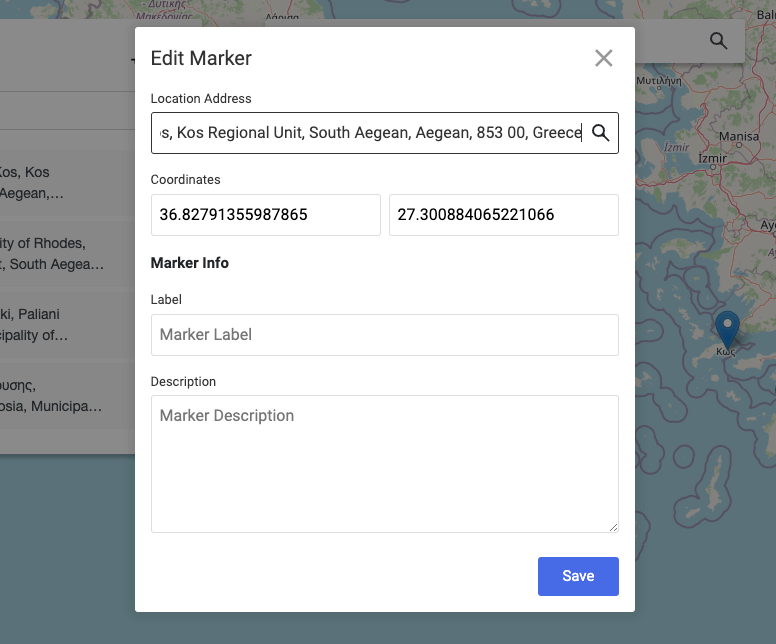
You can now add a new marker by filling in the form details:
- Location Address: Type an address or coordinates (latitude, longitude).
- Coordinates: You can customize the address latitude and longitude.
- Marker Title: Set the marker title.
- Marker Description: Set the marker description.
Method 2: Using the Search bar
Another way to add a map marker is by typing an address or coordinates in the search bar at the top of the map editor.
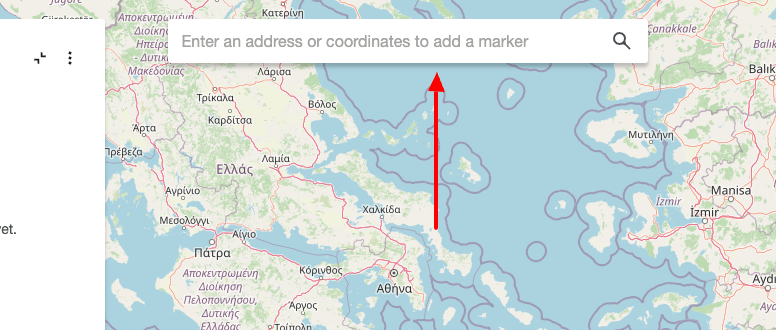
Once you have typed in an address or coordinates, it will autocomplete and display the available locations to choose from.
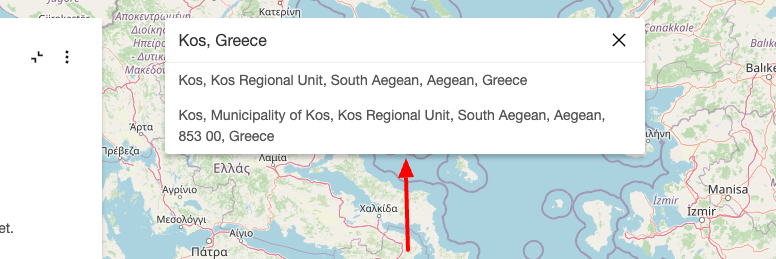
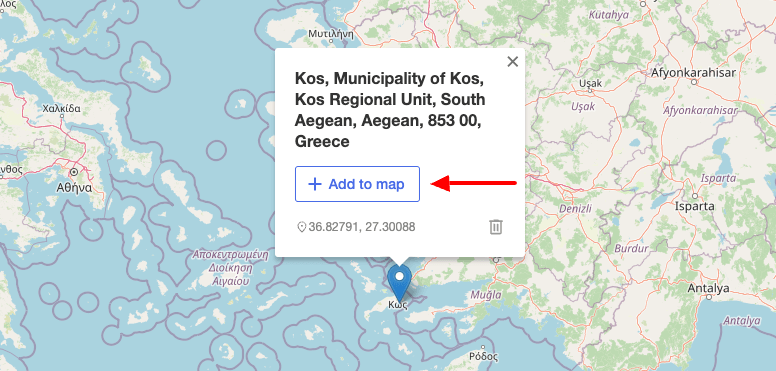
You can now select which location to add to your map as a marker. Note that the marker is temporarily added on the map and you'll need to click Add to Map to save it.
Method 3: Using right-click
The last method of adding a new map marker is the mouse right-click. Locate where you'd like to add a marker on the map, right-click your mouse, and click on Add Marker.
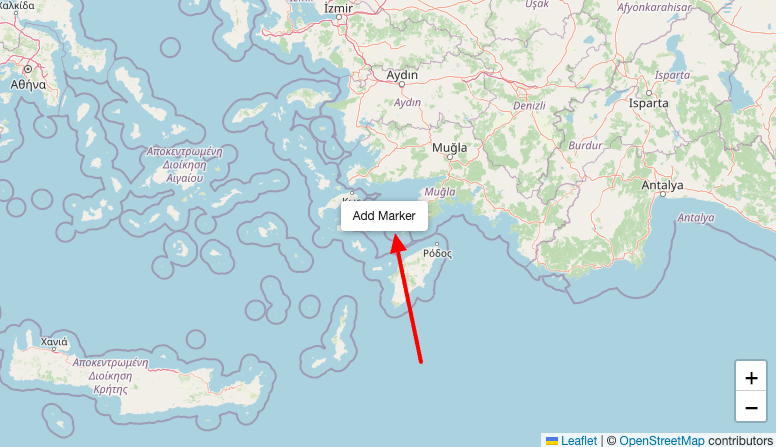
The marker is now visible on the map. Note that the marker is temporarily added on the map and you'll need to click Add to Map to save it.
Editing Markers
Once you have added your markers, you may need to customize their address/location or marker label and description. To do so, you can use two different ways.
Method 1: Using the sidebar
To edit a marker, hover over the marker you're interested in and click the edit icon on the right.
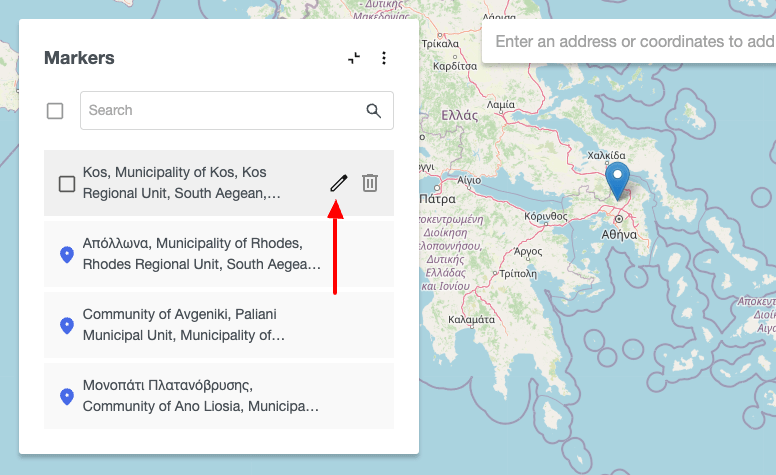
You should now see the modal to customize the marker. Once you have customized your marker, you can save it by clicking the Save button.
Method 2: Using the marker tooltip
You may edit a marker by locating it on the map, clicking it to reveal the tooltip, and clicking on the edit icon.
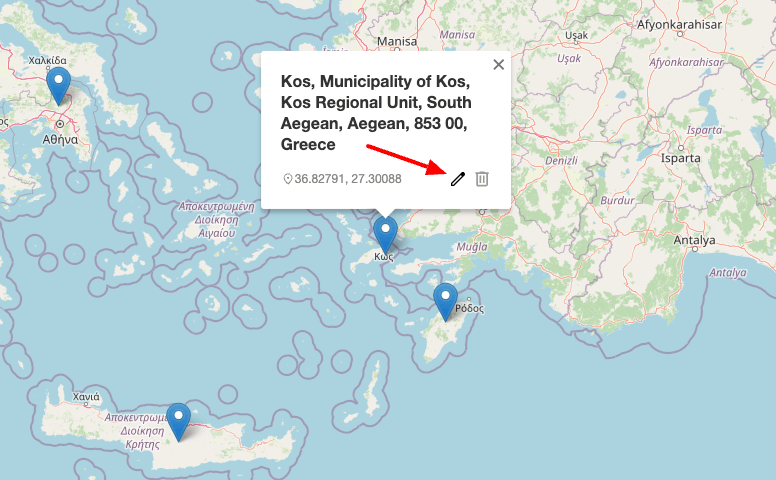
You should now see the modal to customize the marker. Once you have customized your marker, you can save it by clicking the Save button.
Delete Markers
Deleting all markers
To delete all markers from a map, go to the sidebar > click on the checkbox next to the search bar. This will select all markers.
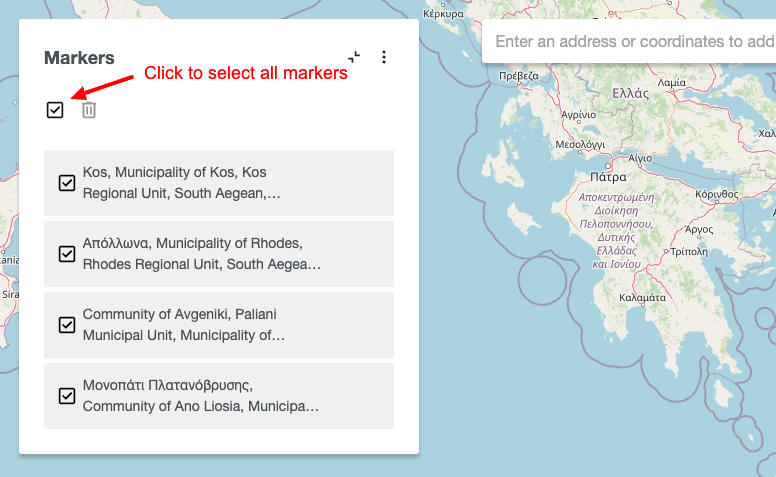
Then, click on the trash icon next to it, allowing you to confirm the deletion of all markers.
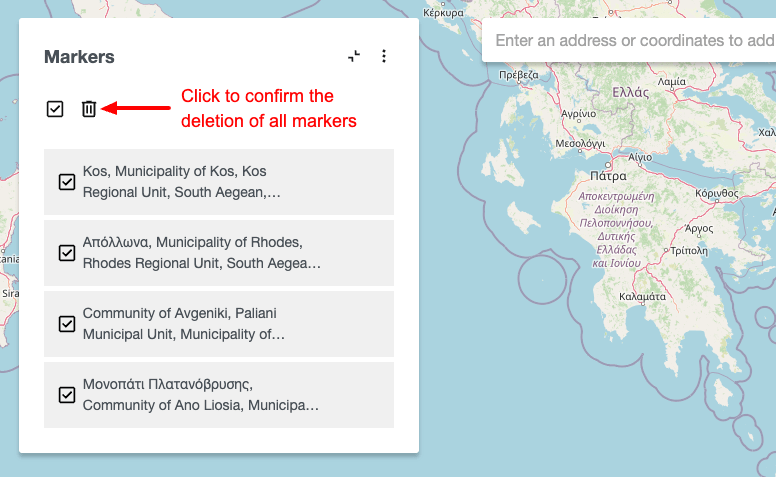
Your map should now be empty. Click Save to save the module.
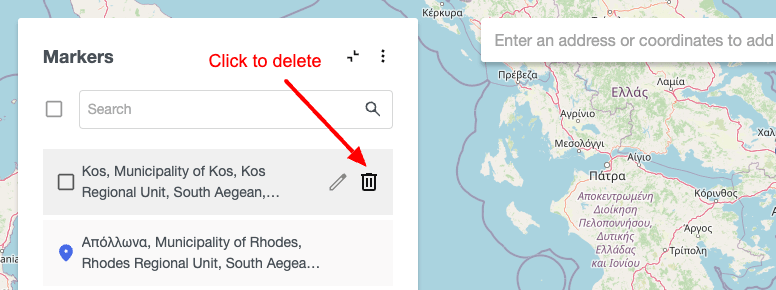
Deleting a marker
You may use either the sidebar or the marker tooltip to delete a specific marker. To delete a marker via the sidebar, locate the marker you'd like to delete from the list, hover over the right side of the marker, and click the trash icon.
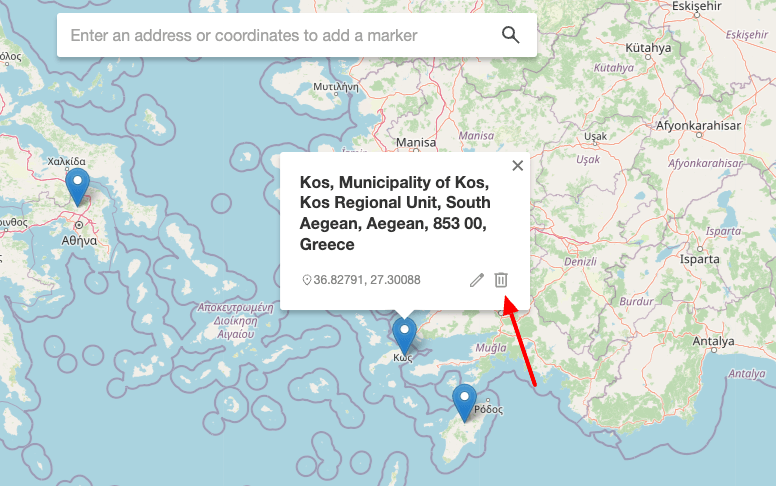
To delete a marker from the marker tooltip, find the marker you'd like to delete from the map, click on it, and then click on the trash icon.
Transfer map markers between sites
If you have markers on a map that you'd like to use on another map module on the same or different site, the don't worry, the provided import/export markers functionality provided helps you do just that. Below, you will find how to import and export map markers by following a few steps.
Importing Markers
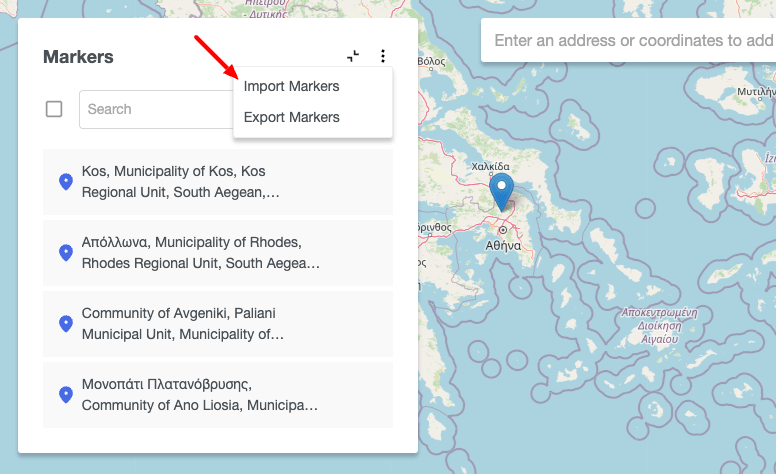
The Smile Pack - Map Module makes importing markers into your map easy using either an address name or coordinates. To start, click on the three dots on the sidebar and click "Import Markers".
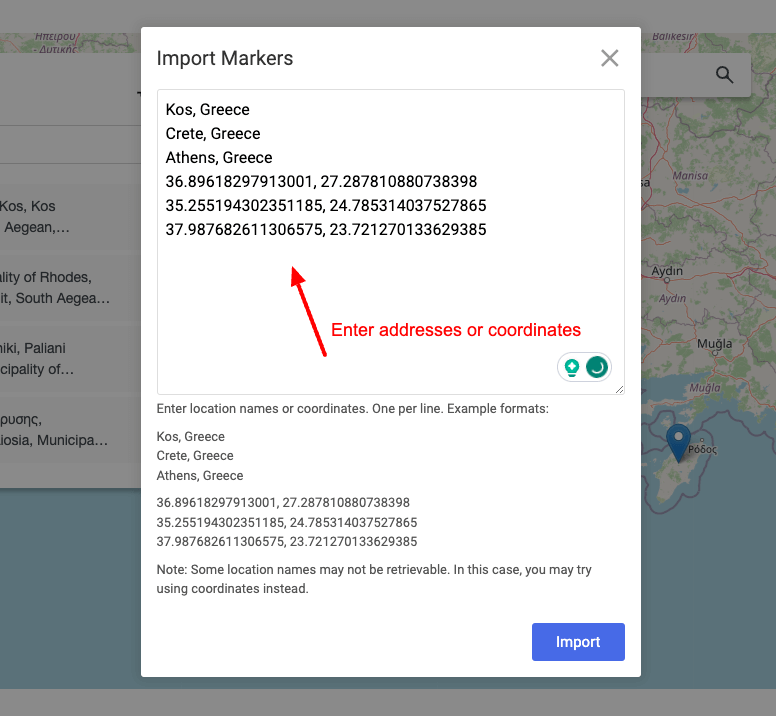
You can now type in an address or coordinates, one per line, and click the Import button to import them into your map.
Exporting Markers
Similarly to importing markers, Smile Pack - Map Module provides an easy way to export your markers and later import them into another Smile Pack - Map Module.
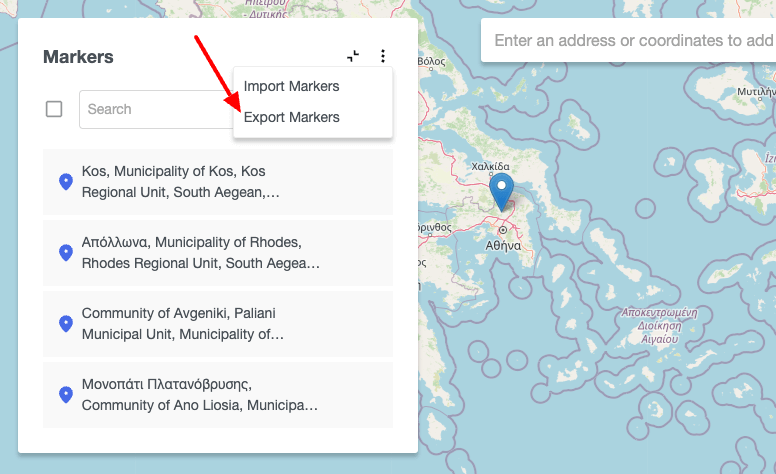
To export your markers, go into the sidebar > click on the three dots > Click on Export Markers.
You will now have a modal containing all markers' coordinates.
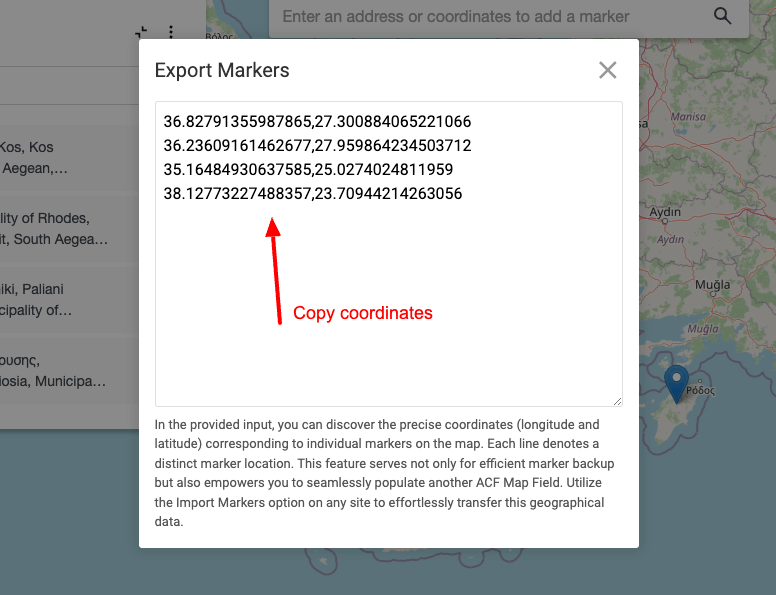
You can copy the coordinates later to import them into another Smile Pack - Map Module instance.
Populate map markers via an ACF Map field
Do you have an ACF Map field populated across different Joomla articles, users, and contacts, and would you like to include all those markers in a single map? The Map Module allows you to do just that! To get started, follow the steps below:
- Go into your Map Module > Markers > Add Marker > Select "Populate via ACF Map Field".
- Select the Joomla Component where you've configured the ACF Map field.
- Select the ACF Map field under the "ACF Map Field" dropdown.
- Finally, use the available filters to fine-tune the Joomla items (articles, contacts, users) to get the ACF Map field markers.
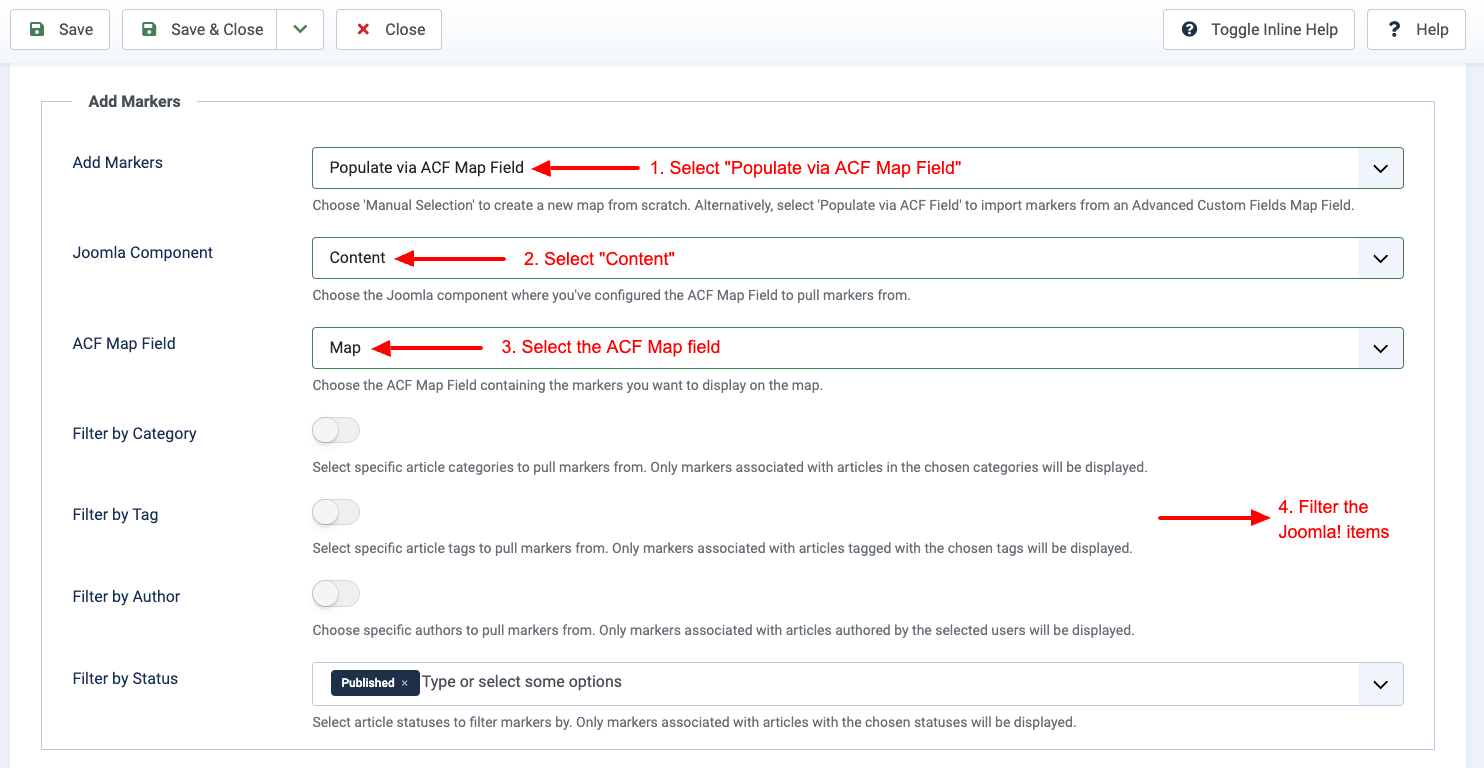
Your map will now be automatically pre-populated with all markers set in the selected ACF Map field in the component items that you have selected.
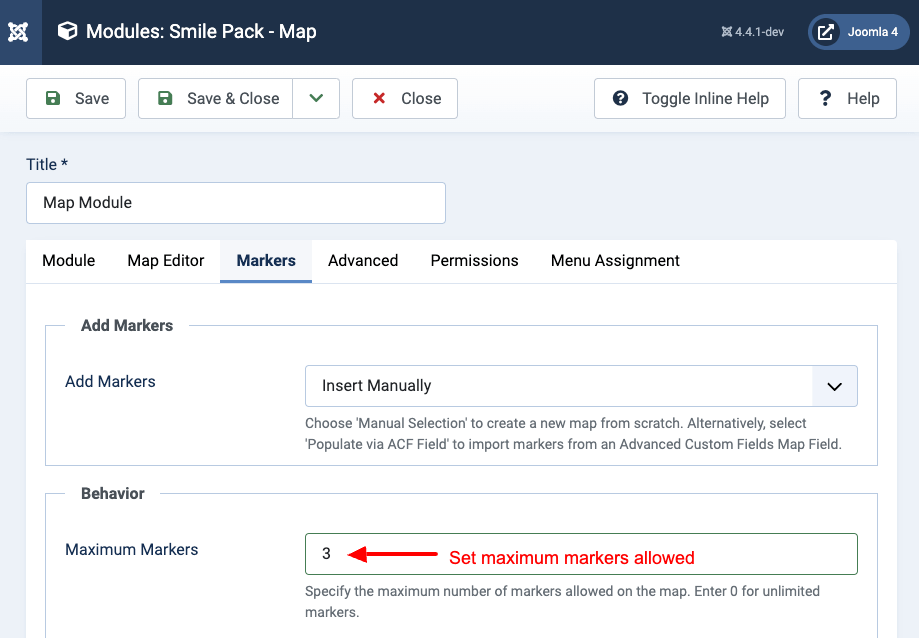
Limit the number of markers allowed
Would you like to limit the number of markers on your map? Do you have an editor or another user group that must add a specific number of markers on your map? The Map Module allows you to set a limit on how many markers can be added on a map.
To set a limit, go into your Map Module > Markers > Maximum Markers > Set the maximum markers limit.
Settings Table
Below, you can find all settings available in the Map Module.
| Name | Description |
|---|---|
| Module | |
| Provider | The map service provider is among options like OpenStreetMap, Google Maps, or Bing Maps. Note that you can switch providers seamlessly later. |
| Map Type | The map style, such as Road or Satellite. The available types may vary depending on the selected provider. |
| Map Scale | Specify whether to display the scale on the map. Choose between Metric, Imperial, or Disabled to hide the scale indicator. |
| Width | The map display area's width. |
| Height | The map display area's height. |
| Map Center | Choose 'Fit Bounds' to automatically adjust the map's center and zoom level to display all markers. Alternatively, select 'Custom' to set a specific address as the map's center and adjust the zoom level accordingly. |
| Set Map Center | The location to center the map. If left blank, the map defaults to the position of the first marker found. |
| Zoom Level | Adjust the map's zoom level to control the level of detail displayed. |
| Show Sidebar | Show or hide the sidebar on the left side of the map editor. This is particularly useful when dealing with multiple markers, as it allows for easy filtering, editing, deletion, and import/export of markers. However, enabling the sidebar may not be necessary if you are using the map for a single location. |
| Map Editor | |
| Map Editor | Configure the map editor to display your desired locations. |
| Markers | |
| Add Markers | Choose 'Manual Selection' to create a new map from scratch. Alternatively, select 'Populate via ACF Field' to import markers from an Advanced Custom Fields Map Field. |
| Joomla Component | Choose the Joomla component where you've configured the ACF Map Field to pull markers from. |
| ACF Map Field | Choose the ACF Map Field containing the markers you want to display on the map. |
| Filter by Category | Select specific article categories to pull markers from. Only markers associated with articles in the chosen categories will be displayed. |
| Category | Select categories to filter the articles. |
| Also on child items | Also assign to child items of the selected items? |
| Filter by Tag | Select specific article tags to pull markers from. Only markers associated with articles tagged with the chosen tags will be displayed. |
| Tag | Select tags to filter the articles. |
| Filter by Author | Choose specific authors to pull markers from. Only markers associated with articles authored by the selected users will be displayed. |
| Author | Select authors to filter the articles. |
| Filter by Status | Select article statuses to filter markers by. Only markers associated with articles with the chosen statuses will be displayed. |
| Enable Info Window | Toggle to show or hide an info window when a map marker is clicked. The info window will present the Label and Description assigned to each marker in the map editor. If no Label or Description is provided, the info window will display the complete address of the location. |
| Maximum Markers | Specify the maximum number of markers allowed on the map. Enter 0 for unlimited markers. |
| Marker Icon | Choose a custom PNG icon to replace the default marker on the map. |
How to display a map anywhere using a shortcode
Smile Pack will soon provide a shortcode to display a map anywhere on your Joomla website. Whether it is an OpenStreetMap, Google Maps, or Bing Maps, we got you covered. You'll also be able to customize it fully using the shortcode settings.
Interested in the Map Shortcode? Get notified.
How to display a map as a custom field
To display your map using a Joomla! custom fields, you can use Advanced Custom Fields, which provides a plethora of custom fields, including the Map custom field, allowing you to embed an OpenStreetMap, Google Maps, and Bing Maps map across your Joomla Articles, Users, Contacts, and 3rd-party components.
Read more here: ACF Map - Add an OpenStreetMap, Google, and Bing Maps in Joomla.
How to display a map in a popup
To create a popup that embeds a map, you can use EngageBox, which helps you create high-converting popups that help you increase your sales. There are a variety of ways to embed a map in your popup:
Method #1: Do you have an existing map module? Click here to create a map module. You can include it in your EngageBox popup using the Joomla! built-in shortcode {loadmoduleid ID}. Replace the ID with the Module ID.
Method #2: Use ACF Map custom field. Within your EngageBox popup, you can use the Smart Tag {article.field.NAME --id=ID} to embed the ACF Map of a specific article in your popup. Replace NAME with the ACF Map custom field Name, and ID with the Article ID, where the ACF Map was set from.
Method #3: Use shortcode (Coming Soon).
Setting up API Keys
Some providers and map types require an API Key for the map to appear on your site. Below, we will see how to grab an API key for each option.
Get OpenStreetMap Satellite API Key
To use the Satellite map type when using the OpenStreetMap provider, you must first grab a free API Key from ArcGIS.
Go to the ArcGIS Developer Dashboard by first logging in.
Upon logging in, you should be presented with your API Key in the middle of the screen.
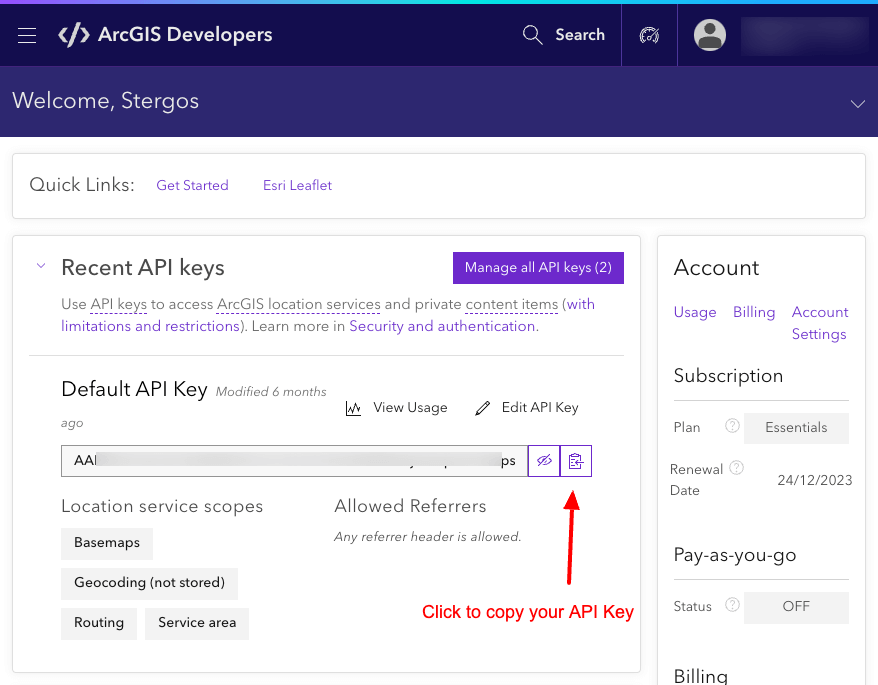
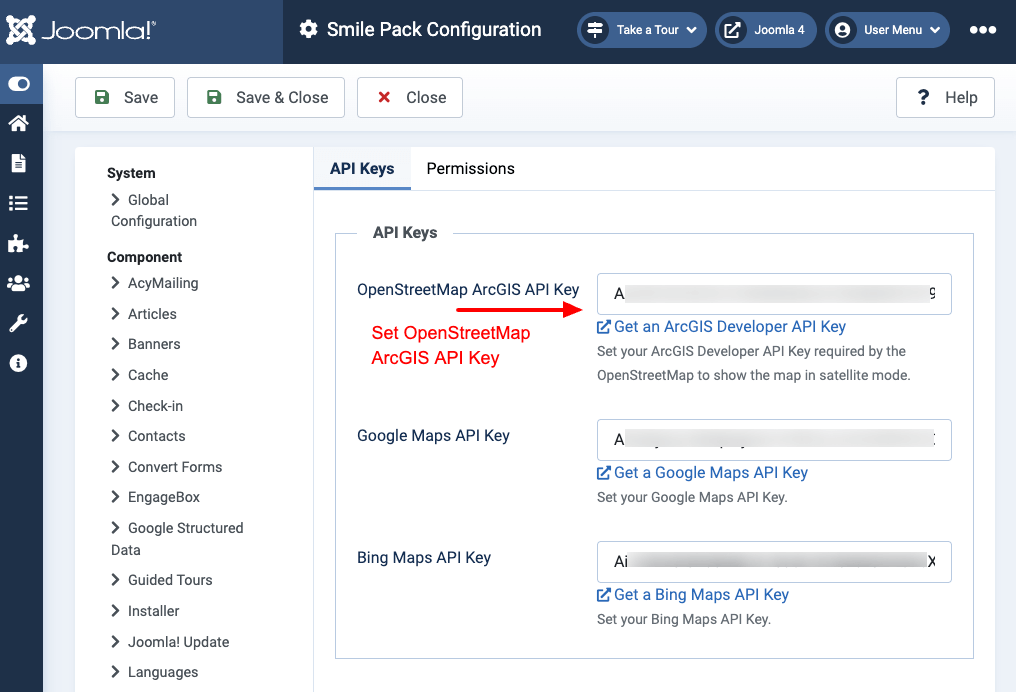
You can now copy and paste the API Key into System > Configuration > Smile Pack > OpenStreetMap ArcGIS API Key field.
Get Google Maps API Key
To use the Google Maps provider, you must first grab a Google Maps API Key. In the tutorial below, we'll see step-by-step instructions on creating a Google Maps API Key. You may read more on Google's documentation: Get a Google Maps API Key
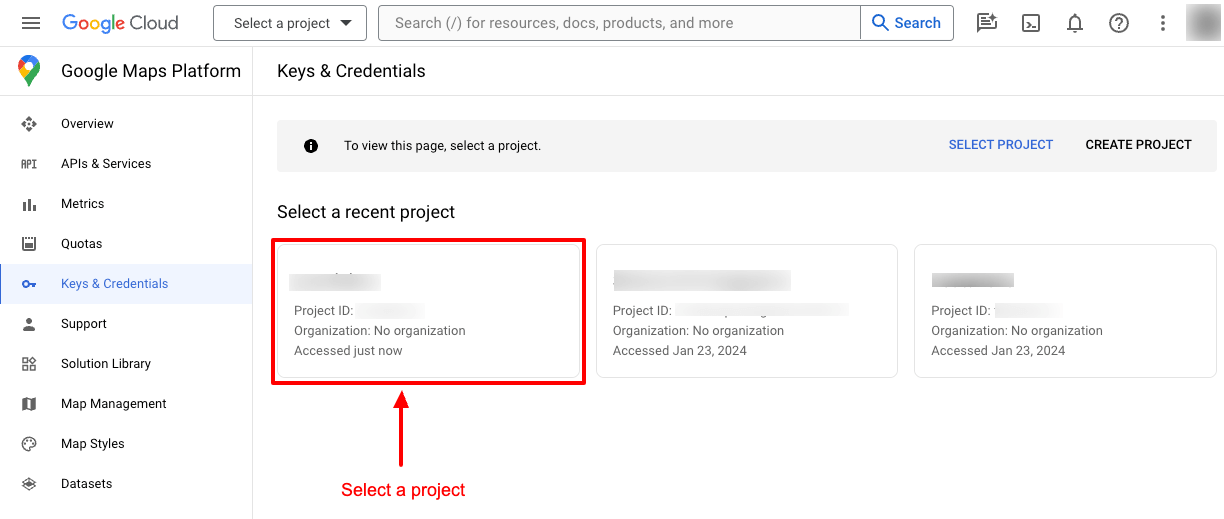
Step 1: Go to the Google Maps Platform > Credentials page and either create a new project or select an existing project.
Step 2: After selecting your project, click on CREATE CREDENTIALS and then click on API Key. Your API Key is now being generated and a new modal will appear containing it, allowing you to copy it.
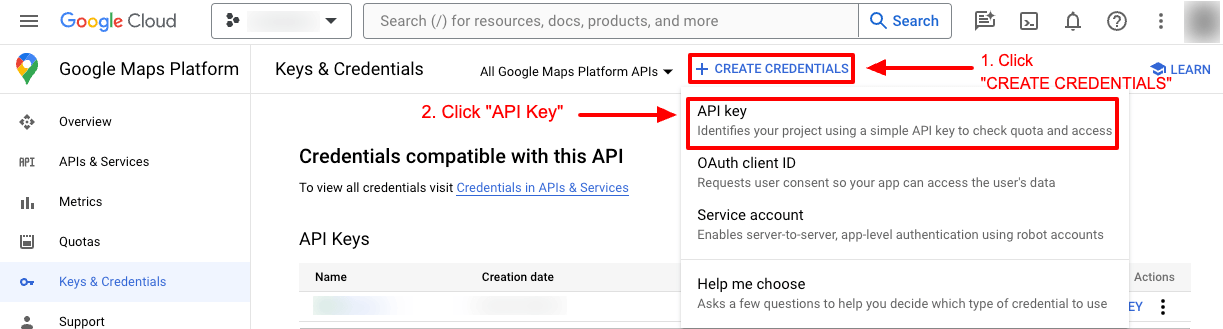
Step 3: Once the API Key has been generated, a new modal will appear with the actual API Key. You can now copy it to your clipboard by clicking the icon next to the API Key. Don't worry, you'll be able to copy it again, whenever you desire.

Step 4: Go to System > Configuration > Smile Pack > Google Maps API Key and paste your API Key.

Get Bing Maps API Key
To use the Bing Maps provider, you must first grab a Bing Maps API Key. In the tutorial below, we'll see step-by-step instructions on creating a Bing Maps API Key. You may read more on Bing Maps documentation: Get a Bing Map API Key
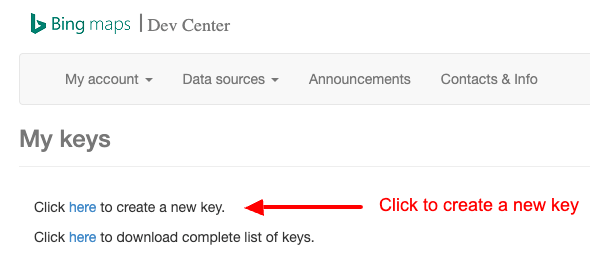
Step 1: Go to the Bing Maps Dev Center page > My Account > My Keys. Then click on "Click here to create a new key." to get started creating your Bing Maps API Key.
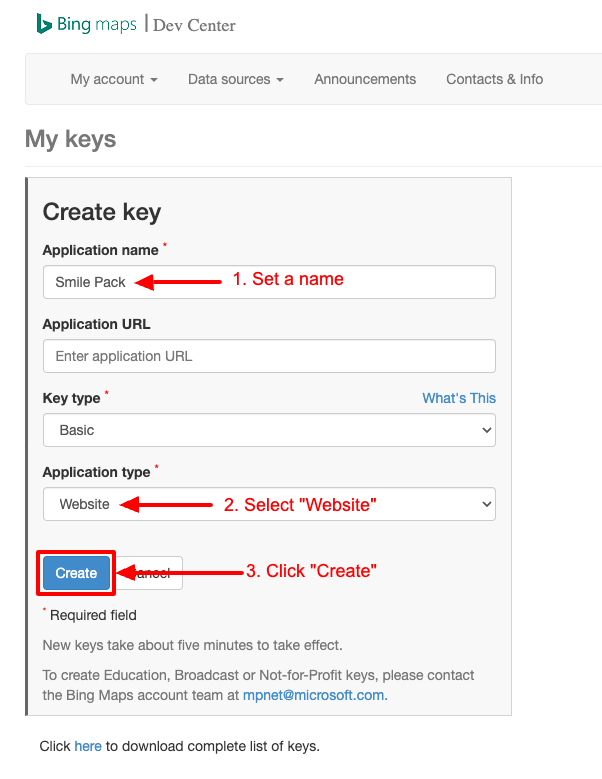
Step 2: Enter a name for your API Key, select "Website" under Application Type, and finally click Create. Your API Key is now being created.
Step 3: Once the page refreshes, your API Key appears in the list. Click on Show key to view your API Key.
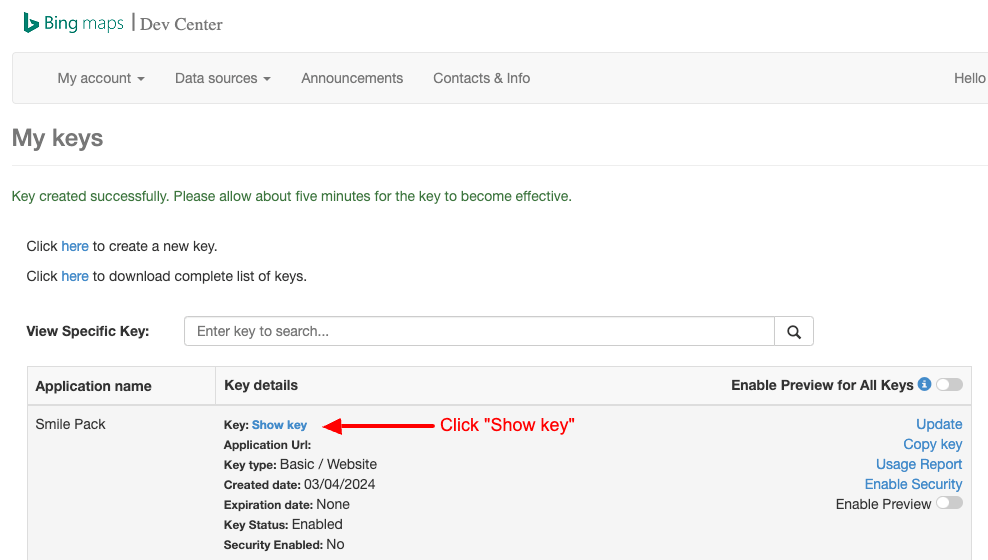
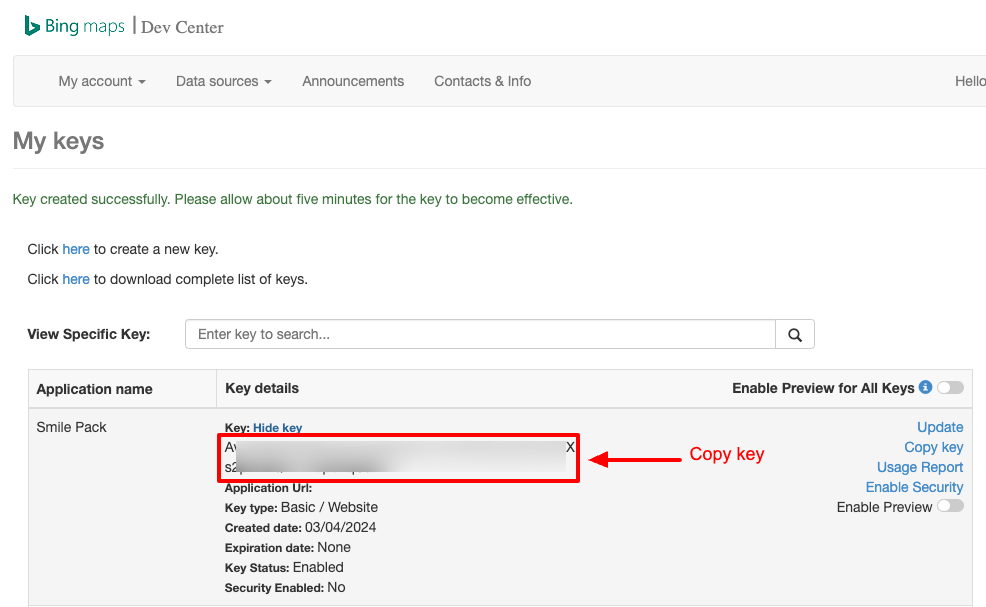
Once you click the "Show key" button, the API Key will appear. Copy the API key in order to paste it into your Smile Pack Configuration settings.
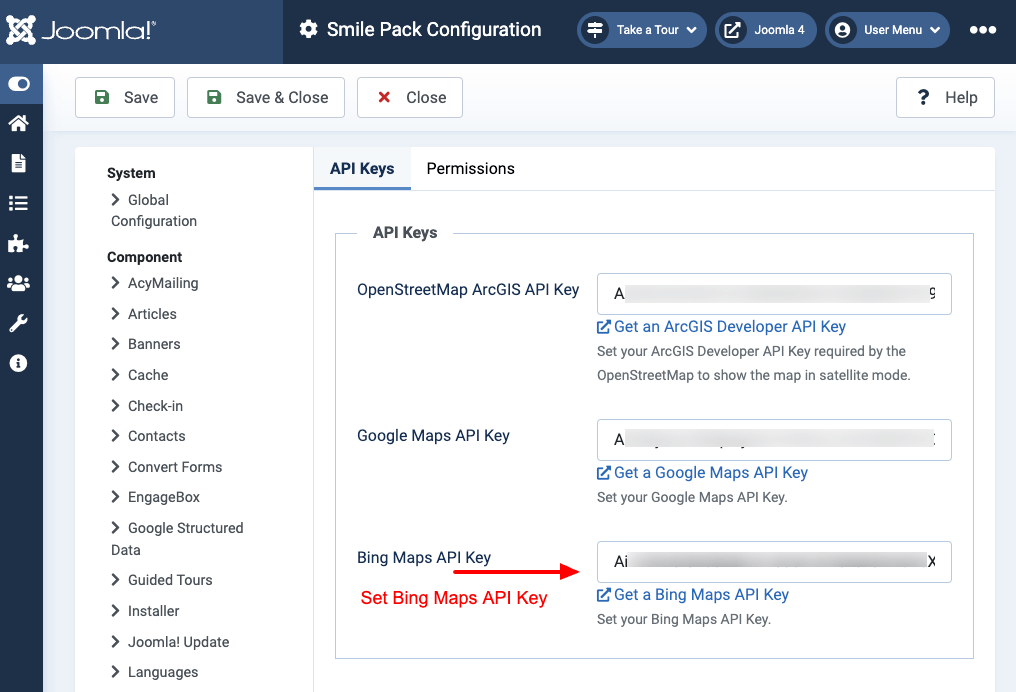
Step 4: Go to System > Configuration > Smile Pack > Bing Maps API Key and paste your API Key.
Frequently Asked Questions
Can I embed this module in an article?
The map module can appear anywhere on your site, even on your Joomla! Articles, using the shortcode {loadmoduleid ID}, where ID is the module's ID, and placing it anywhere you desire on your Joomla! Article.
Can I use this module as a custom field?
Absolutely! You can read more on how to create a map field here: How to display your map using custom fields
Can I display this module in a popup?
Definitely. You can read more on how to display a map module in a popup here: How to display your map in a popup
- How to add a Map Module to Joomla
- How to add a Google Maps module to Joomla
- How to add a Bing Maps module to Joomla
- How to add an OpenStreetMap module to Joomla
- Customize the center of the map
- Using the map module editor
- Add Markers
- Editing Markers
- Delete Markers
- Transfer map markers between sites
- Populate map markers via an ACF Map field
- Limit the number of markers allowed
- Settings Table
- How to display a map anywhere using a shortcode
- How to display a map as a custom field
- How to display a map in a popup
- Setting up API Keys
- Frequently Asked Questions


 Rated: