Unlock this and dozens of other powerful features by upgrading to Advanced Custom Fields Pro.
Unlock this feature
-
- Address Autocomplete
- Articles
- Audio Player
- Chained Fields
- Convert Forms Field
- Countdown Timer
- Country
- Currency
- Download Button
- FAQ
- File Upload
- Gallery
- Gravatar
- IFrame
- Map
- Module Loader
- PayPal Button
- PHP
- Progress Bar
- QR Code
- SoundCloud
- Telephone
- Time Picker
- True/False
- URL
- Video
File Upload Field
Upload multiples files with a modern drag-and-drop uploader. Create dynamic folders with Smart Tags to keep everything organized.
File Upload Field is available in Pro
Are you seeking a solution to effortlessly handle file uploads and image resizing within your Joomla site? Would you like to be able to upload a PDF or a ZIP file directly to the article's editing page and display the respective download link on the front end? Or maybe give your users the ability to upload a profile photo while registering for a new account and resize it automatically?
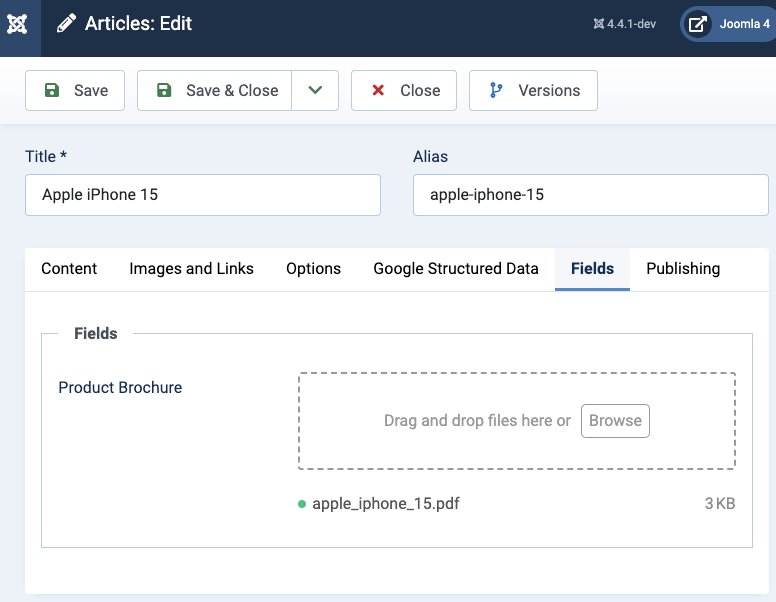
Advanced Custom Fields extension offers a drag & drop multiple file upload field that can be used with any component that supports the Joomla! Fields. Below is an example of a file upload field added to the article editing page.

Requirements
To use the File Upload field, there are a few requirements that must be met, listed below:
- Ensure you are using Advanced Custom Fields Pro. You can easily upgrade to Pro if you're currently in the Free version
- Ensure you have the fileinfo PHP extension installed on your server (it should be installed by default).
- Ensure you have the gd PHP extension installed on your server, as it's required for the resizing functionality.
Setting up File Upload Field
To start using the File Upload Field, create a new custom field and select ACF - File Upload.

Once you have selected the ACF - File Upload Field, you will be presented with all available options to configure the custom field.
File Upload
The File Upload Settings section allows you to configure how the file uploader functions; let's see all available settings:
Upload Folder
Set the path where the uploaded files will be stored. The path must be relative to the root of your webspace (i.e. media/acfupload). Ensure the path entered is writable; otherwise, the file upload will fail. Supports Smart Tags.
This field also supports Smart Tags, which allows you to define a dynamic approach to storing the uploaded files, such as using dates, current item (article, contact, user, etc...) information, and more! You can read more here: Using Smart Tags in Tassos Extensions
Below is a list of Smart Tags specifically created for the ACF - File Upload custom field.
File Smart Tags
- {acf.file.basename}: file.png
- {acf.file.extension}: png
- {acf.file.filename}: file
- {acf.file.index}: The position of the uploaded file within the uploaded files, i.e. 5
- {acf.file.total}: The total uploaded files, i.e. 10
Field Smart Tags
- {acf.field.id}: The custom field ID, i.e. 20
Item Smart Tags
- {acf.item.id}: The item ID in which the custom field is manipulated. Can be the Article ID, User ID, Contact ID, etc...
- {acf.item.alias}: The item alias.
- {acf.item.author_id}: The item author ID.
- {acf.item.cat_id}: The item category ID.
- {acf.item.cat_alias}: The item category alias.
Files Limit
Set the total number of files the user is allowed to upload. Enter 0 for no limit.
File Size Limit
Set the maximum allowable size for each uploaded file in megabytes. Enter 0 for no limit.
Allowed File Types
Enter a comma-separated list of allowed file types. Example: .jpg, .gif, .png, .pdf. Keep in mind that this is not foolproof and can be tricked.
Randomize File Types
Enable to add a random prefix to the beginning of each uploaded file name. This helps to ensure existing files with the same name never get replaced.
Allow Unsafe Files
Allow the upload of unsafe files. A file is considered unsafe when:
- There's a null byte in the file name.
- The file's extension is forbidden, for example, .php, inc, py, java, etc.
- There's a (<?php) php tag in the file content.
- There's a (<?) short tag in the file content.
- There's a forbidden extension anywhere in the content.
Remember that this option also keeps you safe from unsafe files included in a compressed file (zip, rar, tar, etc.).
Show Downloads Links
Enable to display download links for each uploaded file in the file uploader.
When this option is enabled, when you hover over each uploaded file, you will be presented with two new actions: one that opens the uploaded file in a new tab and automatically downloads the file to your device.
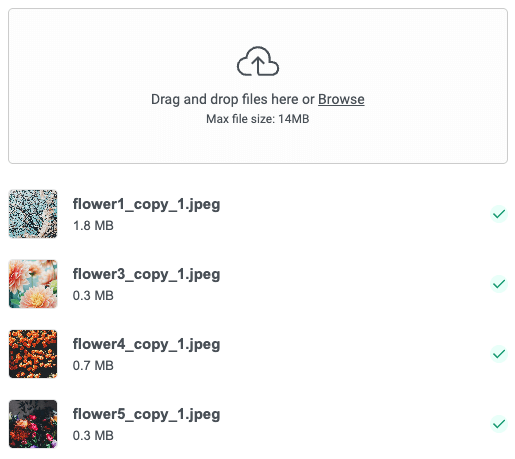
Layout
Choose how uploaded files are displayed in the form.
Select List to display files in a list without previews.
Select Thumbnails to display files with small image previews.
Resize Images
In this section, you can define how your images will be resized upon uploading them on the ACF - File Upload field.
Resize Images
Enabling this allows you to resize the uploaded images to specific dimensions.
Supported images are jpg, jpeg, png, gif, and webp.
Only new images will be resized; existing images are left as-is.
No additional images are created when the image is resized. The image that is uploaded is the one that's resized.
Helpful Resizing Scenarios:
Resize by width:
To resize uploaded images by width and keep the aspect ratio, set only width and leave height blank.
Resize by height:
To resize uploaded images by height and keep the aspect ratio, set only a height and leave the width blank.
Resize by width & height:
To resize uploaded images to a specific width and height and crop the image to these dimensions, set both a width and height.
Front-end Display
Configure how your uploaded files will appear on your site.
Layout
Select the layout that will be used to display each uploaded file in the front end. The available options are Link, Image, and Custom Layout, where you can set your HTML layout.
Link Text
Define the text that will be used in the link. (Available in the Link layout). This option also supports Smart Tags. You can read more here: Using Smart Tags in Tassos Extensions
You can also use the ACF File Upload specific Smart Tags. You can read more here.
Furthermore, some extra Smart Tags available when using the Link Text option are:
- {acf.file.title}: The custom title of the uploaded file.
- {acf.file.description}: The custom description of the uploaded file.
Force Download
Select whether to download the file instead of navigating to the link. (Available in the Link layout).
Custom Layout
Define the custom layout that will be used. (Available in the Custom layout). This option also supports Smart Tags. You can read more here: Using Smart Tags in Tassos Extensions
You can also use the ACF File Upload specific Smart Tags. You can read more here.
Furthermore, some extra Smart Tags available when using the Custom Layout option are:
- {acf.file.path}: The relative path to the uploaded file.
- {acf.file.url}: The URL to the uploaded file.
- {acf.file.size}: The size of the uploaded file, in a human-readable format, i.e., 5KB, 15MB, etc...
- {acf.file.title}: The custom title of the uploaded file.
- {acf.file.description}: The custom description of the uploaded file.
Uploading Files
Once your ACF - File Upload custom field is configured, it's time to upload files. In this section, we will explain how the file uploader works.
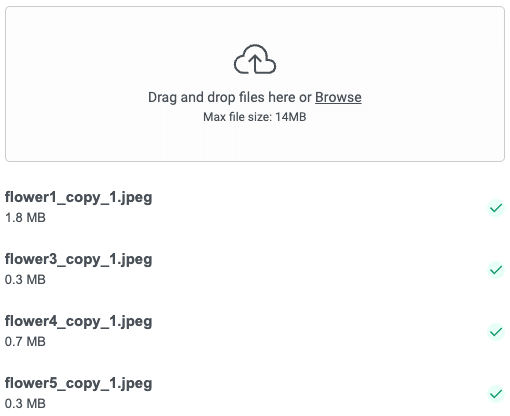
The uploader, by default will look like this:

You can upload files using two different ways:
- Drag and drop files from your computer into the uploader
- Click on the uploader and select the files you'd like to upload.
You may upload multiple files simultaneously; however, remember that the total file limit limits this.
After you have uploaded a few files, you should see a list of all uploaded files.
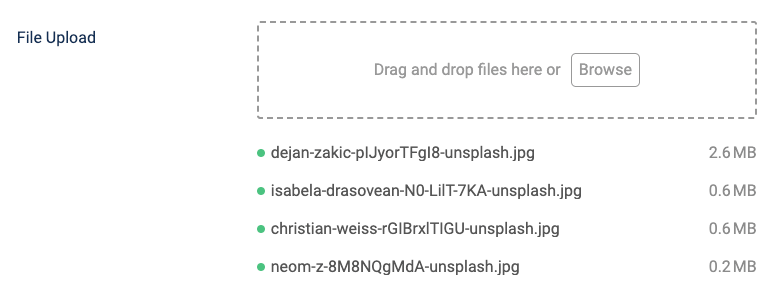
To ensure the uploaded files are uploaded correctly, the bullet on the left side of the uploaded file must be green. However, if the bullet is red, the file couldn't be uploaded.
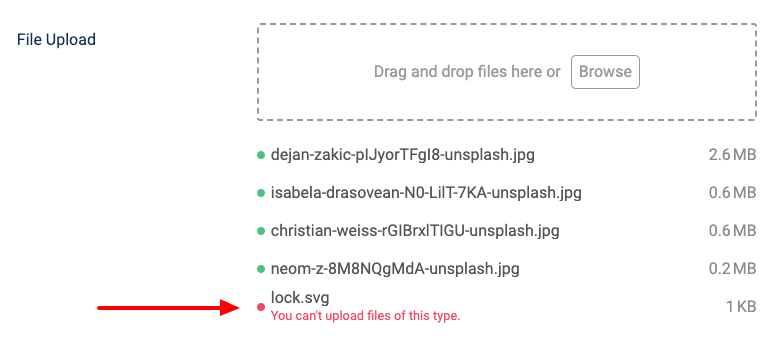
Here are some reasons this may occur:
- The uploaded file is larger than the maximum allowed file size.
- The uploaded file is not allowed based on the allowed file types.
- You have reached the maximum allowed file limit.
Set custom titles and descriptions for your files
After a file has been uploaded, you can customize its title and define a custom description, which you can use in your Link or Custom Layout. You can read more on layouts here.
Hover over an uploaded file and you will be presented with a few actions on the right-hand side. We're interested in the "Pencil" icon, which allows us to define a custom title and description.
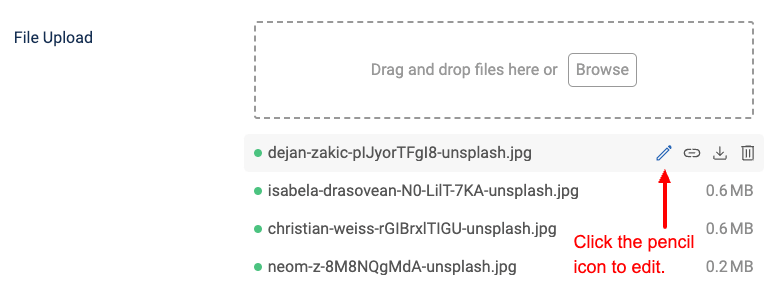
Once you hover over the uploaded file that you'd like to set a custom title and description, click on the pencil icon, and the edit modal will appear, allowing you to define these custom values.
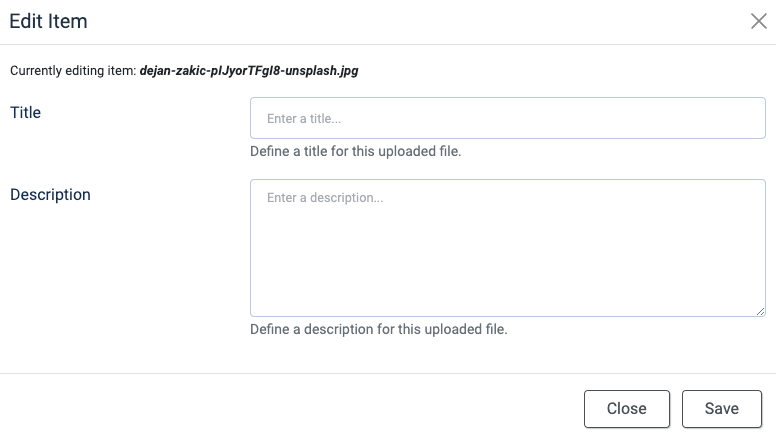
Once you set a custom title and description, press Save, and the custom values will be saved alongside the uploaded file.
View a file
To view a file directly from the uploader, hover over an uploaded file and click on the "Link" icon. For this icon to appear, it requires the Show Downloads Links setting to be enabled from within the custom field settings.
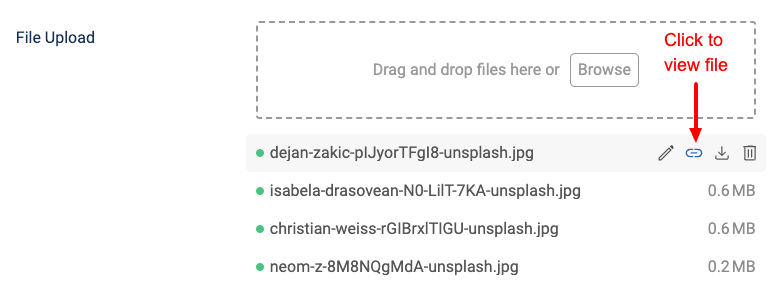
Clicking the icon, will automatically open a new tab and display the uploaded file.
Download a file
Hover over an uploaded file and locate the "Download" icon to download a file. For this icon to appear, it requires the Show Downloads Links setting to be enabled from within the custom field settings.
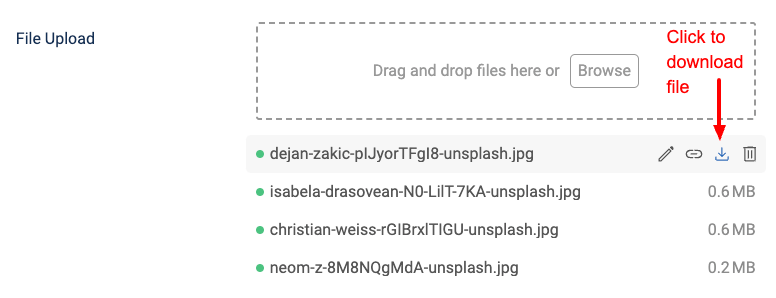
Once you click this icon, it will automatically download the file to your device.
Delete a file
To delete a file, hover over the uploaded file and locate the "Trash" icon.
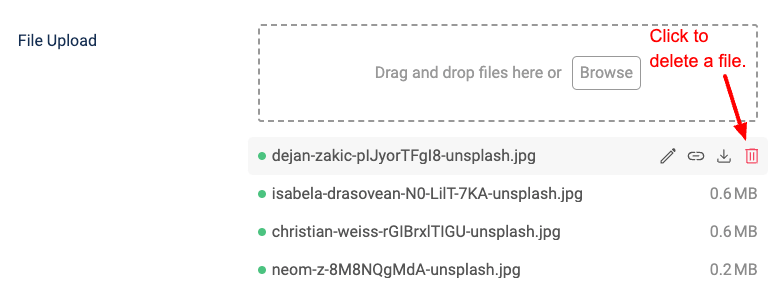
Clicking it will trigger a confirmation message, notifying you that you are about to delete the uploaded file.
Conditional Logic
Using Conditional logic, you can fine-tune when your custom field appears on your site, by specifying some criteria, such as when the user is viewing your site from a mobile device, whether they are viewing a specific page if Google referred them, and more! The possibilities are endless.
When editing a custom field, you can configure when your custom field will appear by going into the Display Conditions tab.
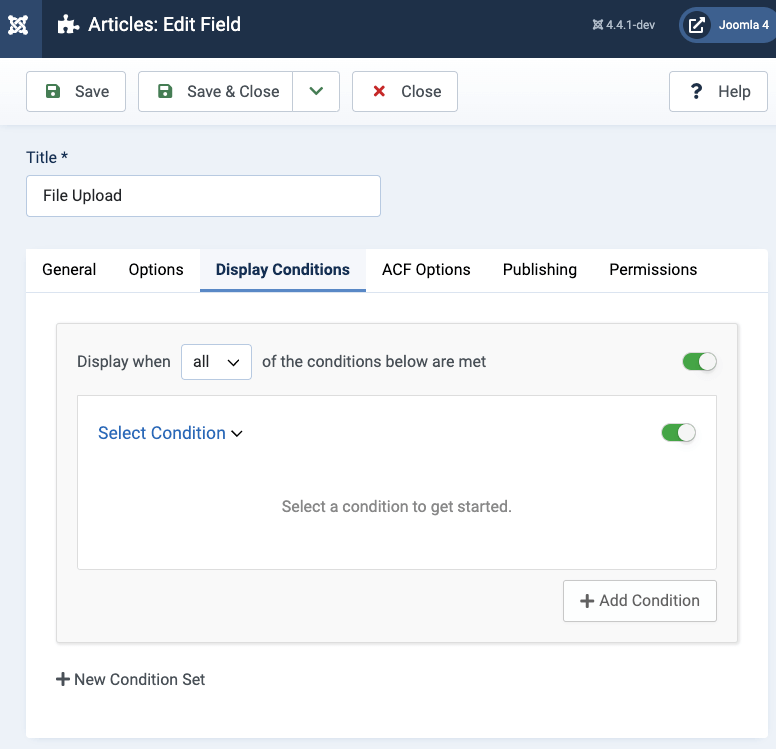
Once on the Display Conditions tab, you can configure when your custom field appears. Leaving the condition logic empty, tells Advanced Custom Fields to display the custom field site-wide.
Use Cases
The File Upload Field can be used with any component that supports the Joomla! Fields such as the Articles (com_content), User (com_user), and the Contact (com_contact) component. Now that we've seen how to create an ACF - File Upload custom field, let's see a few use cases.
How to add a File Upload Field to Joomla! Articles
In this use case, we have an example where content authors can upload a PDF file to the article's editing page in the backend, and website visitors can see a download link in the front end.
Step 1: Create a new File Upload Field
Go to Content → Fields, click New to create a new field. From the Type dropdown, select the ACF - File Upload option.

Click to save the field to return to the same page where, now, you can see two new setting groups.
Step 2: Set the File Upload rules
In the first group, called File Upload Settings, we can set rules and restrictions on the files that are allowed to be uploaded by our field. In our case, we want to limit the user to upload one PDF file up to 2 MB.
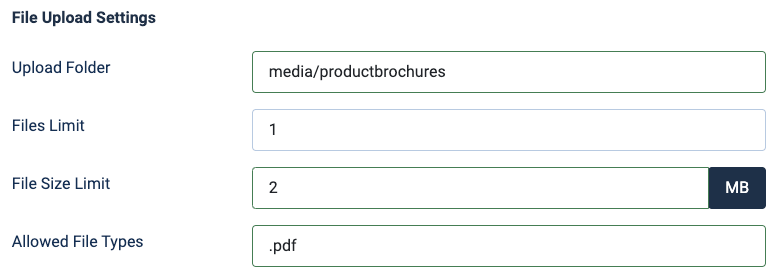
- Set an upload folder to the respective option.
- Set Files Limit to 1
- Set File Size Limit to 2 MB
- Set Allowed Files Types to .pdf
Step 3: Set how the uploaded file will be displayed in the front end
In the second group, Front-end Display, we can define how the uploaded files will be displayed on the front end. In our case, we want to display a downloadable link to the uploaded PDF file. To do so, follow the steps below:
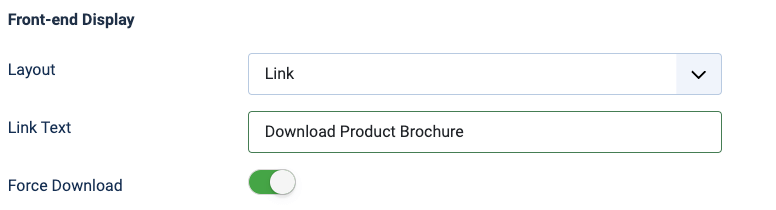
- Set Layout to Link
- Set Link Text to Download Product Brochure or anything similar.
- Enable Force Download. This option forces the browser to download the file on the current window, instead of navigating to it on a new tab.
Save the field and proceed to the next step.
Step 4: Upload a PDF file in your Joomla! article
Now, that we have our file upload field properly configured, we should be able to see it on the article's editing page in the back end.
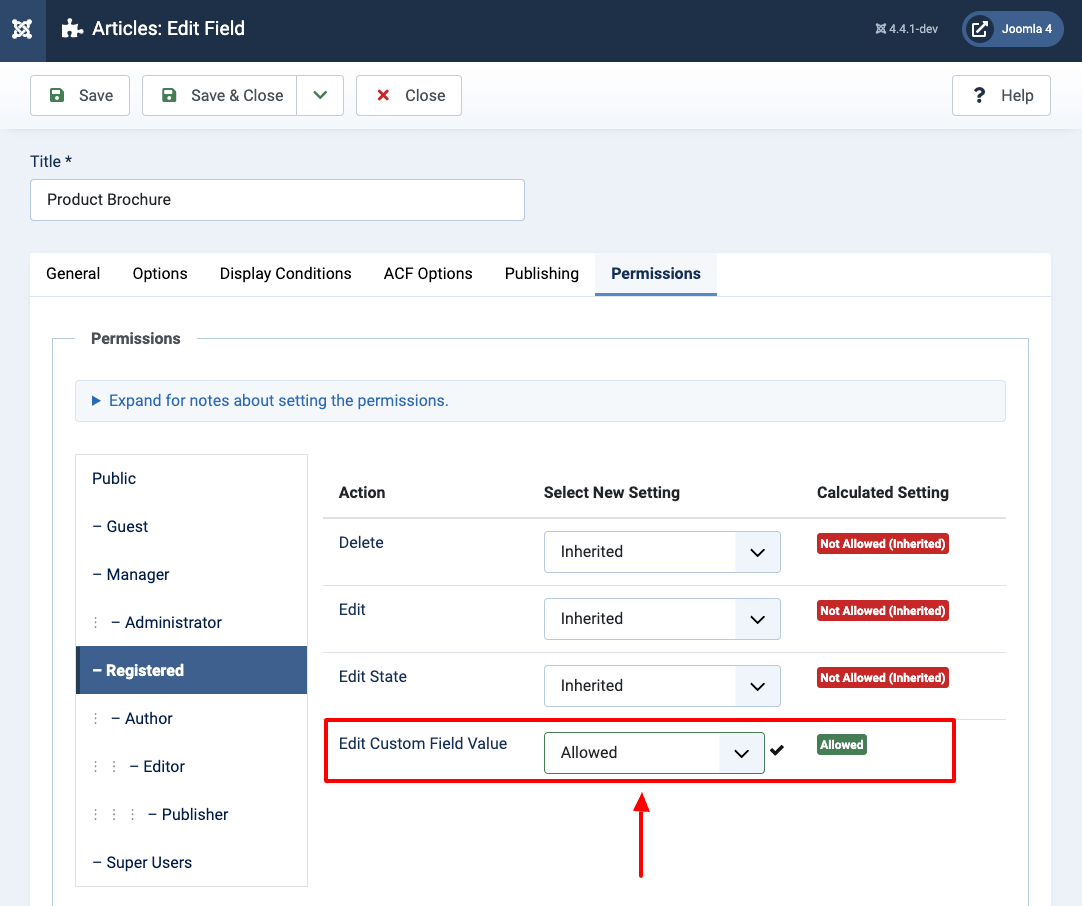
In case the field is displayed disabled in the form and you're not allowed to upload files, you probably don't have the right permissions to edit the content of the field. To fix it, you must set the Edit Custom Field Value option to Allowed in the Permissions tab in the Field settings as well as in the Content component configuration page.
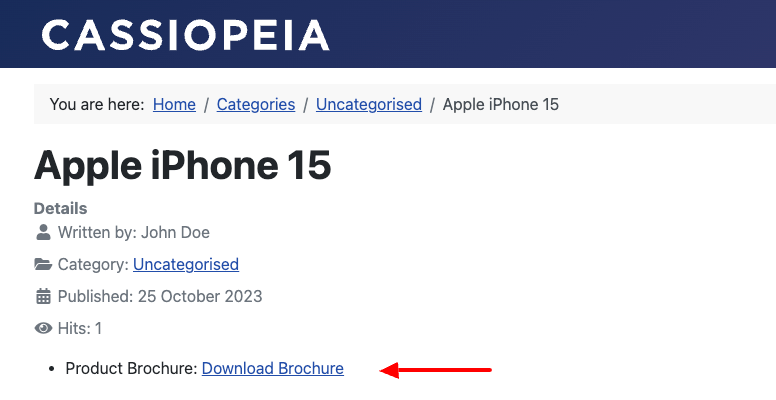
The last step is to upload a PDF file and save the article. Finally, depending on your Joomla! template, you should be able to see a similar download link as shown in the picture below.
How to Add a File Upload Field to Joomla! Registration Form
There are cases where you'd like to enhance the Joomla! registration form with custom fields and specifically with a File Upload Field. A common case is where we want the user to upload a profile photo while they register for a new account on our site. That photo can be displayed and edited on the user's profile page.
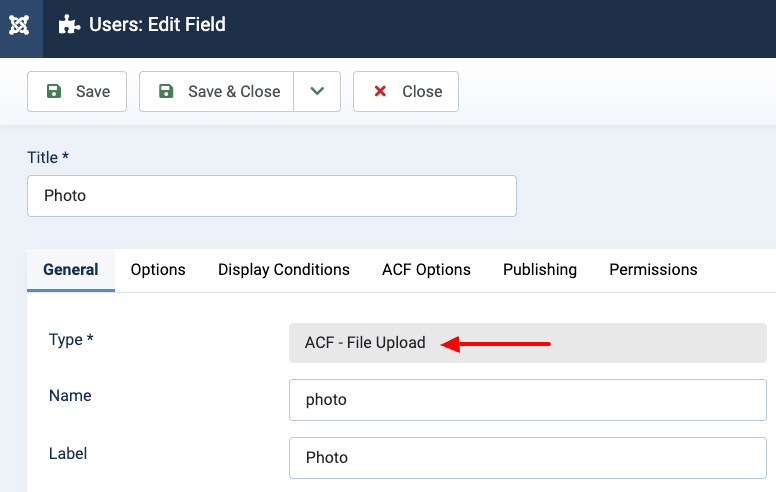
Step 1: Create a new Field Upload Field
Go to the Users → Fields, click New to create a new field. From the Type dropdown, select ACF - File Upload.
Click to save the field to return to the same page where now, you can see 2 new setting groups.
Step 2: Set the File Upload Rules
In the first group, called File Upload Settings, we can set rules and restrictions on the files that are allowed to be uploaded by our field. In our case, we want to limit the user to upload 1 image up to 3 MB.
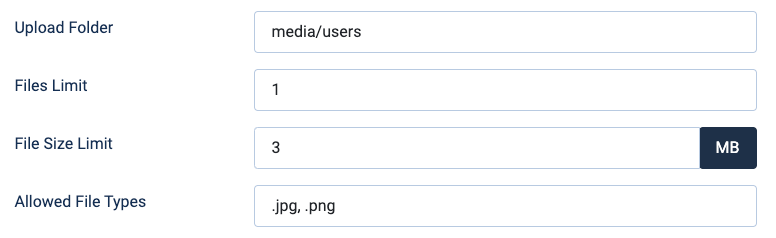
- Set an upload folder to the respective option.
- Set Files Limit to 1.
- Set File Size Limit to 3 MB.
- Set Allowed Files Types to .jpg, .png.
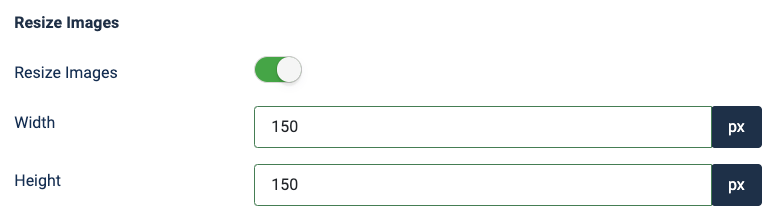
Step 3: Resize images
Under Resize Images, enable the option as we want to limit the uploaded image to 150x150 in dimensions.
To do so, set the width and height to 150 pixels.
Step 4: Set how the uploaded file will be displayed on the user profile page
In the second group, called Front-end Display, we can define how the uploaded files will be displayed on the front end. In our case, we want to display the actual uploaded image when the user views their profile page. To do so, set Layout to Image.

Save the field and proceed to the next steps.
Step 5: Test the Joomla! Registration Form
Go to the registration form in the front end. There, you should be able to see the file upload field we created in the previous step.
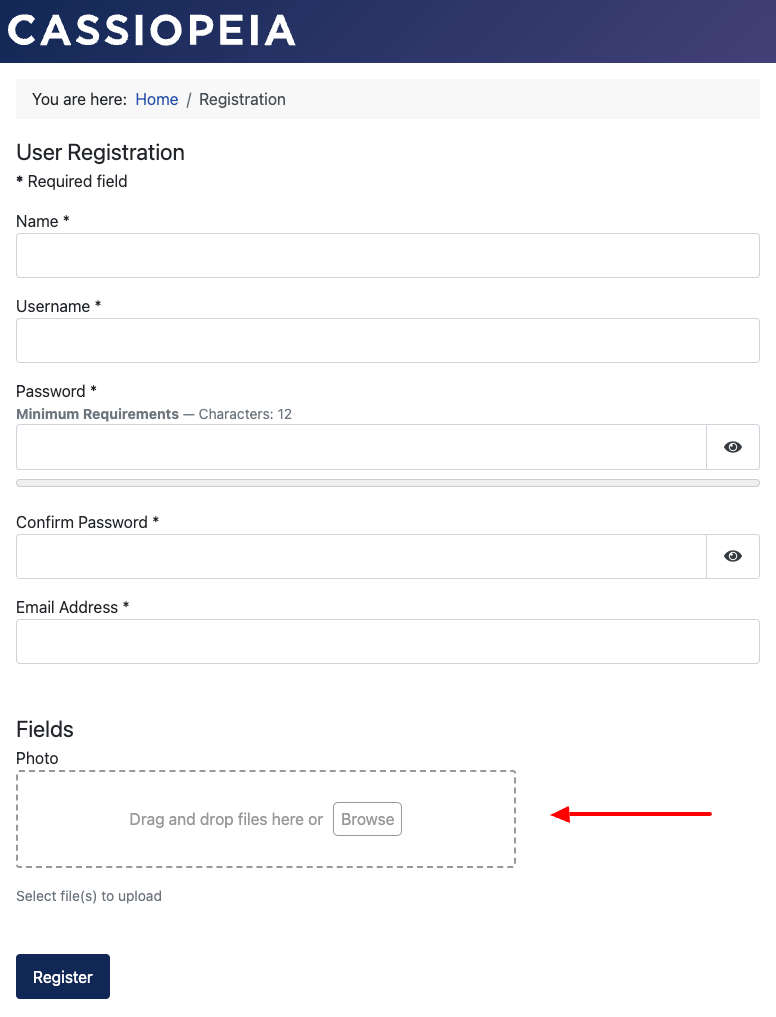
Note: Keep in mind that the styling of the form shown in the picture above may vary depending on your site's template.
In case the field is displayed disabled in the form and you're not allowed to upload files, you probably don't have the right permissions to edit the content of the field. To fix it, you must set the Edit Custom Field Value option to Allowed in the Permissions tab in the Field settings as well as in the Users component configuration page.
Step 6: View the Uploaded Photo in the User Profile Page
After you've created a test account, go to the User Profile page, where you should be able to see an overview of the account, including the uploaded photo.
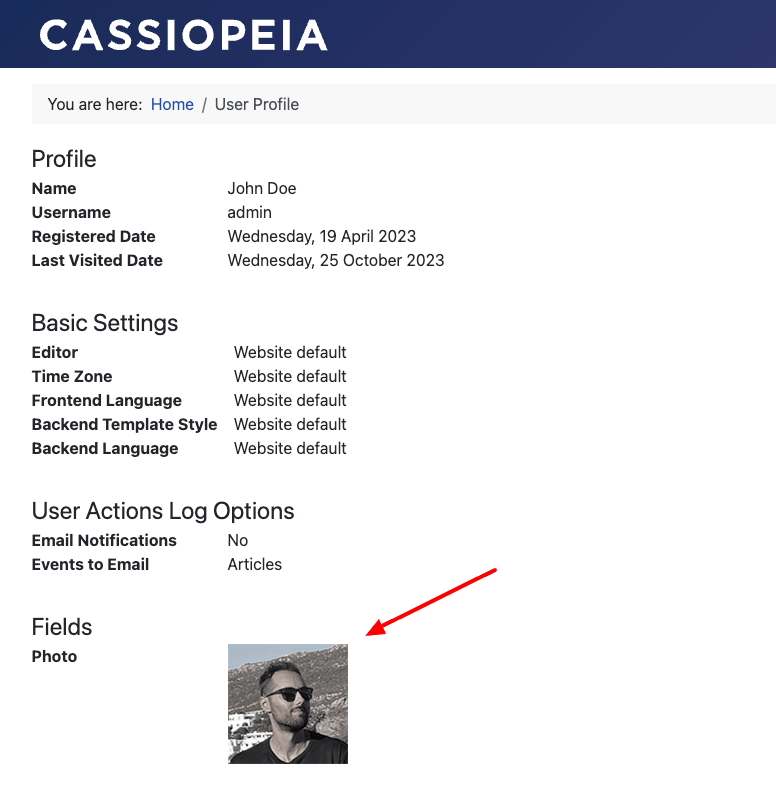
To remove the uploaded photo or upload a new one, go to the Edit Profile Page.
To-do list
Advanced Custom Fields is regularly updated with new features and bug fixes. The roadmap is quite packed with new features, and enhancements. Find out the upcoming new features by visiting the Roadmap page.
Frequently Asked Questions
How can I translate the field into my language?
To translate the texts used by the File Upload Field into your language, you will need to do an override of the following language strings:
- ACF_UPLOAD_DRAG_AND_DROP_FILES="Drag and drop files here or"
- ACF_UPLOAD_BROWSE="Browse"
To learn how to create a language override in Joomla, visit: https://docs.joomla.org/J3.x:Language_Overrides_in_Joomla
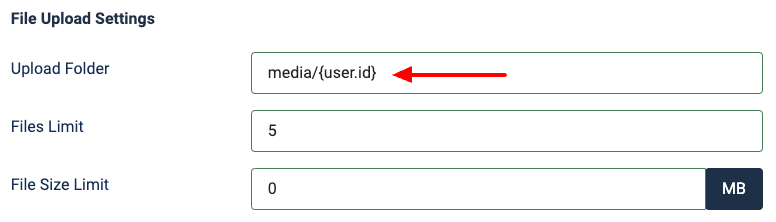
How can I set a different upload folder for each user?
If you would rather each user have their upload folder, you can use the {user.id} Smart Tag in the Upload Folder to pull the ID of the user's account, e.g., /media/{user.id}. In this case, users with id #456 and #678 will have their uploads stored to /media/456/ and /media/678/ respectively.
If the ID of the user is not that practical, you may use {user.username} Smart Tag to pull the login name of the user, e.g., /users/uploads/{user.username}. In that case, users with username, john and maria will have their upload files stored to /users/uploads/john/ and /users/uploads/maria/ respectively.
Note that the User-based Smart Tags require the user to be logged-in. Otherwise, the Smart Tag will always return an empty value.
Can I use this File Upload Field in a Custom Joomla Contact Form
In case the Joomla! Custom Fields don't fit your needs, or you're looking for a way to create advanced file upload forms, try Convert Forms. A Joomla! Form Builder extension that integrates with the same Drag & Drop File Upload Field as Advanced Custom Fields does.
Can I override the field's layout?
To override the custom field layout, consult the following documentation pages:
Is there any list with all available Joomla Fields?
Advanced Custom Fields consists of over 30 custom fields, and you can find more about each one by clicking here: Advanced Custom Fields Collection.
How to add Custom CSS to your Joomla Custom Fields
You can easily add Custom CSS to your pages when a Joomla custom field appears, using ACF Options. You can read more here: How to add Custom CSS to your Joomla Custom Fields.
Can I use it with YooTheme?
All Advanced Custom Fields are YooTheme compatible and can be used with YooTheme Pro Dynamic Content, meaning you can create pages in YooTheme that used as source, any custom field created by Advanced Custom Fields. You can read more here: How to use Advanced Custom Fields with YooTheme Pro Dynamic Content .
I have more questions. Can you help?
If you have further questions after reading this documentation, we suggest you look into our general Frequently Asked Questions page for Advanced Custom Fields, and if your question is still not answered, contact us by clicking here.
Troubleshooting
I get an "Unsupported File" error when I try to upload any file
First, make sure the type of the file you're trying to upload is set in the Allowed File Types option in your file upload field settings. Next, verify the Fileinfo PHP extension is installed and enabled on your server. This is required to guess the mime type of the file.
Why are the files not moved to the upload folder?
If you upload files and upon saving the Joomla article, contact, or user, the files remain on the temporary folder (/media/acfupload/tmp), then the most common issues are:
- The upload folder set in the Upload Folder setting may not be created or have incorrect file permissions.
- You may be using the ACF File Upload field in a Subform field which is then used in another Subform field. To fix this, simply add the ACF File Upload field as a direct child to your main Subform field.
File Upload Field is available in Pro
Unlock this and dozens of other powerful features by upgrading to Advanced Custom Fields Pro.
Unlock this feature
Last updated on Mar 9th 2026 12:03
In This Article
- Requirements
- Setting up File Upload Field
- Uploading Files
- Conditional Logic
- Use Cases
- How to add a File Upload Field to Joomla! Articles
- Step 1: Create a new File Upload Field
- Step 2: Set the File Upload rules
- Step 3: Set how the uploaded file will be displayed in the front end
- Step 4: Upload a PDF file in your Joomla! article
- How to Add a File Upload Field to Joomla! Registration Form
- Step 1: Create a new Field Upload Field
- Step 2: Set the File Upload Rules
- Step 3: Resize images
- Step 4: Set how the uploaded file will be displayed on the user profile page
- Step 5: Test the Joomla! Registration Form
- Step 6: View the Uploaded Photo in the User Profile Page
- To-do list
- Frequently Asked Questions
- How can I translate the field into my language?
- How can I set a different upload folder for each user?
- Can I use this File Upload Field in a Custom Joomla Contact Form
- Can I override the field's layout?
- Is there any list with all available Joomla Fields?
- How to add Custom CSS to your Joomla Custom Fields
- Can I use it with YooTheme?
- I have more questions. Can you help?
- Troubleshooting
Tassos offers a premium suite of Joomla extensions with 7 products and over 2.2 million downloads, providing reliable solutions since 2014.


 Rated:
Copyright © 2014 - 2026 - Smile Motive Development LP. All Rights Reserved.