

Unlock this and dozens of other powerful features by upgrading to Advanced Custom Fields Pro.
Unlock this feature
-
- Address Autocomplete
- Articles
- Audio Player
- Chained Fields
- Convert Forms Field
- Countdown Timer
- Country
- Currency
- Download Button
- FAQ
- File Upload
- Gallery
- Gravatar
- IFrame
- Map
- Module Loader
- PayPal Button
- PHP
- Progress Bar
- QR Code
- SoundCloud
- Telephone
- Time Picker
- True/False
- URL
- Video
Gallery Field
Create stunning photo galleries with our Masonry, Grid, Justified and Slideshow layouts. Perfect for showcasing your images online!
Gallery Field is available in Pro
Would you like to create beautiful responsive photo galleries for your Joomla site? Are you looking for a Joomla Gallery Custom Field plugin to enable you to add image galleries to your Joomla Articles?
ACF Gallery is a Joomla gallery plugin with a drag & drop builder and lightbox functionality that integrates perfectly with Joomla Custom Fields. It comes with stunning pre-built gallery layouts and a focus on performance and SEO. It is also responsive, accessibility-ready, and supports lazy loading for lightning-fast photo galleries and automatic image resizing during upload.
Requirements
To use the Gallery field, there are a few requirements that must be met, listed below:
- Ensure you are using Advanced Custom Fields Pro. You can easily upgrade to Pro if you're currently in the Free version
- Ensure you have the fileinfo PHP extension installed on your server (it should be installed by default).
- Ensure you have the gd PHP extension installed on your server, as it's required for the resizing and watermark functionality.
- Ensure you have the exif PHP extension installed on your server.
The PHP extensions required must be installed on your host, either via cPanel (or alternative) or by contacting them and asking them to install them for you.
Setting up Gallery Field
To get started using the Gallery Field, create a new custom field and select ACF - Gallery.
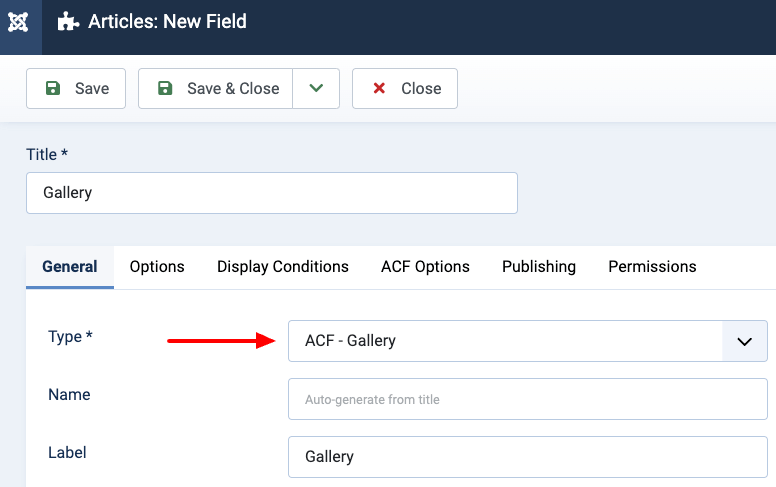
Once you have selected the ACF - Gallery Field, you will be presented with all available options to configure the custom field.
Upload Settings
The Upload Settings section allows you to configure where the uploaded images for your gallery will be stored; let's see all available settings:
Upload Destination
Select whether to store the uploaded images in the default or a custom folder.
The default upload destination will upload all images to the following directory: /media/acfgallery/COMPONENT/ITEM_ID/FIELD_ID/. The COMPONENT represents the component's name from which this field got populated (e.g., content, users, or contacts). The ITEM_ID represents the ID of the item this field was populated from (e.g., The ID of the Joomla Article). The FIELD_ID represents the ID of this custom field.
Upload Folder
Set the path where the uploaded files will be stored. The path must be relative to the root of your webspace (i.e., media/gallery). Ensure the path entered is writable; otherwise, the image upload will fail.
This field also supports Smart Tags, which allows you to define a dynamic approach to storing the uploaded files, such as using dates, current item (article, contact, user, etc...) information, and more! You can read more here: Using Smart Tags in Tassos Extensions
Below is a list of Smart Tags specifically created for the ACF - Gallery custom field.
- {field.field_id} - The ID of the field
- {field.item_id} - The ID of the associated item (article)
- {field.item_alias} - The alias of the associated item (article)
- {field.item_author_id} - The author ID of the associated item (article)
- {field.item_catid} - The category ID of the associated item (article)
- {field.item_catalias} - The category alias of the associated item (article)
- {user.id} - The ID of the currently logged in user
- {user.username} - The username of the currently logged-in user
Files Limit
Set the total number of files the user is allowed to upload. Enter 0 for no limit.
File Size Limit
Set the maximum allowable size for each uploaded file in megabytes. Enter 0 for no limit.
Random Suffix
Adds a random suffix to uploaded filenames so two images with the same name cannot overwrite each other.
Theme
Select and configure the theme that will be used to display your gallery.
Style
Choose in which style to display the gallery, defaults to the grid style.
- Grid: All items will have the same width and the same height as well. You can define the width and height of the items as well as the number of columns for this layout.
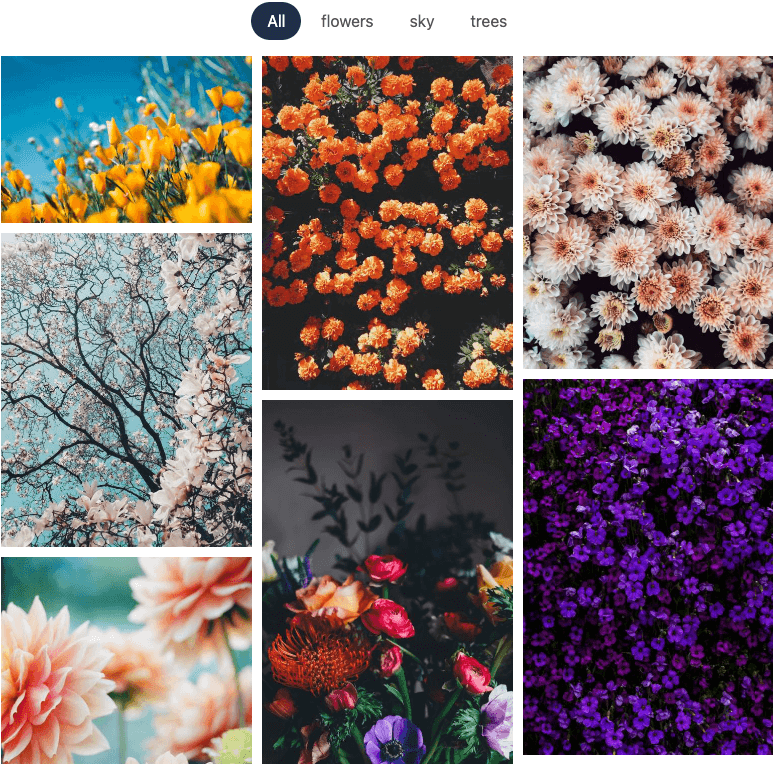
- Masonry: All items have the same width, but the height of each will be different. You can define the column's width and the number of columns for this layout.
- Slideshow: This layout offers a dynamic carousel display with convenient thumbnail navigation for a captivating and interactive gallery experience.
- Justified: This layout is the opposite of the Masonry layout. All items will have the same height but different widths. You can define the target row height.
Thumbnail Size
Shown when Style is Grid. Specify a value for the width and height of the thumbnail image. This crops the original image to fit the given dimensions. Default: 200.
Thumbnail Width
Shown when Style is Masonry. Specify the width of the thumbnail, which retains its aspect ratio. Default: 200.
Thumbnail Height
Shown when Style is Justified. Specify the height of the thumbnail image, which retains its aspect ratio. The specified height determines the approximate height of each gallery item as it appears in the gallery. Default: 200.
Columns
Choose the number of columns used to display the gallery items, or use auto to display the images next to each other. Shown for the Grid and Masonry styles.
Columns is a responsive setting: you can set a different value for desktop, tablet and mobile. Grid defaults to auto, Masonry to 3 columns.
Item Gap
Adjust the horizontal and vertical spacing between gallery items. Also a responsive setting, so you can tighten the spacing on smaller screens. Default: 10px. Available for every style except Slideshow.
Item Ordering
Select how the gallery items will be ordered.
- Default: Display the gallery items in the same order uploaded in the Gallery Manager. Drag and drop an image to change its order.
- Alphabetical: Displays the gallery items alphabetically based on the file name.
- Reverse alphabetical: Displays the gallery items in reverse alphabetical order based on the file name.
- Random: Displays the gallery items in random order.
Slideshow
In this section, you can configure your slideshow gallery.
Slides Per View
Set how many slides to display at the same time.
Examples:
To show 1 slide, enter: 1
To show 1 and a half slides, enter: 1.5
To show 2 slides, enter 2.
Navigation Controls
Select the type of navigation controls.
- Arrows: Displays previous and next arrows on top of the slideshow.
- Dots: Display dots below the slideshow, allowing you to choose a slide.
- Arrows + Dots: Display both arrows and dots pagination.
Transition Effect
Select the transition effect between slides.
Note: If Slides Per View is >= 2, the Slide effect will always be used automatically.
Theme Color
Define the base color scheme for the slideshow. Default: #fff.
Autoplay
Enable to automatically play the slideshow. This provides a hands-free viewing experience for users, increasing engagement with your content.
Autoplay Delay
Set the autoplay delay until the next slide appears, in milliseconds. Default: 3000.
Autoplay Progress
Enabling this setting displays a circular progress bar on the bottom-right hand side of each slide, indicating how long until the next slide appears.
Infinite Loop
Enable to seamlessly loop from the last slide back to the first. This prevents interruptions in the viewing experience, ensuring continuous engagement with your content.
Keyboard Control
Enable keyboard navigation for the slideshow. This allows users to navigate through the slideshow using the keyboard arrows, providing an alternative and convenient method of interaction.
Slideshow Size
Specify the size of the slideshow image:
- Maintain Original Image — use the uploaded image as it is
- Resize by Width — resize to a width, keeping the aspect ratio
- Resize by Height — resize to a height, keeping the aspect ratio
- Custom Size — crop the image to fit exact dimensions
Thumbnails
These settings appear when Style is set to Slideshow
Show Thumbnails
Enable this setting to display thumbnails below the slideshow.
Navigation Arrows
Choose whether to show navigation arrows in the thumbnails slider.
Thumbnail Size
Specify a value for the width and height of each thumbnail below the slideshow. Default: 120.
Lightbox
Define the lightbox settings for your gallery.
Enable Lightbox
Enable to view the lightbox image in a popup when clicking a thumbnail. This enhances the user experience by providing a convenient way to preview images without navigating away from the gallery page.
The lightbox uses Glightbox, which is 11kb gzipped, with no jQuery dependency.
Module as Caption
Select a module to display below the image in the lightbox popup, useful for reusable content or advertisements.
Watermark Images
In this section, you can define whether to apply a watermark text or image in your images (original image and thumbnails).
The watermark, will only be applied on the image uploaded. To apply the watermark on thumbnails, enable the Apply on thumbnails option.
Watermark Type
Select the type of the watermark.
- Text: Set a text to be used as watermark.
- Image: Select a custom image as watermark.
Watermark Text
Set the watermark text. You can either choose a predefined option — Site Name or Site URL — or enter a custom text.
Custom Text
Enter the text to be used as a watermark. Shown when Watermark Text is set to Custom. You can also use Smart Tags:
| Smart Tag | Example |
|---|---|
| {file.filename} | myfile |
| {file.basename} | myfile.png |
Color
Set the watermark text color.
Font Size
Select the font size for the watermark, specified in pixels. It dynamically adjusts to fit the dimensions of the gallery image. For instance, a font size of 50px suits large images such as 1024x800 pixels; for smaller images like 50x50 pixels, the font size adapts to ensure optimal visibility. Default: 30.
Image
Select the watermark image. It adjusts based on the gallery image's dimensions. For example, if the watermark is 800x800 pixels, it fits correctly on a 1024x1024 gallery image. If the gallery image is smaller, like 500x500 pixels, the watermark scales down proportionally to fit.
Position
Set the watermark position in the image.
Available positions:
- Top Left
- Top Center
- Top Right
- Middle Left
- Center
- Middle Right
- Bottom Left
- Bottom Center
- Bottom Right
Opacity
Adjust the transparency of the watermark. This helps strike the right balance between visibility and subtlety. Default: 50.
Rotation
Rotate the watermark clockwise by entering the angle in degrees. Default: 0.
Apply on thumbnails
Set whether to apply the watermark on thumbnails.
Filtering Tags
Select whether to disable the filtering tags, or show a list of tags above or below the gallery items. This will allow your users to filter the gallery items by tag.
Sort Tags
Select how the tags will be sorted. Either in the default selected way, alphabetical, reverse alphabetical, or in a random order.
All Tags Label
Enter a label to add an "All" item at the start of the tags filter list, allowing you to view all gallery items. Leave this empty if you don't want to display an "All" item.
You can make this multilingual by setting it to a translation string.
Tags on Mobile
Set whether to display the tags on mobile devices, make them appear as a dropdown or disable them.
Text Color
Set the tags default text color.
Text Color - Hover
Set the tags text color on hover.
Background Color - Hover
Set the tags background color on hover.
Conditional Logic
Using Conditional logic, you can fine-tune when your custom field appears on your site, by specifying some criteria, such as when the user is viewing your site from a mobile device, whether they are viewing a specific page if Google referred them, and more! The possibilities are endless.
When editing a custom field, you can configure when your custom field will appear by going into the Display Conditions tab.
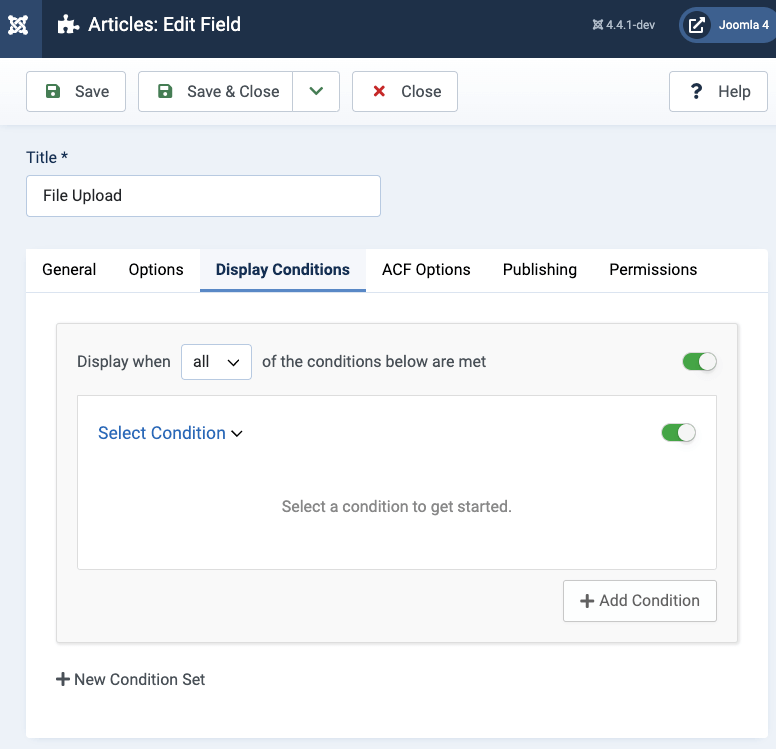
Once on the Display Conditions tab, you can configure when your custom field appears. Leaving the condition logic empty, tells Advanced Custom Fields to display the custom field site-wide.
Uploading Images
Once your ACF - Gallery custom field is configured, it's time to upload images. In this section, we will explain how the Gallery works.
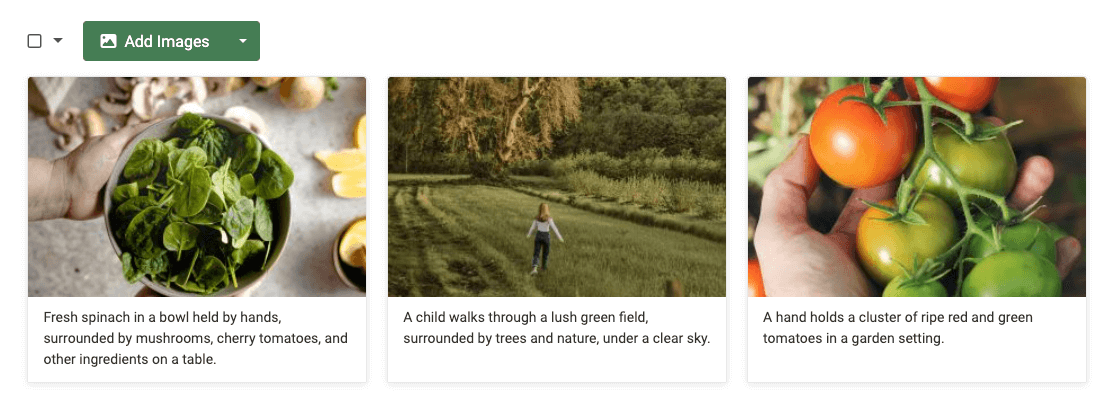
The uploader, by default, will look like this:
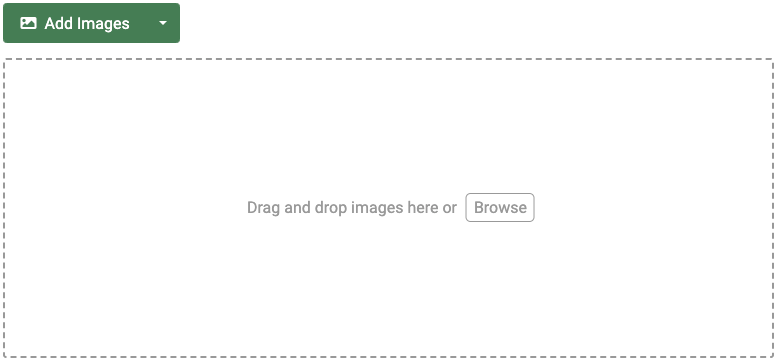
You can upload images using three different ways:
- Drag and drop images from your computer into the uploader
- Click on the ADD IMAGES green button and select the images you'd like to upload.
- Click on the down arrow next to the ADD IMAGES green button and click Browse Media Library to select images from your Joomla Media Library.
You may upload multiple images simultaneously; however, remember that the total file limit limits this.
After you have uploaded a few images, you should see a grid of all uploaded images.
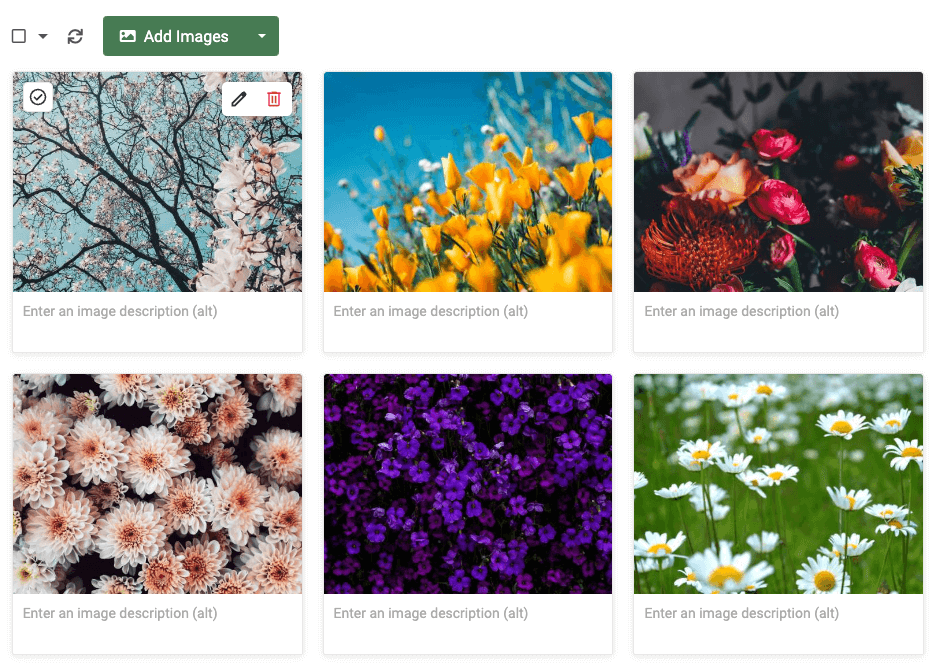
To ensure the uploaded images are uploaded correctly, the images should appear without any error messages. However, if there is an error message, the image can't be uploaded.
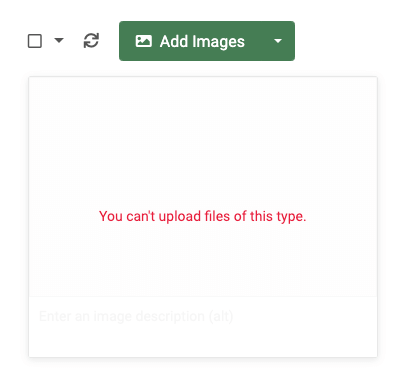
Here are some reasons this may occur:
- The uploaded image is larger than the maximum allowed file size.
- The uploaded image is not allowed based on the allowed file types.
- You have reached the maximum allowed images limit.
Set image description (alt) for your images
Setting the image description (alt) for your images, enhances SEO by providing search engines with relevant information about the image, improving accessibility for users with visual impairments, and ensuring a positive user experience by displaying descriptive text when images cannot be loaded.
To set the image description (alt), you have two options:
Option 1: Set the image description (alt) below the gallery image, in the textarea field:
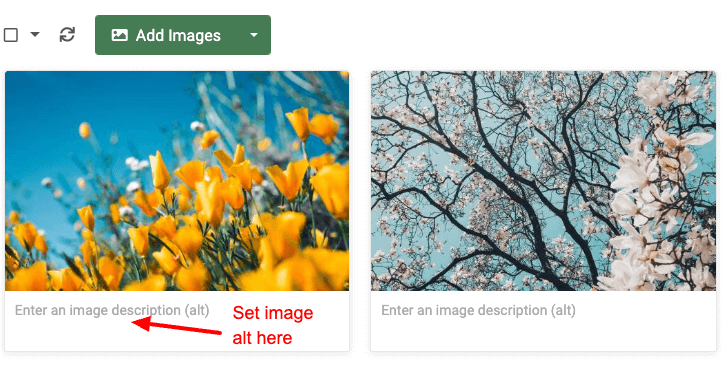
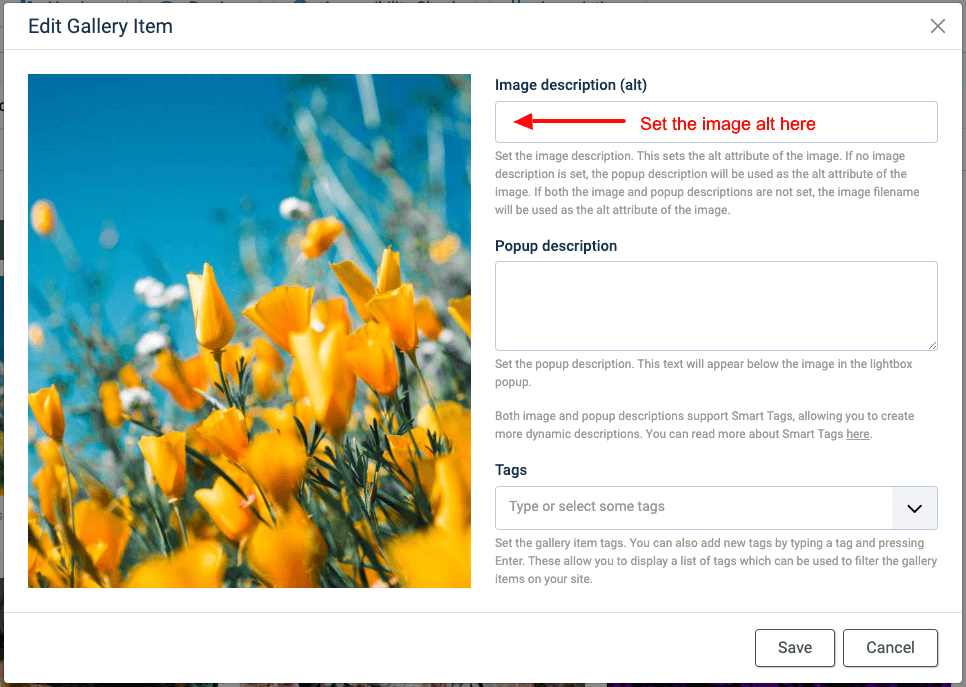
Option 2: Set the image description (alt) by hovering over the gallery item > click the Pencil (edit) icon > in the edit modal that will appear, type in the image description (alt) in the respective field:
Set custom caption for your images
To set a custom caption that will appear when you open the image in the lightbox popup, follow the steps below.
Hover over the gallery item > click the Pencil (edit) icon > in the edit modal that will appear, type in the popup description in the respective field.
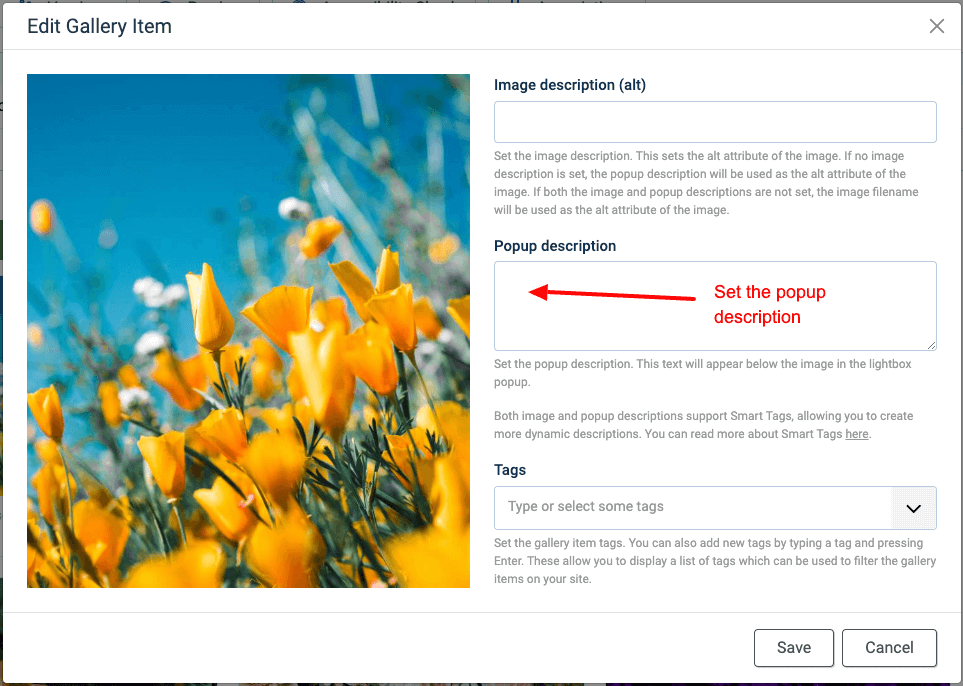
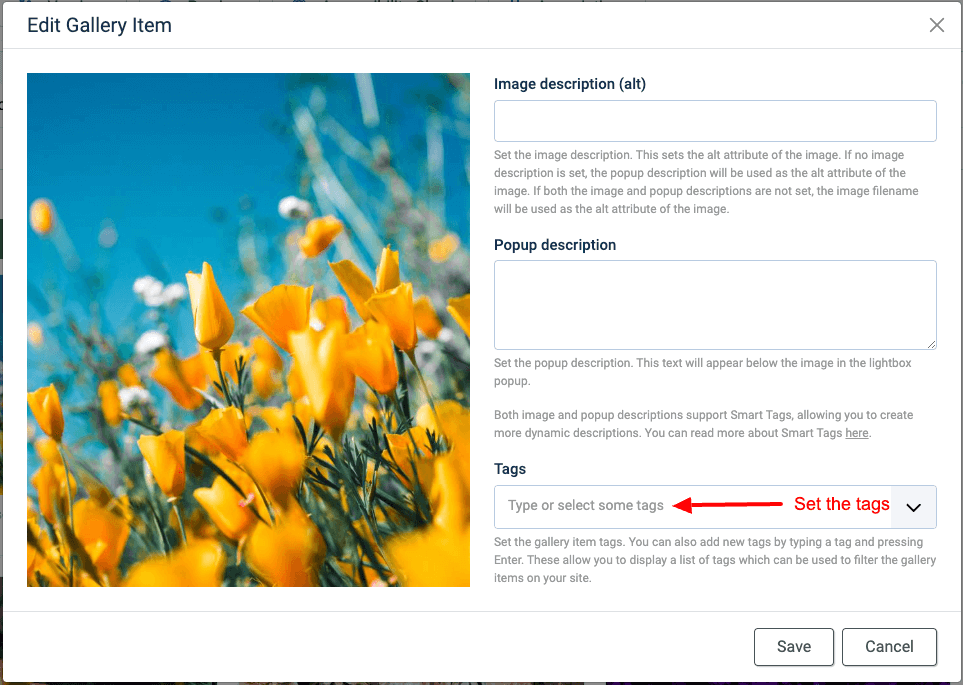
Set tags for your images
To tag your image, where the tags can appear above/below the gallery items, after enabling the setting "Filtering Tags" in the custom field settings, follow the steps below.
Hover over the gallery item > click the Pencil (edit) icon > in the edit modal that will appear, add your tags in the respective field.
How to generate image descriptions using AI
Long gone are the times when you manually had to set image descriptions (alt text) for the uploaded gallery items. Using AI, you can now generate image descriptions with the click of a button, by letting AI do its magic.
Before we get started, please set up your Open AI key by following this guide How to enable AI Features in Tassos extensions.
How to generate image descriptions on a specific gallery item
To generate an image description using AI, find a gallery item, hover over the image description textarea, and click on the "AI magic" button that appears.
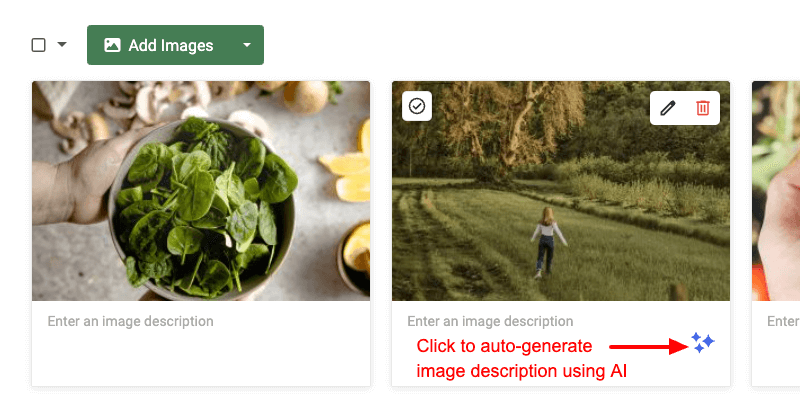
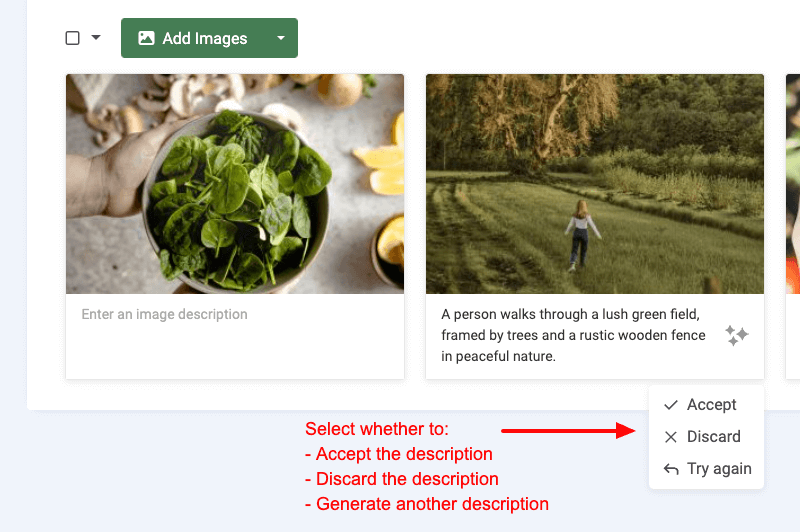
Upon clicking it, it will automatically start generating the image description for you. When it finishes loading, the image description will appear in the textarea, allowing you to perform three actions:
- Accept the generated image description
- Discard the generated image description
- Or try again, by generating a new image description.
How to generate image descriptions on all gallery items
Generating image descriptions one by one can be a tedious job when your gallery contains a lot of images. For this reason, we've implemented one button to do this job for all selected images.
Simply select the images you want to generate an image description, and at the top of the gallery, you will find the same "AI magic" button. Upon clicking it, it will prompt you to confirm that you want to generate an image description for all selected images.
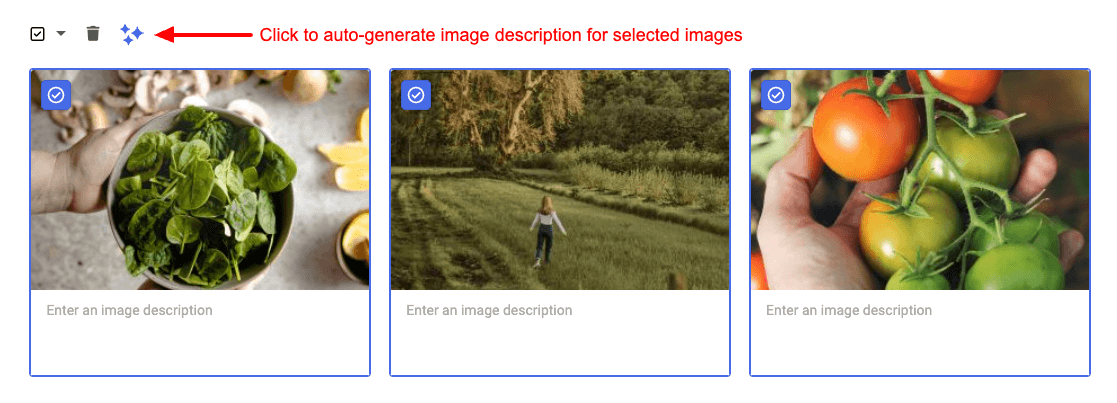
When it finishes generating the image description, all gallery items should contain their descriptions.
Use Cases
The Gallery Field can be used with any component that supports the Joomla! Fields such as the Articles (com_content), User (com_user), and the Contact (com_contact) component. Now that we've seen how to create an ACF - Gallery custom field, let's see a use case.
How to add a Gallery Field to Joomla! Articles
In this use case, our website provides articles about flowers, and we want to display an image gallery for each article. To do so, we need to upload our images to the ACF - Gallery field on the article's editing page in the backend, and website visitors can see our gallery on the front end.
Step 1: Create a new Gallery Field
Go to Content → Fields, click New to create a new field. From the Type dropdown, select the ACF - Gallery option.
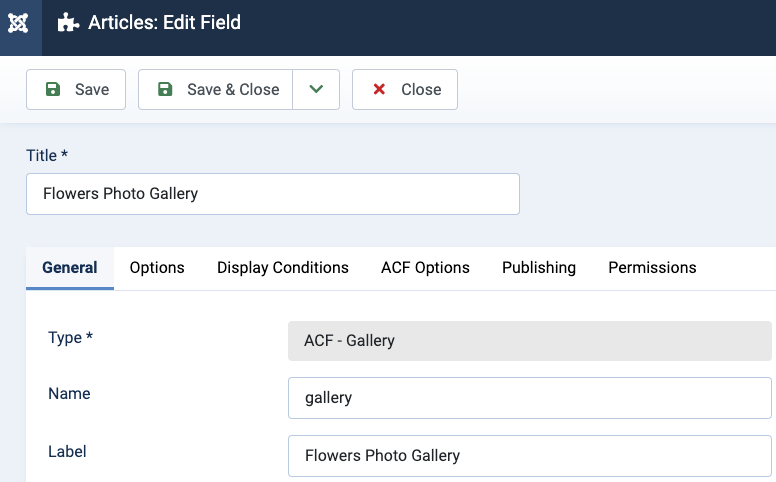
Click to save the field to return to the same page where, now, you can see two new setting groups.
Step 2: Set the gallery upload folder
In the first group of options, called “Upload Settings”, we can set where to store our uploaded photos and the rules and restrictions on the files allowed to be uploaded by our field. In our case, we are going to use the default options.
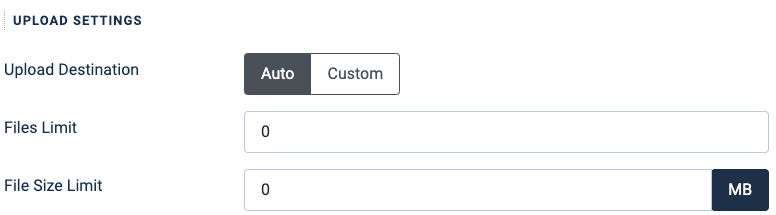
- Set Upload Destination to Auto.
- Set Files Limit to 0
- Set File Size Limit to 0 MB
Step 3: Configure the photo gallery to be displayed in a Grid layout
In the second group of options called “Theme”, we can define the layout for our photo gallery on the front end. In our case, we will use the well-known and typical Grid layout.
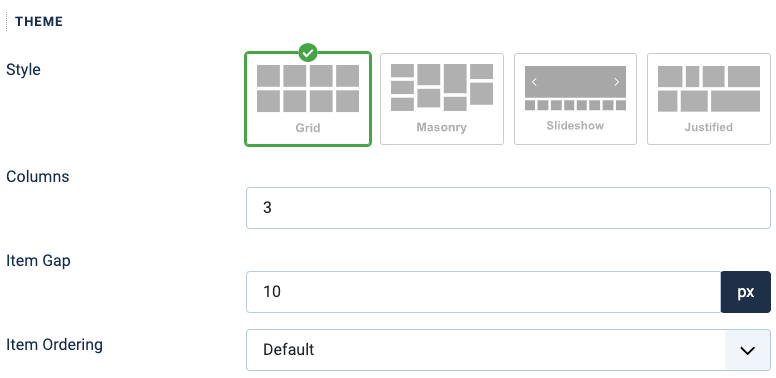
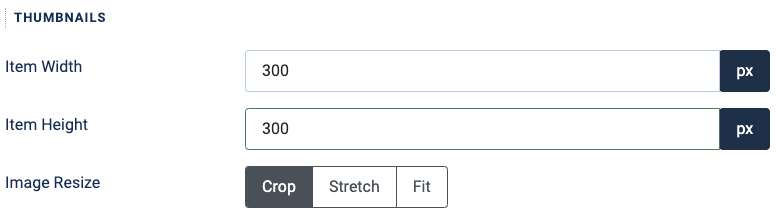
Step 4: Set the size of the thumbnail images
Next, we need to configure the size and quality of the gallery thumbnail photos. In our case, we would like all thumbnails to have the same size.
- Set the Width option to 300px
- Set the Height option to 300px
- Select Crop in the Resize Method
Step 5: Optimize the original image (Optional)
In the next group of settings, we can set whether to optimize the original photos uploaded by the user to increase loading speed and free up storage space. This is the fullscreen image your users see in the lightbox popup. In our case, we will enable it and resize all images to 1920px width.

Step 6: Enable the Lightbox option
In the next group of options called “Lightbox Popup”, we can allow the user to click on a thumbnail and display the full image in a lightbox popup. In our case, click to enable this option.

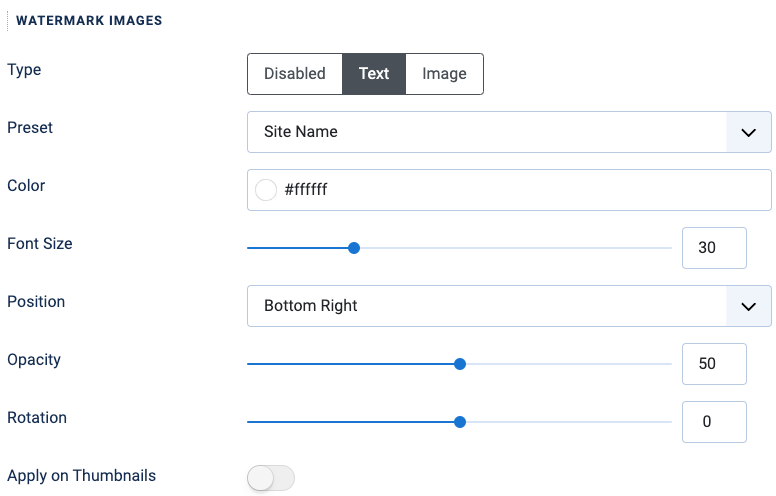
Step 7: Apply a watermark to images (Optional)
In this step, we can apply a watermark on our images, if we don't need them to be easily copied and used by third parties. In this case, we set our site's name to be used as the watermark, and it will be positioned at the bottom right of each image.
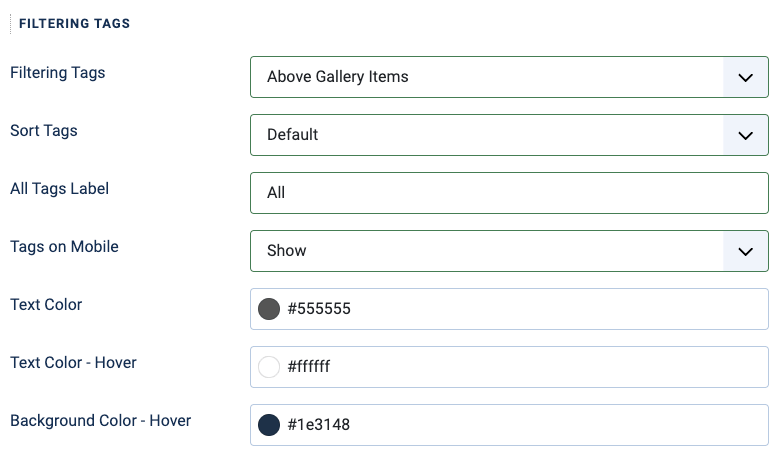
Step 8: Enable Filtering Tags (Optional)
Enabling Filter Tags allows you to display the tags set on each gallery item as a list above or below your gallery, allowing your visitors to filter the gallery items based on the selected tags.
Save the field and proceed to the next step.
Step 9: Upload your images in your Joomla! article
Now that we have our Gallery field properly configured, we should see it on the article's editing page. Head over to Joomla Content and click to edit the article you want to attach to the photo gallery. In most cases, the Gallery Field should be in the Fields tab. Once there, click Add Images to select photos from your computer.
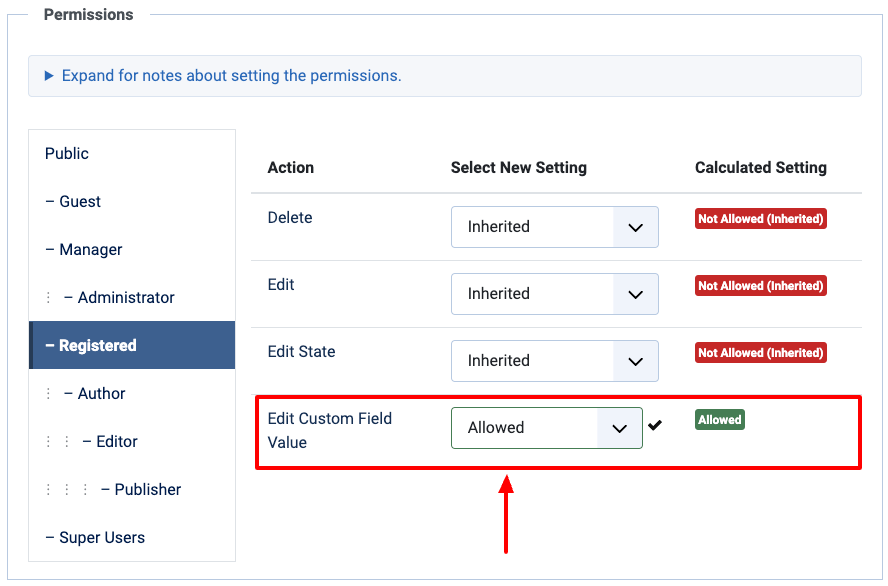
In case the field is displayed disabled in the form, and you're not allowed to upload files, you probably don't have the right permissions to edit the content of the field. To fix it, you must set the Edit Custom Field Value option to Allowed in the Permissions tab in the Field settings and the Content component configuration page.
You’re now done! Once you’ve finished uploading your photos, save the article and go to your front end to enjoy your photo gallery.
To-do list
Advanced Custom Fields is regularly updated with new features and bug fixes. The roadmap is quite packed with new features, and enhancements. Find out the upcoming new features by visiting the Roadmap page.
Frequently Asked Questions
ACF Gallery is a perfect solution for photographers, designers, bloggers, and small businesses. If you want to create a beautiful Joomla gallery, you need the ACF Gallery plugin.
ACF Gallery is part of the Advanced Custom Fields extension. To use ACF Gallery, you must have a Joomla 3.7 version or later site and the Advanced Custom Fields extension installed. That’s all.
Absolutely not. ACF Gallery is carefully built with performance in mind. We have tested it on extremely high-traffic websites to ensure that it scales without having any performance issues.
Yes, ACF Gallery is both responsive and mobile-ready, which will adapt to the device it is being viewed, ensuring that the photo galleries look great on all devices.
The Lightbox Popup feature of ACF Gallery allows you to click on a thumbnail and display the full image in a lightbox popup. This feature is enabled by default and is based on Glightbox, a lightweight and dependency-free (no jQuery) lightbox script that is only 11kb gzipped. Additionally, you can choose a module to be displayed below the image’s caption in the lightbox popup and enable the optimization of the original image uploaded by the user to increase loading speed and free up storage space.
The justified layout expects images in different dimensions, such as portraits and landscapes. The logic behind the justified layout is that all images will be resized by a specific height (thus, all images will have different widths but the same height, as set in the Row Target Height setting). The justified layout will automatically fit all images nicely together.
You may notice that not all justified gallery rows have the same height. The reason is that the height set under "Row Target Height" is the lever we use to fit everything nicely. The algorithm will get as close to the target row height as possible.
Also, images will not stretch to fit a single row when there is extra space due to missing images.
ACF Gallery supports uploading images in the webp format. However, it does not yet support generating gallery images in the webp format. That'll come in a future update.
With the ACF - Gallery custom field, you can create a slideshow gallery to present your images in a carousel. It provides essential customizable options as well thumbnails for easier navigation.
Can I override the field's layout?
To override the custom field layout, consult the following documentation pages:
Is there any list with all available Joomla Fields?
Advanced Custom Fields consists of over 30 custom fields, and you can find more about each one by clicking here: Advanced Custom Fields Collection.
How to add Custom CSS to your Joomla Custom Fields
You can easily add Custom CSS to your pages when a Joomla custom field appears, using ACF Options. You can read more here: How to add Custom CSS to your Joomla Custom Fields.
Can I use it with YooTheme?
All Advanced Custom Fields are YooTheme compatible and can be used with YooTheme Pro Dynamic Content, meaning you can create pages in YooTheme that used as source, any custom field created by Advanced Custom Fields. You can read more here: How to use Advanced Custom Fields with YooTheme Pro Dynamic Content .
I have more questions. Can you help?
If you have further questions after reading this documentation, we suggest you look into our general Frequently Asked Questions page for Advanced Custom Fields, and if your question is still not answered, contact us by clicking here.
Troubleshooting
Lightbox popup images appear in incorrect size
The reason your images appear at the incorrect size in the lightbox popup could be that your ACF Gallery field settings > Upload Folder points to the "images" directory, which also has the "Create thumbnails" toggle enabled in the "FileSystem - Local" plugin. You should either disable the thumbnails generation in the "FileSystem - Local" plugin or change the ACF Gallery > Upload Folder directory.
Why do my gallery images not get updated after changing them?
If you're manually updating your gallery images (i.e. reuploading them via FTP or overriding them with changes), and have Cloudflare installed on your Joomla site, you must clear the cache in order to get the latest changes.
How to fix the error "Joomla\Filesystem\File::copy: Cannot find or read file"
This error may appear after saving your ACF Gallery custom field. The reasons why this appears can be found below:
- Your temp folder doesn't have valid permissions or has been changed to point to an invalid directory. Switching back to the default temp directory should resolve this issue.
Why when I batch copy categories, the gallery images don't get duplicated?
This is a limitation in Joomla's category batch copy feature as it doesn't let us copy custom field files like gallery images. As a workaround, open the category you want to duplicate and click Save as Copy instead. This will properly duplicate all your gallery images to the new category.
Gallery images disappear when I save the article
If the images you just added are gone after saving, with no error shown, a cache cleaning tool is probably emptying Joomla's temp folder in the middle of the save. Cache Cleaner's Empty tmp Folder option is the usual culprit. See Uploaded files disappear after saving for the fix.
Gallery Field is available in Pro
Unlock this and dozens of other powerful features by upgrading to Advanced Custom Fields Pro.
Unlock this feature
Last updated on Aug 4th 2026 17:08
In This Article
- Requirements
- Setting up Gallery Field
- Uploading Images
- How to generate image descriptions using AI
- Use Cases
- How to add a Gallery Field to Joomla! Articles
- Step 1: Create a new Gallery Field
- Step 2: Set the gallery upload folder
- Step 3: Configure the photo gallery to be displayed in a Grid layout
- Step 4: Set the size of the thumbnail images
- Step 5: Optimize the original image (Optional)
- Step 6: Enable the Lightbox option
- Step 7: Apply a watermark to images (Optional)
- Step 8: Enable Filtering Tags (Optional)
- Step 9: Upload your images in your Joomla! article
- To-do list
- Frequently Asked Questions
- Who should use it?
- What’s required to use it?
- Will it slow down my website?
- Is it responsive and mobile-ready?
- What is the Lightbox Popup feature of ACF Gallery?
- How does the justified layout work?
- Does it support the webp format?
- Can I create a Slideshow Gallery?
- Can I override the field's layout?
- Is there any list with all available Joomla Fields?
- How to add Custom CSS to your Joomla Custom Fields
- Can I use it with YooTheme?
- I have more questions. Can you help?
- Troubleshooting
- Lightbox popup images appear in incorrect size
- Why do my gallery images not get updated after changing them?
- How to fix the error "Joomla\Filesystem\File::copy: Cannot find or read file"
- Why when I batch copy categories, the gallery images don't get duplicated?
- Gallery images disappear when I save the article

Tassos offers a premium suite of Joomla extensions with 7 products and over 2.4 million downloads, providing reliable solutions since 2014.


 Rated:
Copyright © 2014 - 2026 - Smile Motive Development LP. All Rights Reserved.