-
- Managing Form Submissions
- Searching and Filtering Submissions
- Submission Context Tracking
- Customizing Submission Columns
- Editing Submissions
- Deleting Submissions
- Importing Submissions
- Exporting Submissions
- Exporting Submissions with a Webhook URL
- Tracking the User's IP Address
- Tracking the User's Country
- Disable Submission Storage
- Auto-Delete Old Submissions
- Auto-Save Each Submission to a JSON file
- Increment a Count on Each Submission
- Add a Unique ID to Each Submission
-
- Set up Auto-Responder Emails
- Email the Person Who Filled Out the Form
- Send an Email Only When a Checkbox Is Checked
- Attach the Submission PDF to Emails
- Send Email Based on Drop Down Selection
- Send Different Email Content Based on Form Responses
- Styling Emails with CSS
- Sending Plain-Text Alternative Body Emails
- Troubleshooting Email Delivery
- Tracking Sent Emails
- Resending Emails
-
- Browser Autocomplete for Form Fields
- Redirect to a Menu Item After Form Submission
- Show a Form Only to Logged-In Users
- Adding an “Other” Option
- Show or Hide Form Fields Based on User Joomla User Group
- Scroll the Page to the Top When a Long Form is Submitted
- Display Submissions Count for a Specific Form
- Populate Drop Down, Radio Buttons or Checkboxes with a CSV File
- Silently POST Submitted Data to Any API or URL
- Create a Custom Login Form
- Auto-Populate Fields with Article Data
- Add a placeholder text to a Dropdown field
- Create Multilingual Forms in Joomla
- Redirect User to a URL After Form Submission
- Importing and Exporting Forms
- Display Convert Forms in a popup
-
- Does Convert Forms Use Cookies?
- Minimum Time to Submit
- Restrict Form Submissions Based on IP
- Enforcing a Custom Password Policy in Convert Forms
- Add Cloudflare Turnstile to your Joomla Form
- Implement the Iubenda Consent Database in Joomla with Convert Forms
- Add Custom Validations to Fields and Forms
- Add Math Captcha to your Form
- Prevent a Field From Saving in the Database
- Add hCaptcha to your Form
- Enable Double Opt-in
- Allow Form Submissions in Specific Date Range
- Ensure a Unique Value is Entered Into a Field
- Block Form Submissions Containing Profanity (Bad Words)
- Block Email Addresses or Email Domains
- Honeypot
- Setting Up Google reCAPTCHA
- Create GDPR Compliant Forms
Create a Stripe Joomla Form
Would you like to collect payments with your form? You can now transform your form into a Stripe payment form where you can collect one-time payments. You can either redirect your customers to Stripe to complete the payment and return them back to your site to a thank you page, or even allow them to finalize the payment without them ever leaving your site.
How to create a Stripe form (3D Secure) - Recommended
This method allows you to accept Stripe payments but will redirect users to Stripe to finalize the payment. Once the user completes the payment, they will be redirected to your site.
Step 1: Create a form
Start by creating a new Form via Components > Convert Forms > Forms > New or edit an existing one. Once you are in your Form, you must add a few fields. Below, you can find all fields required for your Stripe form to work.
Step 2: Populate your form
I want my users to select the payment amount.
If you want your users to enter the amount for the payment, create a Number field with the following settings:
| Field Type | Field Name |
|---|---|
| Number | amount |
I want to define a fixed payment amount.
If you want your payment to have a fixed amount, create a Hidden field with the following settings:
| Field Type | Field Name | Field Value |
|---|---|---|
| Hidden | amount | 50 |
Replace the number 50 with the amount of your choice.
Step 4: Set your form to redirect
Go into the Submission tab > and set "Successful Submission Action" to "Redirect" and leave the Redirect URL empty.
Step 5: Get your API Keys
You will need to get your Stripe secret API keys. The secret API key is used to create the payment link from Stripe. You can find the key on Stripe's docs: Find your API Keys.
Step 6: Add custom code
Go to your Form > Behavior > PHP Scripts > After Form Submission and enter the following:
/**
 * Enter the currency. Should be a 3-letter lowercase value.
 * Find more: https://stripe.com/docs/currencies#presentment-currencies
 */
$currency = 'usd';

// Set the product name
$product_name = 'Product';

// Recurring Subscriptions
// Set the interval for recurring subscriptions. Possible values: day, week, month, year
$recurring_subscription_interval = '';

// The number of intervals between subscription billings. For example, if interval=month and interval_count=3, bills every 3 months.
$recurring_subscription_interval_count = 1;

// Set a description that appears under the Description tab in your Stripe Payments page for one-time payments only
$payment_description = 'Convert Forms payment';

// Enter the success URL
$success_url = 'https://site.com/thank-you/?checkout_id={CHECKOUT_SESSION_ID}';

// Enter your Secret API Key
$secret_api_key = 'sk_test_SECRET_KEY';

// Do not edit below
// Validate amount
if (empty($submission->params['amount']) || $submission->params['amount'] < 0) {
    throw new Exception('Please enter a valid amount.');
}

$finalAmount = $submission->params['amount'] * 100;

// Create the price object
$priceData = [
    'currency' => $currency,
    'unit_amount' => $finalAmount,
    'product_data' => [
        'name' => $product_name
    ]
];

if ($recurring_subscription_interval)
{
    $priceData['recurring']['interval'] = $recurring_subscription_interval;
    $priceData['recurring']['interval_count'] = $recurring_subscription_interval_count;
}

$headers = [
    'Authorization' => 'Bearer ' . $secret_api_key
];

$response = (new \Joomla\Http\HttpFactory())->getHttp()->post('https://api.stripe.com/v1/prices', http_build_query($priceData), $headers);

if ($response === null || $response->code !== 200) {
    throw new Exception('Couldn\'t create the price object. Please try again.');
}

$priceObject = json_decode($response->body);

$data = [
    'line_items' => [
        [
            'price' => $priceObject->id,
            'quantity' => 1
        ]
    ],
    'after_completion' => [
        'type' => 'redirect',
        'redirect' => [
            'url' => $success_url
        ]
    ]
];

if (!isset($priceData['recurring']))
{
    $data['payment_intent_data'] = [
        'description' => $payment_description
    ];
}

$headers = [
    'Authorization' => 'Bearer ' . $secret_api_key
];

if ($response === null || $response->code !== 200) {
    throw new Exception('Couldn\'t create the price object on Stripe. Please try again.');
}

$response = (new \Joomla\Http\HttpFactory())->getHttp()->post('https://api.stripe.com/v1/payment_links', http_build_query($data), $headers);

$paymentLinkObject = json_decode($response->body);

if ($response === null || $response->code !== 200) {
    throw new Exception($paymentLinkObject->error->message);
}

$submission->form->successurl = $paymentLinkObject->url;- Set the currency of the payment on $currency variable. You can find all Stripe supported currencies, here
- Set the product name in the $product_name variable.
- Set the payment description in the $payment_description variable. This works only for one-time payments.
- Set the success URL in the $success_url variable.
- Set your Stripe Secret API Key on $secret_api_key variable.
Setting recurring payments
To create a recurring payment set the following variables:
- Set the subscription interval in the $recurring_subscription_interval variable. Possible values: day, week, month, year
- Set the subscription interval count in the $recurring_subscription_interval_count variable. For example, if interval=month and interval_count=3, bills every 3 months.
Your form is now ready to accept payments.
How to create a Stripe form
This method doesn't require your users to leave your site to finalize the payment, but it also has limitations in terms of not accepting cards that require extra verification via 3D Secure.
Step 1: Create a form
Start by creating a new Form via Components > Convert Forms > Forms > New or edit an existing one. Once you are in your Form, you must add a few fields. Below, you can find all fields required for your Stripe form to work.
Step 2: Populate your form
I want my users to select the payment amount.
If you want your users to enter the amount for the payment, create a Number field with the following settings:
| Field Type | Field Name |
|---|---|
| Number | amount |
I want to define a fixed payment amount.
If you want your payment to have a fixed amount, create a Hidden field with the following settings:
| Field Type | Field Name | Field Value |
|---|---|---|
| Hidden | amount | 50 |
Replace the number 50 with the amount of your choice.
You will also need to create the following fields:
| Field Type | Field Name |
|---|---|
| Hidden | stripeToken |
| Field Type | CSS Class |
|---|---|
| HTML | cf-card-element |
| HTML | cf-card-errors |
Step 3: Get your API Keys
You will need to get your Stripe publishable and secret API keys. The publishable API key displays the form on your site, whereas the secret API key is used to make the payment request to Stripe. You can find both keys on Stripe's docs: Find your API Keys.
Step 4: Add custom code
Go to your Form > Design > Advanced > Custom CSS and enter the following:
.cf-card-errors {
	display: none;
	margin: 3px 9px;
	border: 1px solid currentColor;
	color: #ff0000;
}

.cf-card-errors.is-visible {
	display: block;
}
Go to your Form > Behavior > PHP Scripts > Form Prepare and add:
$doc->addScript('https://js.stripe.com/v3/');Go to your Form > Design > Advanced > Custom Javascript and enter the following:
// Enter your Form's ID
var cf_form_id = 170;

// Enter your Stripe Publishable Key
var cf_stripe_publishable_key = 'pk_test_PUBLISHABLE_KEY';

// Do not edit below
document.addEventListener('DOMContentLoaded', function(e) {
	var stripe = Stripe(cf_stripe_publishable_key);
	var elements = stripe.elements();

	// Create an instance of the card Element.
	var card = elements.create('card');

	// Add an instance of the card Element into the `cf-card-element` element.
	card.mount('.cf-card-element');

	var form = document.querySelector("#cf_" + cf_form_id);
	form.querySelector('button[type="submit"]').addEventListener("click", function(event) {
		event.preventDefault();

		// form is working
		form.classList.add('cf-working');
		form.classList.add('cf-disabled');

		var errorElement = document.querySelector('.cf-card-errors');

		// store card options
		var card_options = {};

		// Check whether we have a card holder
		var card_holder = form.querySelector('input[type="text"].cf-card-holder');
		if (card_holder) {
			card_options.name = card_holder.value;
		}

		stripe.createToken(card, card_options).then(function(result) {
			// reset form
			form.classList.remove('cf-working');
			form.classList.remove('cf-disabled');

			if (result.error) {
				// Inform the customer that there was an error.
				errorElement.classList.add('is-visible');
				errorElement.innerHTML = result.error.message;
			} else {
				errorElement.classList.remove('is-visible');

				// Save token ID into the form so it gets submitted to the server
				form.querySelector('input[name="cf[stripeToken]"]').value = result.token.id;

				// submit form
				form.ConvertForms.submit(event);
			}
		});
	});

	// Clear stripe field values on success
	form.addEventListener("success", function(event) {
		card.clear();
	});
});- Set your form ID on variable cf_form_id.
- Set your Stripe Publishable API Key on variable cf_stripe_publishable_key
Go to your Form > Behavior > PHP Scripts > After Form Submission and enter the following:
/**
 * Enter the currency. Should be a 3-letter lowercase value.
 * Find more: https://stripe.com/docs/currencies#presentment-currencies
 */
$currency = 'usd';

// Enter your Secret API Key
$secret_api_key = 'sk_test_SECRET_KEY';

/**
 * (Optional) Add a description to the transaction.
 *
 * Useful as you can pass user-submitted data and know which user made this transaction.
 */
$payment_description = 'Transaction made by Convert Forms';

// Do not edit below
// Validate amount
if (empty($submission->params['amount']) || $submission->params['amount'] < 0)
{
	throw new Exception('Please enter a valid amount.');
}

// Validate stripe token
if (empty($submission->params['stripeToken']))
{
	throw new Exception('Could not verify credit card details. Please try again.');
}

$data = [
	'amount' => $submission->params['amount'] * 100,
	'currency' => $currency,
	'source' => $submission->params['stripeToken']
];

// add a description to the payment
if (!empty($payment_description))
{
	$data['description'] = $payment_description;
}

// add email address where the receipt will be sent
if (isset($submission->params['receipt_email']))
{
	$data['receipt_email'] = $submission->params['receipt_email'];
}

$headers = array(
	'Authorization' => 'Bearer ' . $secret_api_key,
);

$response = (new \Joomla\Http\HttpFactory())->getHttp()->post('https://api.stripe.com/v1/charges', http_build_query($data), $headers);

// If an error HTTP code was returned, show the error
if ($response->code != 200 && $response->code != 100)
{
	$error = json_decode($response->body);
	throw new Exception($error->error->message);
}- Set the currency of the payment on $currency variable. You can find all Stripe supported currencies, here
- Set your Stripe Secret API Key on $secret_api_key variable.
- You may pass a description alongside each payment by setting a value to the variable $payment_description.
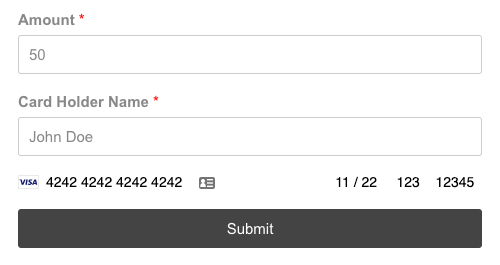
Stripe Form Preview
Below you can see how your Stripe form can appear.
Frequently Asked Questions
How can I store the card holder's name?
To save the card holder name, create a field with the following settings:
| Field Type | Field Name | Input CSS Class |
|---|---|---|
| Text | card_holder | cf-card-holder |
The cardholder's name will now automatically be synced with each payment.
How can I send the receipt to the customer?
To automatically send the charge receipt to your customer, you must create either a hidden or a text field to store the user's email address. Field settings can be found below:
| Field Type | Field Name |
|---|---|
| Text or Hidden | receipt_email |
You may utilize Smart Tags if the form appears to registered users to automatically fill it with your users email address.
Can I calculate the amount based on field values?
Whether you have a simple or a complex calculation, using the Field Calculations you can now pass the calculated total as the amount to your payment or donation.
How can I include an idempotency key to prevent duplicate submissions?
The idempotency key helps prevent accidentally performing the same charge twice. You can read more on Stripe's documentation, here.
To include an idempotency key, replace:
$headers = [
	'Authorization' => 'Bearer ' . $secret_api_key
];
with:
$headers = [
	'Authorization' => 'Bearer ' . $secret_api_key,
	'Idempotency-Key' => uniqid('cf_submission_' . $submission->id)
];
This will automatically add a unique ID as the idempotency key ensuring its uniqueness given the submission ID.
Why is my card declined and requires authentication?
The method described above provides just the bare minimum to perform a Stripe payment and does not support 3DSecure, which is a way to validate that the person performing the purchase is the card owner. This will be supported in the future once we implement Payment Gateways.


 Rated: