

-
- Managing Form Submissions
- Searching and Filtering Submissions
- Submission Context Tracking
- Customizing Submission Columns
- Editing Submissions
- Deleting Submissions
- Importing Submissions
- Exporting Submissions
- Exporting Submissions with a Webhook URL
- Tracking the User's IP Address
- Tracking the User's Country
- Disable Submission Storage
- Auto-Delete Old Submissions
- Auto-Save Each Submission to a JSON file
- Increment a Count on Each Submission
- Add a Unique ID to Each Submission
-
- Email the Person Who Filled Out the Form
- Send an Email Only When a Checkbox Is Checked
- Attach the Submission PDF to Emails
- Send Email Based on Drop Down Selection
- Send Different Email Content Based on Form Responses
- Set up Auto-Responder Emails
- Styling Emails with CSS
- Sending Plain-Text Alternative Body Emails
- Troubleshooting Email Delivery
- Tracking Sent Emails
- Resending Emails
-
- Browser Autocomplete for Form Fields
- Redirect to a Menu Item After Form Submission
- Show a Form Only to Logged-In Users
- Adding an “Other” Option
- Show or Hide Form Fields Based on User Joomla User Group
- Scroll the Page to the Top When a Long Form is Submitted
- Display Submissions Count for a Specific Form
- Populate Drop Down, Radio Buttons or Checkboxes with a CSV File
- Silently POST Submitted Data to Any API or URL
- Create a Custom Login Form
- Auto-Populate Fields with Article Data
- Add a placeholder text to a Dropdown field
- Create Multilingual Forms in Joomla
- Redirect User to a URL After Form Submission
- Importing and Exporting Forms
- Display Convert Forms in a popup
-
- Does Convert Forms Use Cookies?
- Minimum Time to Submit
- Restrict Form Submissions Based on IP
- Enforcing a Custom Password Policy in Convert Forms
- Add ALTCHA Proof of Work to your Joomla form
- Add Cloudflare Turnstile to your Joomla Form
- Implement the Iubenda Consent Database in Joomla with Convert Forms
- Add Custom Validations to Fields and Forms
- Add Math Captcha to your Form
- Prevent a Field From Saving in the Database
- Add hCaptcha to your Form
- Enable Double Opt-in
- Allow Form Submissions in Specific Date Range
- Ensure a Unique Value is Entered Into a Field
- Block Form Submissions Containing Profanity (Bad Words)
- Block Email Addresses or Email Domains
- Honeypot
- Setting Up Google reCAPTCHA
- Create GDPR Compliant Forms
File Upload Field
Let users upload documents, images, PDFs, audio, and other files with ease.
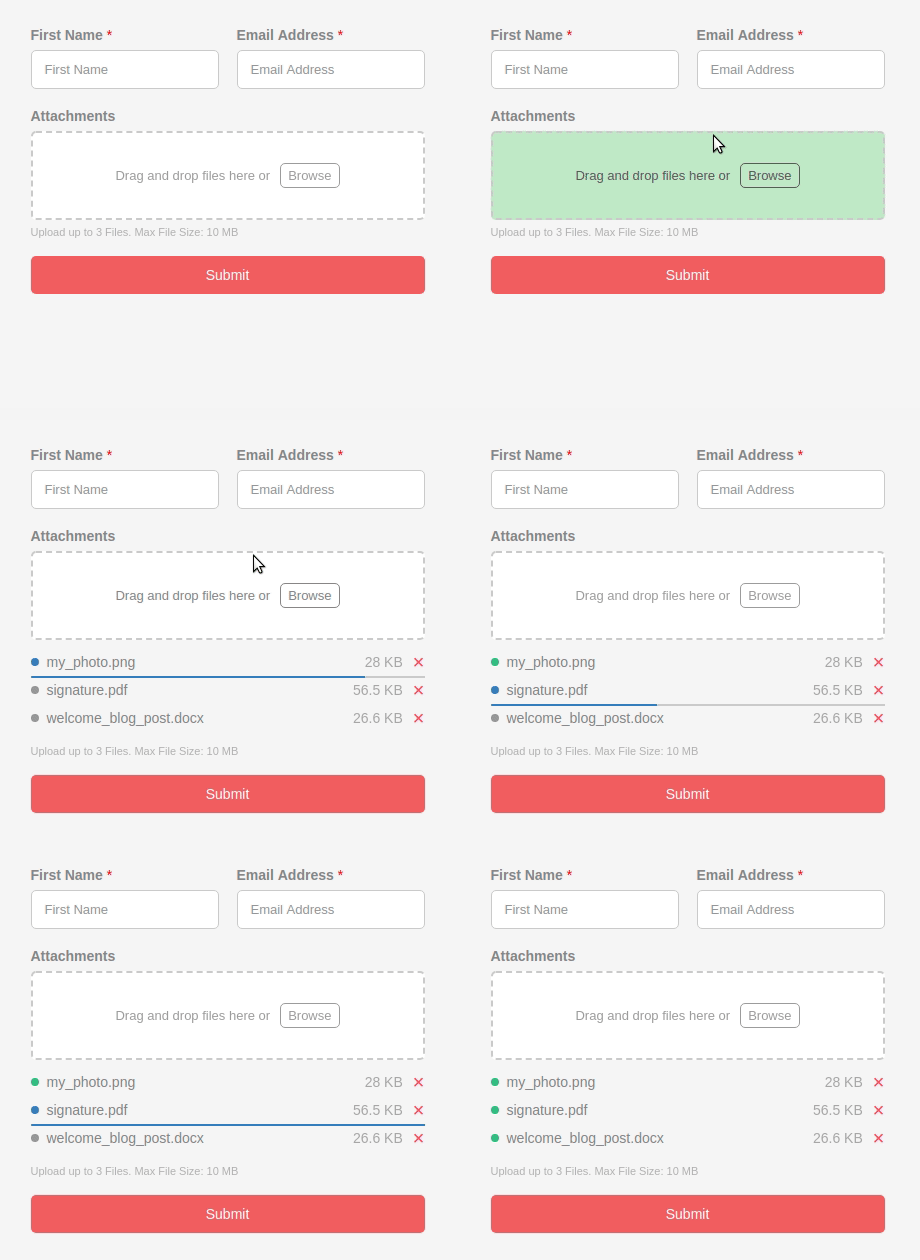
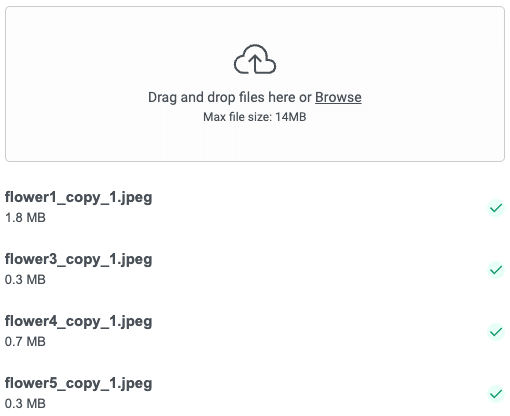
Do you want to allow users to upload files on your site? Convert Forms File Upload Field allows you to easily collect files and media through your Joomla! forms. Let's see how you can easily add an upload field to your form like in the screenshot below.
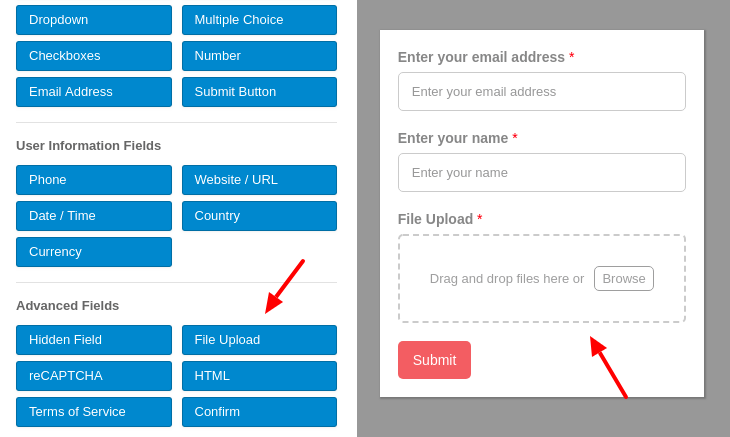
How to add a File Upload field
Convert Forms makes it easy to accept files from your website visitors. All you need to do is add the File Upload field to your form with just a single click.
How to Display Uploaded Files as a List or Thumbnails?
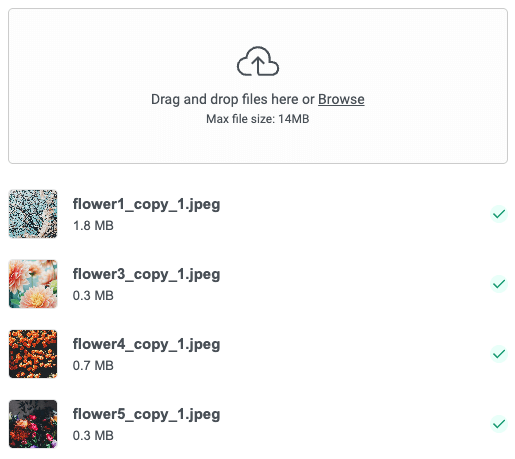
The Layout option lets you control how uploaded files are displayed within the File Upload field as the user fills out the form. This helps improve usability, especially when multiple files are uploaded.
You can choose between two layouts: List and Thumbnails.
Thumbnails Layout (Default)
The Thumbnails layout shows a small preview for each uploaded file.
If the uploaded file is an image, a preview will be displayed. For other file types, the uploader will show a small label indicating the file type (such as PDF, DOC, MP3, etc.) for the most common file formats.
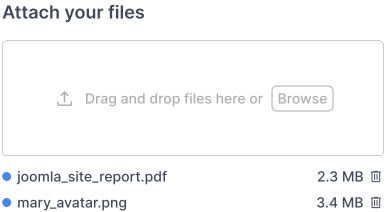
List Layout
The List layout displays uploaded files in a simple list showing the file name along with actions such as previewing or removing the file. This layout is often more convenient when users upload documents or other non-image files.
Where are uploaded files stored?
By default, the user-uploaded files are stored in the com_convertforms/uploads folder inside the media directory of your site.
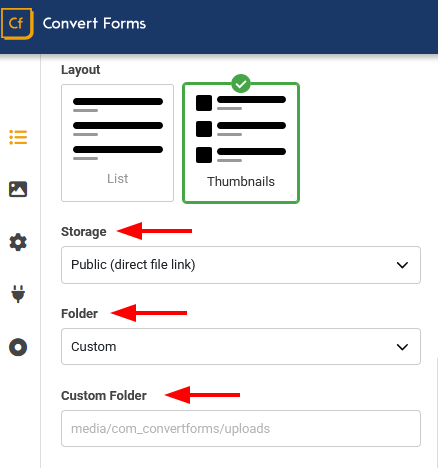
Two settings on the File Upload field control this: Storage and Folder.
Storage decides whether the file can be opened straight from a browser.
- Public (direct file link): the file is kept inside your site and has a normal URL. Anyone holding that URL can open it. This is the default, and the way Convert Forms has always worked.
- Private (secure download link): the file is kept in a folder outside your site, where your web server cannot serve it at all. Convert Forms delivers it through a download link that expires, and that you can limit to logged-in users. See Store uploads outside your site.
Folder decides which folder inside that storage the file goes to.
- Auto: Convert Forms picks the folder. Public files go to media/com_convertforms/uploads. Private files go to a folder named after the form, inside your Uploads Base Path. A random prefix is added to every file name.
- Custom: you pick the folder. With Public storage, enter a path relative to the root of your webspace in Custom Folder. With Private storage, enter a path relative to your Uploads Base Path in Subfolder. Make sure the path entered is writable, otherwise the file upload will fail.
Both fields accept Smart Tags. There are a few Custom Smart tags available such as {file.basename} which returns uploaded file name (cat.jpg), {file.extension} which returns the uploaded file extension (jpg), {file.filename} which returns the uploaded file name without the extension (cat), and {file.index} which returns the index number of the uploaded file (for example, if you upload 2 files, it will contain the number 1 and 2 respectively). Submission Smart Tags such as {submission.id} work too, so you can group every upload of one submission in its own folder.
Store uploads outside your site (Private storage)
A file kept inside your site has a URL of its own. Anyone who gets hold of that URL can open the file, even without an account on your site. For CVs, contracts, ID documents or medical forms, that is often not acceptable.
Private storage keeps the file in a folder outside your site. Your web server cannot reach that folder, so the file has no URL at all. Convert Forms serves the file itself, through a link that expires and that you can limit to logged-in users.
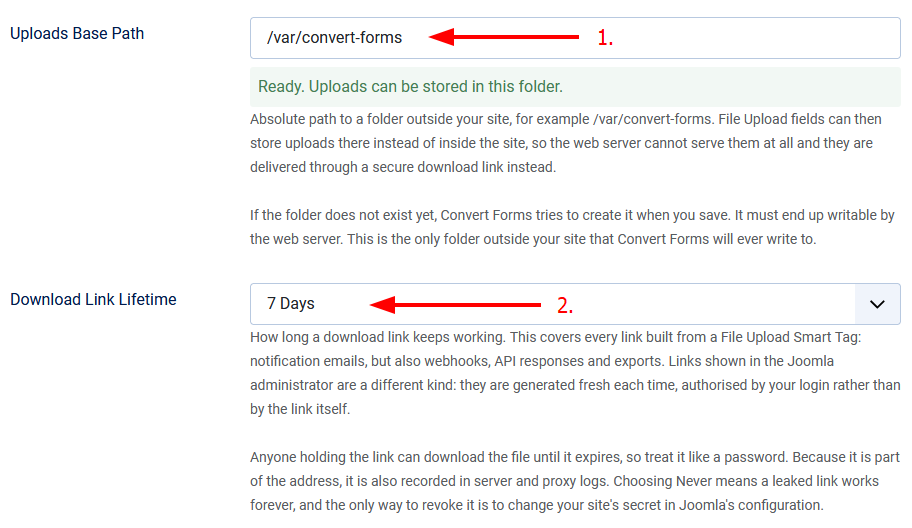
Step 1: Set the Uploads Base Path
Go to Convert Forms > Options > Security and set Uploads Base Path to an absolute path outside your site, for example /var/convert-forms. Then save.
Convert Forms checks the folder when you save, and tells you exactly what is wrong when it cannot use it. If the folder does not exist yet, Convert Forms tries to create it. It must end up writable by your web server. This is the only folder outside your site that Convert Forms ever writes to.
Step 2: Choose how long the link lives
The Download Link Lifetime option in Convert Forms > Options > Security sets how long a download link keeps working. You can pick 1 hour, 1 day, 7 days, 30 days, or Never Expires. The default is 7 days, and it applies to every link built from a File Upload Smart Tag.
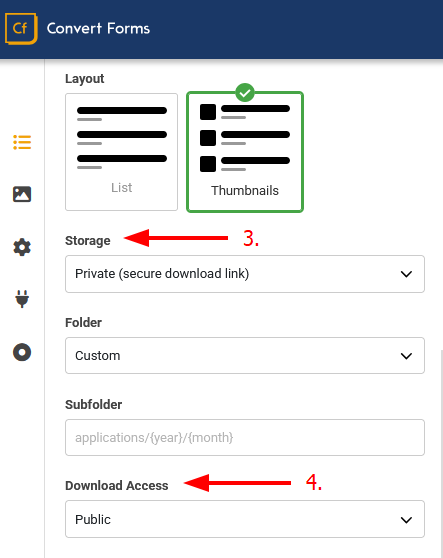
Step 3: Set the field to Private
Edit your form, click the File Upload field, and set Storage to "Private (secure download link)".
Leave Folder on "Auto" to store the files in a folder named after the form. Choose "Custom" instead to set your own Subfolder, such as applications/{year}/{month}. The subfolder is always taken relative to your Uploads Base Path, and it accepts Smart Tags just like a custom in-site folder does.
Step 4: Choose who may open the link
The Download Access setting takes a Joomla access level. "Public" means anyone holding the link, which is what a notification email normally needs. Any other level asks the visitor to log in first, and checks that their account holds that level.
Changing this takes effect at once, including for links you have already sent.
The settings from the four steps above, on the two screens where you find them:
How the secure download link works
An emailed link looks like this:
https://www.yoursite.com/contact/download?token=G42lQRR-1Y44lmJQrClPMXUnn-aTjKgF78wsSCTX2l231wuF7XThe token is an encrypted package. It holds the path of the file, the form and field it belongs to, and the date it expires. It is sealed with your own site secret, so only your site can read it, and nobody can change it without breaking it. The real path of the file never appears in the link, and nothing is stored in your database.
When somebody clicks the link, Convert Forms decrypts the token, checks that it has not expired, checks that the file is still inside your Uploads Base Path, and applies the Download Access level of the field. Only then does it send the file. Images open in the browser, so an uploaded photo still works inside an <img> tag. Every other file type is handed over as a download.
The link is built under the menu item of the form, so it follows your SEF settings. When the form has no menu item of its own, the link uses /component/convertforms/download?token=... instead.
Things to know about Private storage
- Files already uploaded are not moved. Switching a field from Public to Private only changes where the next uploads go. Files uploaded before the change keep their direct URLs.
- Switching back breaks nothing. Every file remembers how it was stored, so download links for older private files keep working after you set the field back to Public.
- You can move the base folder, but you must move the files. Links resolve against the Uploads Base Path that is set today. Change the setting, move the files yourself, and links already sent keep working. Convert Forms never moves the files for you, and it warns you how many submissions are affected before you save.
- Clearing the base path makes the files unreachable. The submissions keep their values, but no link can be built until you set an Uploads Base Path again.
- A field set to Private needs a base path. When none is set, the upload fails and the visitor sees a general upload error. The real reason is written to the Joomla log.
- Email attachments ignore Download Access. An attachment travels inside the message, so there is no link to protect. Only links are covered.
- Exported links expire too. Exports, webhooks and API responses carry the same kind of link, with the same lifetime. Export again to get fresh links.
- Links in the Joomla administrator are different. They are built fresh every time you open the submission, and they are authorised by your login instead of by a token.
- Auto Delete Files works the same for private files.
How to allow multiple file uploads?
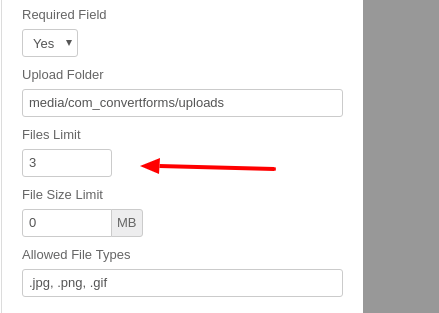
Convert Forms File Upload field supports multiple file uploads with a single field. To do so, go to the File Upload field settings and configure the Files Limit option accordingly. Enter 0 if you don't want any limit.
What is the maximum file size allowed for uploads?
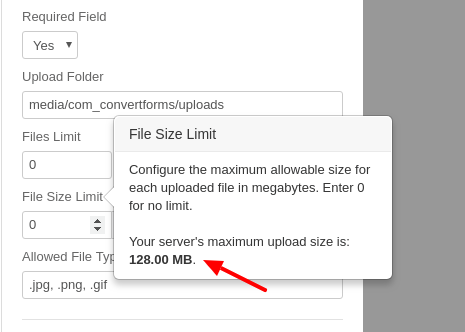
To find the maximum allowed file size, you can click on the File Upload field in the form builder. Then, from the Field Options panel, mouse over the the File Size Limit label. The tooltip will show the maximum file size that your server allows.
How to resize images?
Images uploaded by your users are, by default, saved as-is. This means that there's a high chance your users upload large image files, and you end up serving these images to your visitors, which increases page load times, which isn't ideal.
This is where resizing images comes into play. It helps optimize image sizes for faster loading times and improved site display.
The supported file types are JPG, PNG, WEBP.
Available options:
- Disabled: Do not resize images.
- By Width: Resizes the image based on its width, maintaining the aspect ratio.
- By Height: Resizes the image based on its height, maintaining the aspect ratio.
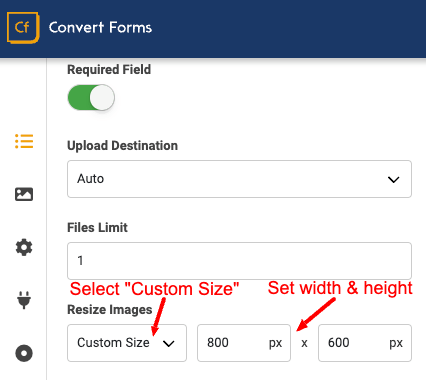
- Custom Size: Crops the image to the specified width and height, centered.
Image resizing happens when the form is submitted. When you resize by width or height, the aspect ratio is preserved. When the Custom Size option is selected, the image is resized to the specified dimensions and cropped. We only resize the original image, meaning no duplicate images are generated. Also, there is no upscaling happening to your images. The image will only be resized if larger than the specified dimensions.
Resize by Width
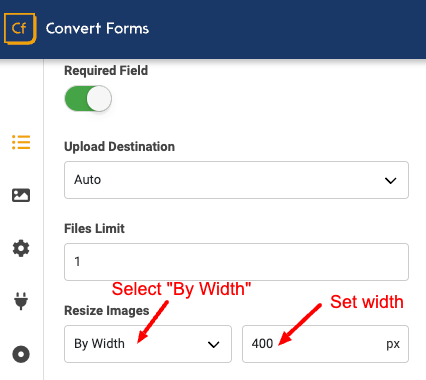
To resize the uploaded images to a specific width and maintain the aspect ratio, go to your form > File Upload field > Resize Images > Select "By Width" and specify the desired width.
Resize by Height
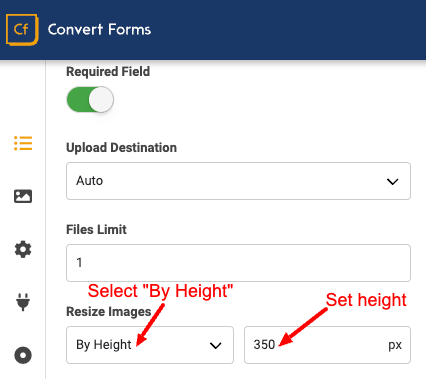
To resize the uploaded images to a specific height and maintain the aspect ratio, go into your form > File Upload field > Resize Images > Select "By Height" and specify the height you desire.
Resize by Custom Size
To resize the uploaded images to a specific width and height, which will resize the image to the specified dimensions and crop it, go into your form > File Upload field > Resize Images > Select "Custom Size" and specify the width and height you desire.
How to restrict certain file types?
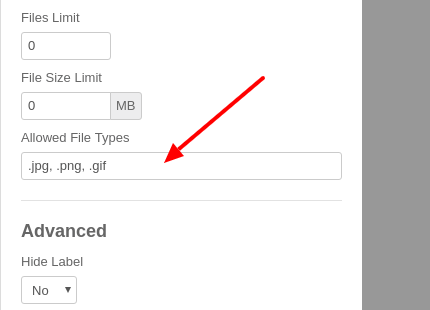
To restrict certain file types, click on the File Upload field in the form builder. In the Field Options panel there will a field called Allowed File Types. You can specify the extensions you’d like to allow, separated by a comma.
How to auto-delete old uploaded files?
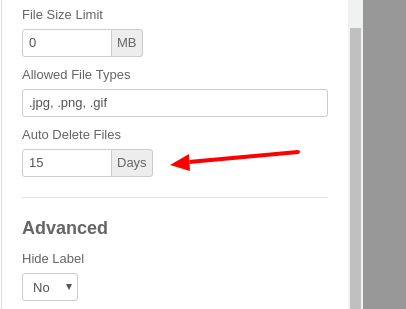
By default, files uploaded in a File Upload field will remain on your site indefinitely. If you are getting a lot of uploads, though, the server space used by the uploaded files can quickly mount up, requiring some regular housekeeping to free up space. Convert Forms can be configured to auto delete uploaded files after a period set in the Auto Delete Files option found in the File Upload settings.
For example, to auto-delete files more than 15 days old follow the steps below.
Step 1: Configure the field
Set the Auto Delete Files option to 15 and save your form.
Step 2: Enable the files cleaner plugin
Go to the Extensions → Manage and search for the System - Convert Forms Uploaded Files Cleaner plugin and click to activate it. If you have already enabled it, skip this step.
Step 3: Setup CRON job
You will need to create a CRON job on your server that will schedule the deletion of the files at regular intervals and automate the process for all forms that accepts file uploads. This CRON job must be created once per site. So, if you have already set it up, skip this step.
Below you can find the command you will need to add to your host's CRON interface:
wget "https://www.yoursite.com?option=com_convertforms&task=cron&command=uploadedfilescleaner&secret=SECRET_KEY”How to delete uploaded files right after the email is sent
Place the code into your form's PHP Scripts > After Form Submission area, and change the first line to the Name of your File Upload field (the field's Name, not its Label, as shown in the field settings).
// The File Upload field name whose files should be removed after the email is sent.
$upload_field = 'fileuploaded';

\Joomla\CMS\Factory::getApplication()->getDispatcher()->addListener(
    'onConvertFormsSubmissionAfterSave',
    function ($event) use ($upload_field)
    {
        $submission = $event instanceof \Joomla\Event\EventInterface ? $event->getArgument(0) : $event;
        $params     = array_change_key_case((array) $submission->params);

        $field_name = strtolower($upload_field);

        if (!isset($params[$field_name]))
        {
            return;
        }

        foreach ((array) $params[$field_name] as $stored_value)
        {
            // Resolves a private file against the Uploads Base Path, and an in-site file
            // against your site root. Returns an empty string when the path is not safe.
            $file = \ConvertForms\FileStorage::toAbsolutePath($stored_value);

            if ($file === '' || !is_file($file))
            {
                continue;
            }

            \Joomla\Filesystem\File::delete($file);
        }
    },
    \Joomla\Event\Priority::MIN
);
Update $upload_field with your File Upload field > Field Name value.
If the field allows more than one file, every file uploaded through it will be deleted.
The code deletes the file whichever storage the field uses. FileStorage::toAbsolutePath() resolves a private file against your Uploads Base Path, and an in-site file against your site root. It returns an empty string when the path is not safe, or when no Uploads Base Path is set, so nothing outside those two folders is ever touched.
Keep in mind that the submission still holds the name of the file after the deletion. The Joomla administrator, your exports and your Smart Tags all keep showing it, and opening it gives a 404. Delete the submission as well when you want no trace left.
How to include uploaded file on email?
In order to include an uploaded file on an Email Task, you will need to use the respective field Smart Tag {field.FIELD_NAME} as you would normally do with any field that you would like to pull its value. In the case of the File Upload Field, the Smart Tag will return the file's front-end URL.
When the field uses Private storage, the same Smart Tag returns a secure download link instead of a direct file URL. Every example below still works. Keep in mind that the link expires after the Download Link Lifetime you set, and that it obeys the Download Access level of the field. An attachment is not a link, so neither setting applies to it.
Let's see some examples:
Include file as attachment
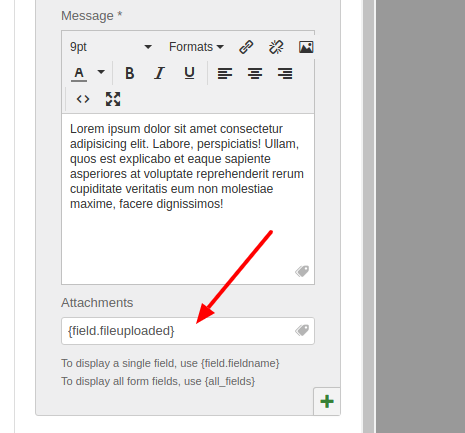
To include uploaded files as attachments in the Email Task, click on the Attachments setting, and in the dropdown that will appear, select the File Upload field, as seen below:
Display as a link
To receive an e-mail notification including a link pointing to a uploaded file, use the following code:
<a href="{field.fileuploaded}">{field.fileuploaded}</a>Display as a download link
There are cases where you'd like to download the file when clicking on the link (instead of navigating to the file). To make that happen you will need to add the download attribute to the <a> element like in the example:
<a href="{field.fileuploaded}" download>Download File</a>Display multiple uploaded files as a download link
The previous examples work for single-file Upload Fields only. In case of a multiple files Upload Fields where you don't know how many files the user has uploaded, you can use the {field.FIELDNAME.html} Smart Tag instead which will render each file as a download link.
{field.fileuploaded.html}This will output something like this:
<div class="cf-links">
    <div><a download href="http://site.com/files/img1.png">img1.png</a></div>
    <div><a download href="http://site.com/files/img2.png">img2.png</a></div>
    <div><a download href="http://site.com/files/img3.png">img3.png</a></div>
</div>
Display multiple uploaded files with custom HTML output
In case the previous shortcode does not fit your needs and you would like more control over the output HTML, there's a solution. Let's say you want to render the uploaded files like this:
<ul>
    <li><a href="https://site.com/files/file1.png" download>Download</a></li>
    <li><a href="https://site.com/files/file2.png" download>Download</a></li>
    <li><a href="https://site.com/files/file3.png" download>Download</a></li>
</ul>
To make this happen, use the following Smart Tag
<ul>
	{field.FIELDNAME.raw --layout=<li><a href="/%value%" download>Download</a></li>}
</ul>
Display as an image
Another case is where you would like to see a preview of the uploaded image. To do that, you just need to include an <img> element and add the respective Field Smart Tag to its src property.
<img src="{field.userimage}" width="500px" height="auto"/>This works with Private storage too. Convert Forms detects that the file is an image and shows it in the browser, instead of sending it as a download.
You can also have a downloadable preview image link
<a href="{field.userimage}" download>
	<img src="{field.userimage}" width="500px" height="auto"/>
</a>
To learn more details on how you can properly configure your forms to send an email on each form submission, visit the Email Notifications Guide.
How to upload to Dropbox, Google Drive or Amazon S3
Are you looking for a way to create an upload form that automatically sends a copy of the uploaded files to cloud storage systems such as Dropbox, Google Drive or even Amazon S3? Convert Forms got you covered. All you need to do, is to connect Convert Forms with Zapier.
To learn how to to make that happen, visit the How to connect Convert Forms with Zapier guide.
How to Rename Uploaded Files Using PHP
Are you looking for a way to rename uploaded files using PHP? Would you like to move uploaded files to a custom folder programmatically? You can use the code example below to make this happen:
$app->registerEvent('onConvertFormsFileUpload', function($event)
{
    [$filepath, $data] = $event->getArguments();

    $newFilepath = JPATH_SITE . '/images/customDir/' . basename($filepath);

     // Move file to the new folder and return the new filename
    $filepath = NRFramework\File::move($filepath, $newFilepath);

    $event->setArgument(0, $newFilepath);
});
Note: The code above must be placed into the PHP Scripts → Form Process
Translate the File Upload Field into your language
To display the default File Upload Field text into your language, you will need to do an override of the following language strings:
- NR_DRAG_AND_DROP_FILES_OR_BROWSE="Drag and drop files here or"
- NR_BROWSE="Browse"
- NR_MAX_FILE_SIZE="Max file size: %s"
To learn how to create a language override in Joomla, visit: https://docs.joomla.org/J3.x:Language_Overrides_in_Joomla
Editing / Viewing File Uploads in the backend
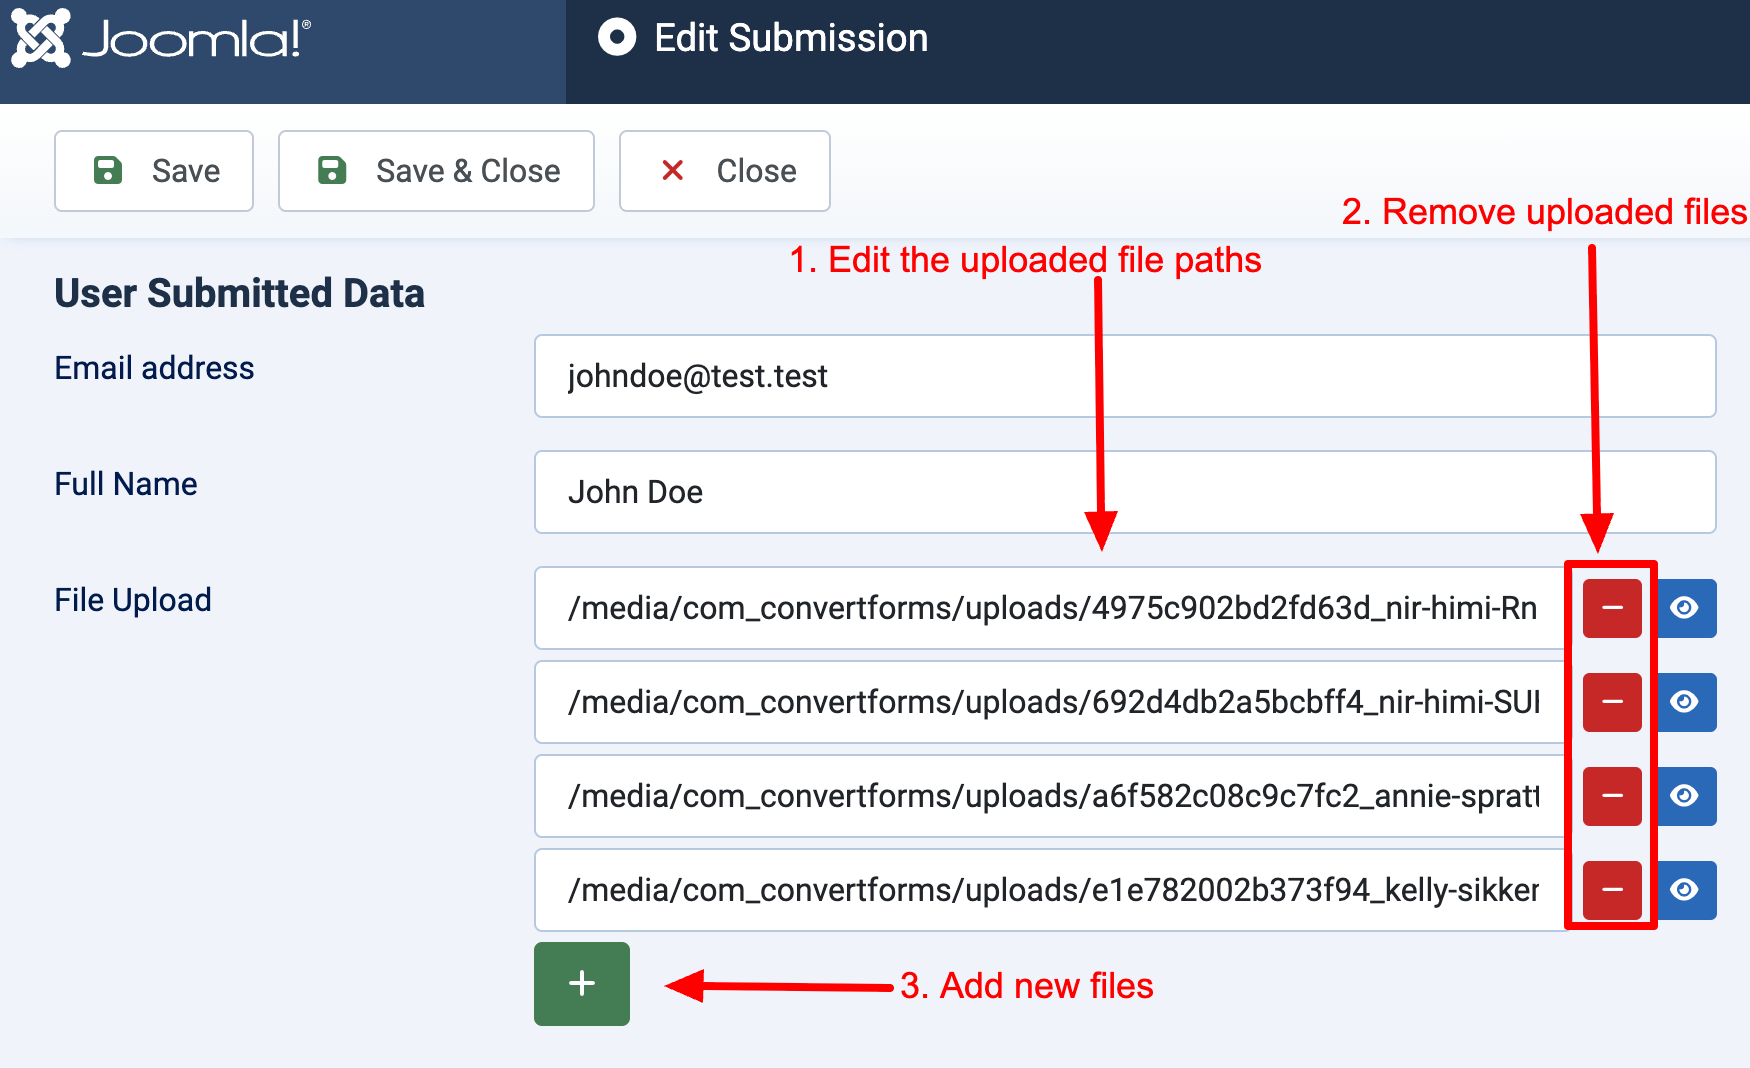
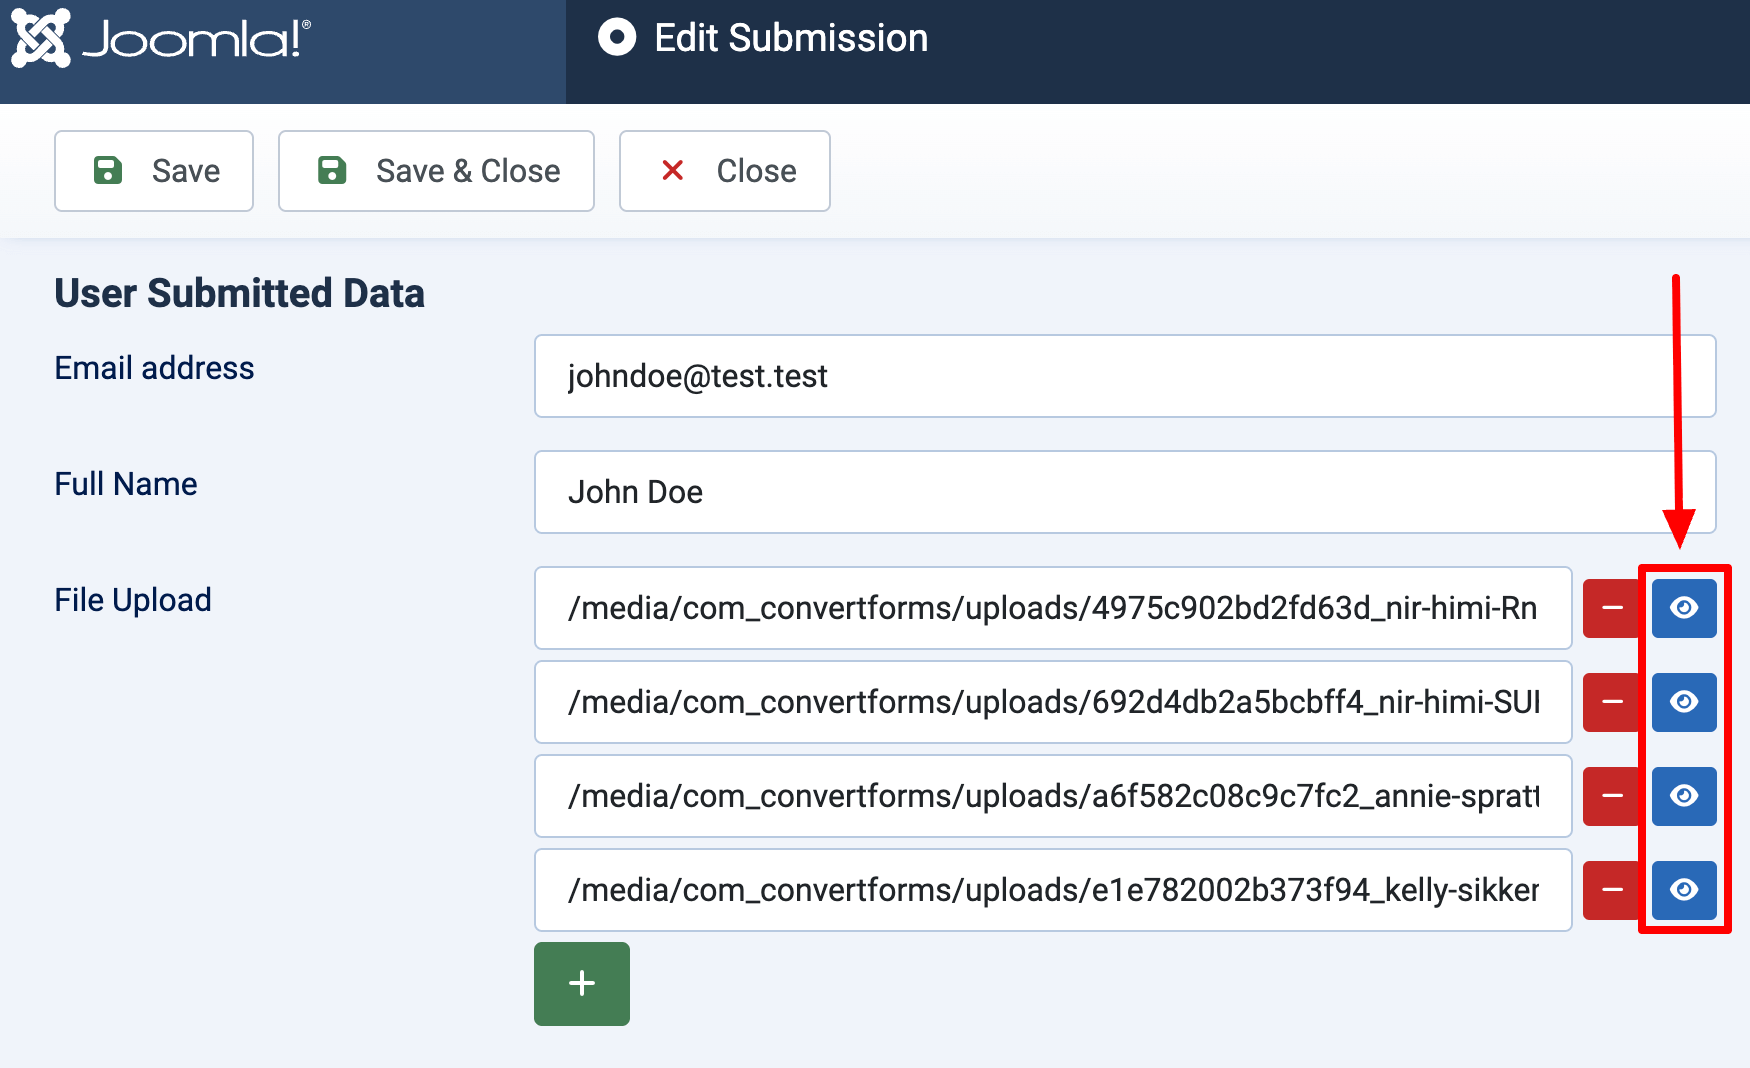
There are times when you want to check or remove a file uploaded by one of your users. Open the submission in the Joomla administrator and you will find every File Upload field with its files listed. From Convert Forms 5.2.6, the value of a File Upload field can be viewed there but no longer edited.
Each file comes with a "View File" button, for fields that accept a single file as well as for fields that accept several.
Private files get that button too. The link behind it is authorised by your administrator login instead of by a token, so it never expires, and it is not the link your visitors receive.
File Upload Security
We're sometimes asked about the security around the file upload feature. Bear in mind that files can only be uploaded to the server if there's a file upload field on an active form. If no active forms have a file upload field then no files can be uploaded to the server.
How Convert Forms protects you from attackers
Can store files outside your site
The strongest protection is to give a file no URL at all. Set the Storage option of the field to Private, and Convert Forms keeps the file in a folder your web server cannot reach, then serves it through a link that expires. See Store uploads outside your site.
Runs a MIME type check
Adds an extra layer of security by running a MIME type validation check to determine whether the uploaded file is in allowed file types.
Prevents unauthorized access
Convert Forms attempts to protect you against unauthorized requests called CSRF (Cross Site Request Forgery) attacks by adding a token into each File Upload request. This token is a randomized string that is used to authenticate that the request being made is coming from a valid form and a valid session. Read more details about this method, on the Joomla! official documentation page here.
Randomises uploaded file names
Once hackers have managed to upload an executable file to your server, they may attempt to execute it using a web browser or command line. One simple trick from preventing hackers running their file is to randomly rename it. Convert Forms protects you by adding a random prefix to the file uploaded.
Disables upload directory file browsing
If there is no default page or homepage under a website directory or folder, you may find it display all files under the directory when browsing it from web browsers. Convert Forms uses another trick to disable directory browsing by placing an empty index.html file into every upload directory.
Prevents PHP execution inside the upload directory
Although PHP files are not allowed to be uploaded by default, Convert Forms needs to ensure also that PHP files are disabled and not executed inside the upload directory folder structure. It makes that happen by generating and placing an .htaccess file into each upload directory.
Makes use of the Joomla!'s index.php entry point file to handle uploads
All file uploads pass through the Joomla! application ensuring bad files and code upload attacks are blocked. This also makes Convert Forms compatible with security-based Joomla! extensions such as Akeeba Admin Tools which adds an extra layer of security to file uploads.
Best practices to increase File Upload security
Reduce max file upload size
Preventing users from uploading large files will reduce the risk of your file upload system being used for a DoS attack. Make sure you've properly configured the File Size Limit option found under the File Upload options.
Restrict file types
When a file upload field is added to a form make sure you configure the Allowed File Types option to be as restrictive as possible. There are certain extensions that Convert Forms will always block to protect from attacks but it's good practice to limit the extensions to the file extensions you expect to receive.
Store sensitive uploads outside your site
For CVs, contracts, ID documents or anything else personal, set the Storage option of the field to Private. The file then has no public URL, the download link expires, and you can limit it to logged-in users. See Store uploads outside your site.
When you keep the files inside your site, use a different folder for each form instead. You can do this with the Folder option.
Troubleshooting
I get "Unsupported File" error when I try to upload any file
First make sure the type of the file you're trying to upload is set in the Allowed File Types option in your file upload field settings. Next, verify the Fileinfo PHP extension is installed and enabled on your server. This is required to guess the mime type of the file.
File uploads are not working after upgrading to Joomla 5
This issue can be solved by using the official .htaccess file that comes with Joomla 5.
The download link says it has expired
Download links stop working after the Download Link Lifetime set in Convert Forms > Options > Security. The default is 7 days. Raise the setting for future links, or open the submission in the Joomla administrator and download the file from there. Links that are already sent keep the lifetime they were built with.
The download link says it is not valid
Check these, in this order:
- The Uploads Base Path was changed or cleared, and the files were not moved to the new folder.
- The file was deleted, by hand or by the Auto Delete Files option.
- The site secret in Joomla's Global Configuration was changed. That cancels every download link ever issued.
- The email client cut the link short. Long links are sometimes broken over two lines.
Convert Forms writes the reason to the Joomla log when the cause is a setting.
- How to add a File Upload field
- How to Display Uploaded Files as a List or Thumbnails?
- Where are uploaded files stored?
- Store uploads outside your site (Private storage)
- How to allow multiple file uploads?
- What is the maximum file size allowed for uploads?
- How to resize images?
- How to restrict certain file types?
- How to auto-delete old uploaded files?
- How to delete uploaded files right after the email is sent
- How to include uploaded file on email?
- How to upload to Dropbox, Google Drive or Amazon S3
- How to Rename Uploaded Files Using PHP
- Translate the File Upload Field into your language
- Editing / Viewing File Uploads in the backend
- File Upload Security
- Troubleshooting



 Rated: