-
- Email the Person Who Filled Out the Form
- Set up Auto-Responder Emails
- Send an Email Only When a Checkbox Is Checked
- Attach the Submission PDF to Emails
- Send Email Based on Drop Down Selection
- Send Different Email Content Based on Form Responses
- Resending Emails
- Sending Plain-Text Alternative Body Emails
- Styling Emails with CSS
- Tracking Sent Emails
- Troubleshooting Email Delivery
-
- Browser Autocomplete for Form Fields
- Disable Submission Storage in Convert Forms
- Redirect to a Menu Item After Form Submission
- Tracking Form Lead Source
- Show a Form Only to Logged-In Users
- How to Increment a Count on Each Form Submission
- Adding an “Other” Option
- Adding a Unique ID to Each Form Submission
- Show or Hide Form Fields Based on User Joomla User Group
- Scroll the Page to the Top When a Long Form is Submitted
- Display Submissions Count for a Specific Form
- Populate Drop Down, Radio Buttons or Checkboxes with a CSV File
- Automatically Delete Submissions Older Than X Days
- Silently POST Submitted Data to Any API or URL
- Automatically Save Each Submission to a JSON file
- Create a Custom Login Form
- Auto-Populate Fields with Article Data
- Add a placeholder text to a Dropdown field
- Create Multilingual Forms in Joomla
- Redirect User to a URL After Form Submission
- Importing and Exporting Forms
- Export Submissions
- Display Convert Forms in a popup
-
- How to Create a Quiz Form
- Show Confirmation Popup After Submission
- Using the Conditional Content Shortcode in Convert Forms
- Copy Value From One Field to Another
- Submission Tasks
- Exporting Form Submissions with a Webhook URL
- Conditional Fields
- PDF Generator
- Input Masking
- Calculations
- Populate Fields Using Query String
- Smart Tags
-
- Minimum Time to Submit
- Restrict Form Submissions Based on IP
- Enforcing a Custom Password Policy in Convert Forms
- Add Cloudflare Turnstile to your Joomla Form
- Implement the Iubenda Consent Database in Joomla with Convert Forms
- Add Custom Validations to Fields and Forms
- Add Math Captcha to your Form
- Prevent a Field From Saving in the Database
- Add hCaptcha to your Form
- Enable Double Opt-in
- Allow Form Submissions in Specific Date Range
- Ensure a Unique Value is Entered Into a Field
- Block Form Submissions Containing Profanity (Bad Words)
- Block Email Addresses or Email Domains
- Honeypot
- Setting Up Google reCAPTCHA
- Create GDPR Compliant Forms
Set up Auto-Responder Emails
Would you like to automatically send an email whenever a user submits one of your forms? With Convert Forms you can reply to the person who filled out the form, notify your team of the new submission, or do both at once. The Email Task gives you full control over each email sent by your form: choose the recipients, route emails based on what the user submitted, pull submission data in with Smart Tags, style the message with inline CSS, attach uploaded files, and send only when your conditions are met, no code required. This guide walks you through setting one up and explains every option in detail.
Send an Email Notification
To send an automated email every time your form is submitted, follow the steps below:
-
Go to Components → Convert Forms → Forms.
-
Create a new form or click to edit an existing one.
-
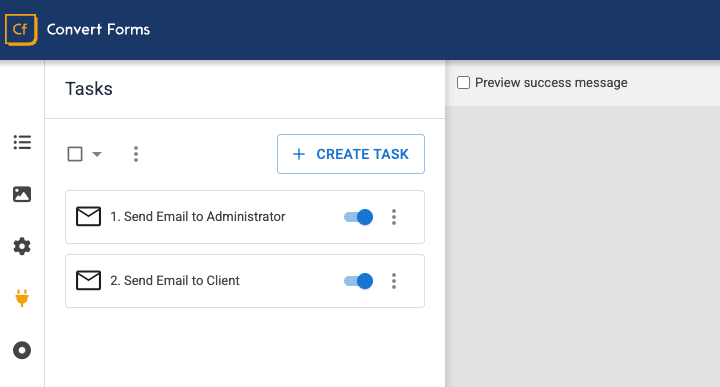
From the left sidebar, open the Tasks panel.
-
Click Create your first task, then select the Email app.
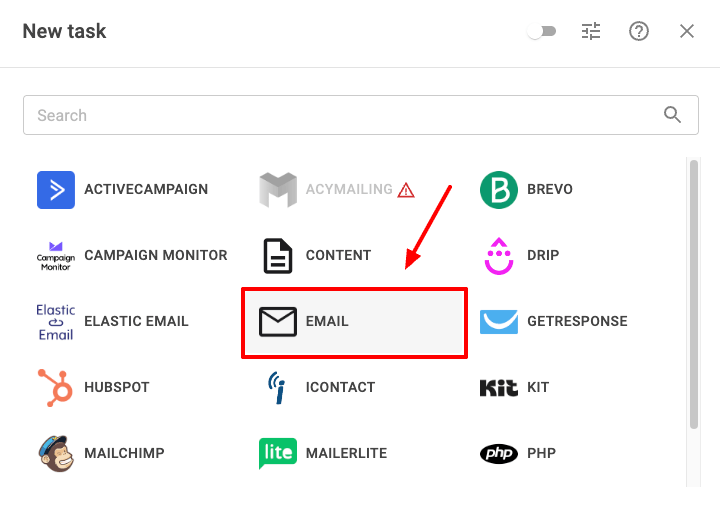
-
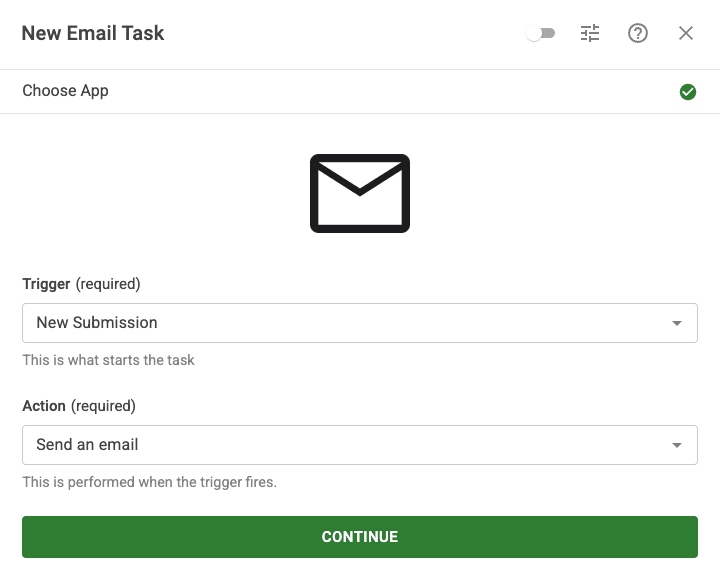
Choose a trigger and an action, then click Continue:
- Set the Trigger to New Submission so the task fires every time the form is submitted.
-
Set the Action to Send an Email.
-
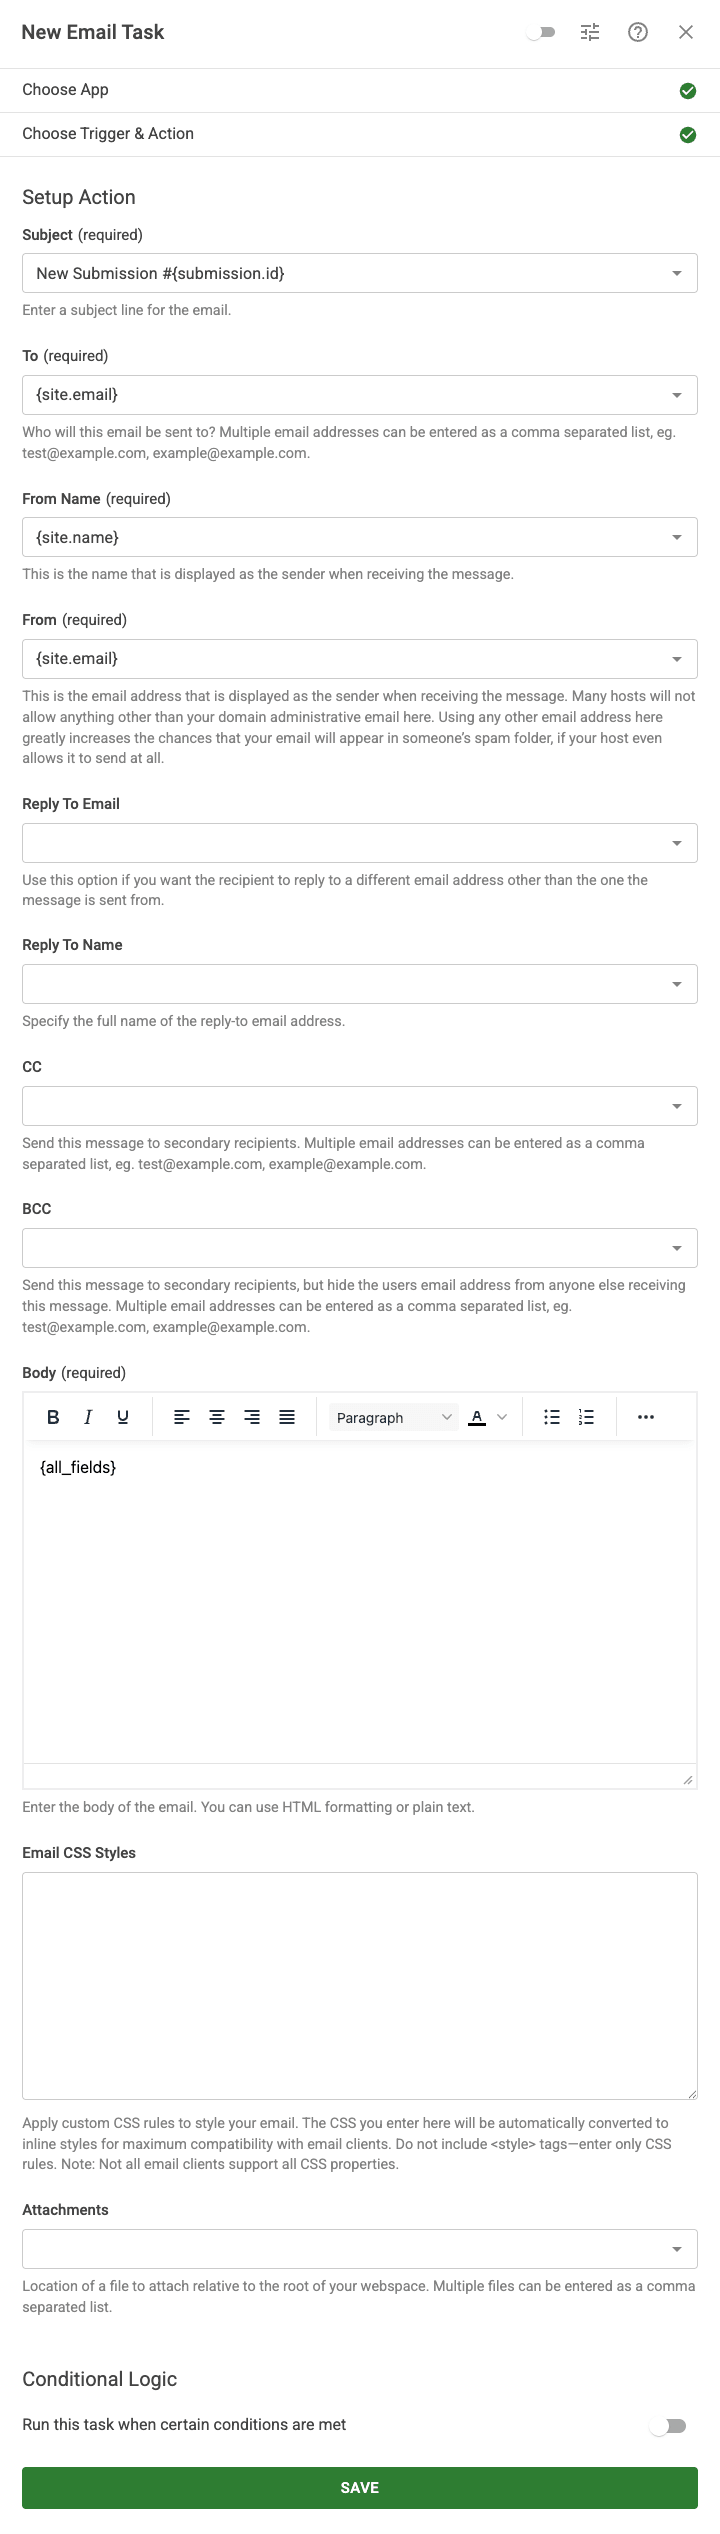
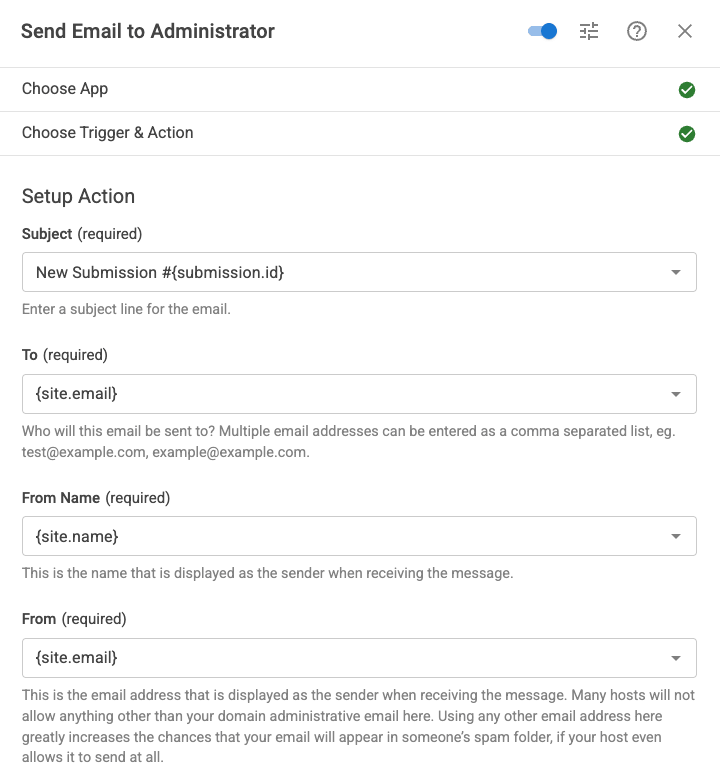
Configure the email. The Email Task comes prefilled with the most common settings, so out of the box it sends a notification to your site's email address. Fill in the essential fields in the next steps to match what you want to send. Each field accepts plain text, Smart Tags, or a mix of both.
-
Set the Subject, the subject line of the email. Mix plain text with Smart Tags, for example
New Submission #{submission.id}, where{submission.id}is the unique ID of the submission. -
Set the To address, the recipient of the email. It accepts a single address, several comma-separated addresses, or a Smart Tag. It defaults to
{site.email}, which pulls the administrator email from your Joomla configuration.To send it somewhere else, such as to the person who filled out the form, see Email Routing below.
-
Set the From Name, the sender name your recipients see. It defaults to
{site.name}, your site's name from the Joomla configuration. To use the submitter's name instead, set it to the relevant field Smart Tag. -
Set the From address, the sender email. It defaults to
{site.email}. For the best deliverability, use the address configured in your Global Configuration → Server → Mail settings, since many hosts block email sent from unrelated domains. -
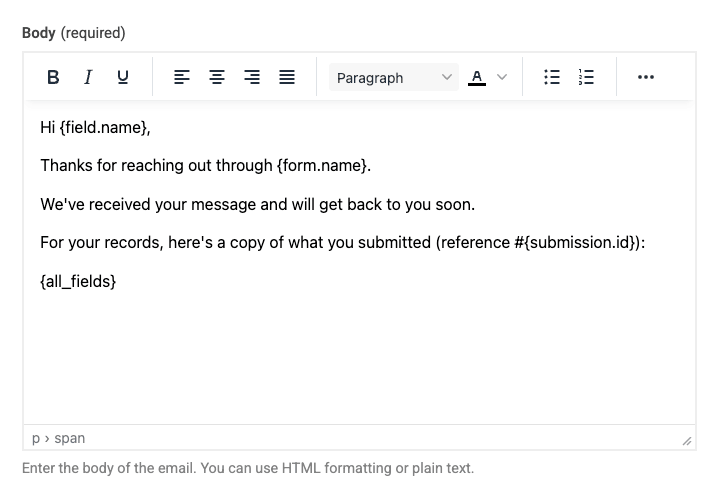
Write the Body, the content of the email. It defaults to the
{all_fields}Smart Tag, which lists every submitted field and its label. Replace it with your own text, specific field Smart Tags, or HTML to build the message you want. -
(Optional) Send the email only when certain conditions are met, for example only when an opt-in checkbox is ticked. See Send Emails Conditionally below.
-
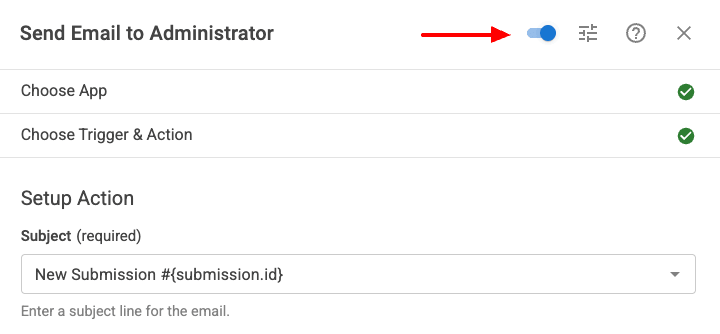
Give the task a title so you can recognize it later, which is handy once a form has several tasks. Click the label at the top of the dialog and type a title.

-
Activate the task and save. New tasks start in draft so you can finish configuring them before they run. Click the toggle next to the task's title to enable it, click Save, then save the form.
That's it. Your form now automatically sends an email with every submission (or only when your conditions are met).
Send Multiple Emails
You'll often want more than one email per submission, for example, one notification to your team and a separate confirmation to the person who filled out the form. Each email is its own Email Task, with its own recipients, subject, body, attachments, and Conditional Logic.
To add another email, create a new Email Task and configure it independently. Tasks run from top to bottom, so drag your Email Tasks into the order you want them to send.
Send Emails to Multiple Recipients
A single Email Task can reach several people at once. There are three ways to do it, and you can combine them:
- Comma-separated addresses in the To option: Enter every recipient in the To field, separated by commas, e.g.
[email protected], [email protected]. Every address receives the same email and can see the others. - Using CC: Add addresses to the CC field to send a visible copy. CC recipients are typically people who should be kept in the loop rather than the primary recipient.
- Using BCC: Add addresses to the BCC field to send a hidden copy. BCC recipients receive the message, but their addresses stay invisible to everyone else, which is useful for archiving a copy to an internal mailbox.
All three fields accept Smart Tags, so recipients can be pulled dynamically from the submission.
Send Different Emails to Different Recipients
When different people need different messages, don't try to cram everything into one email. Instead, create one Email Task per audience and use Conditional Logic to decide which one runs.
For example, you can build a "Sales" Email Task and a "Support" Email Task, then add a condition to each so only the relevant one fires based on a dropdown selection or a checkbox. Because tasks run independently, several can fire on the same submission when their conditions all match. See Send Emails Conditionally for how to build the conditions, and Send Email Based on Drop Down Selection for routing by a single field value.
Attach Files to Emails
The Attachments field accepts local file paths relative to the root of your webspace, separated by commas:
{field.upload1}, {field.upload2}, images/avatar.png
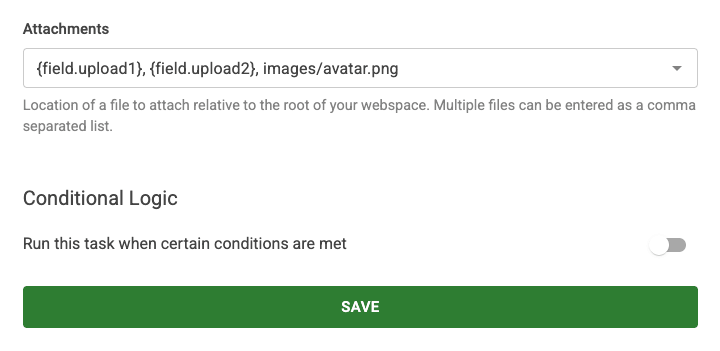
You can attach:
- Files uploaded through the form: Use the Smart Tag of your File Upload field, e.g.
{field.upload1}. - Static files from your site: Point to any file under your Joomla root, e.g.
images/terms.pdf. - The generated submission PDF: If you use the PDF feature, attach it with
{submission.pdf}. See Attach the Submission PDF to Emails for the full setup.
Create Reusable Email Templates
If you send the same email design across several forms, keep its content in one place instead of rebuilding it for each form. Store your layout once and load it into the Email Task Body, so you edit the template in a single place and every email stays in sync. We recommend storing it as a Code Snippet, but a Joomla Module or Article works too.
Using Code Snippets (Recommended)
Code Snippets is built for exactly this: store a reusable piece of content once and drop it in wherever you need it. It's the cleanest option, because the snippet exists only to be embedded, so it never renders anywhere on your site by accident, and you can reuse it across any form.
-
Log into your Joomla administrator.
-
Go to Components → Tassos Code Snippets → Snippets.
-
Click New.
-
Give it a descriptive Title, for example Email Template, and select HTML as the Code Type.
-
Set the Insertion Method to Shortcode, so the snippet is inserted only where you place it rather than auto-inserted across your site.
-
Paste your email layout into the editor, Smart Tags included (e.g.
{all_fields}or{form.name}). Set the Status to Published, save, and note the snippet's alias. -
In the Email Task Body, insert the snippet with its shortcode:
{tcs email-template}Replace
email-templatewith your snippet's alias. -
Reuse the same shortcode in any other form's Email Task. To change the wording everywhere, edit the snippet once.
Using a Joomla Module
-
Create a Joomla Custom HTML module under Extensions → Modules → New and paste your email layout into it, Smart Tags included (e.g.
{all_fields}or{form.name}). Assign it to an unused module position, for exampleemail_template. -
Make sure the Content - Load Modules plugin is enabled under System → Plugins.
-
In the Email Task Body, load the module by its position:
{ loadposition email_template } -
Reuse the same shortcode in any other form's Email Task. To change the wording everywhere, edit the module once.
Using a Joomla Article
Convert Forms can pull an article's body straight into the email, so you can keep your template as a regular Joomla article with no module wrapper.
-
Create or open the Joomla Article that holds your email layout, Smart Tags included, and note its ID from the article list.
-
In the Email Task Body, load the article by its ID with the
{article.fulltext}shortcode:{article.fulltext --id=42}Replace
42with the ID of your article. -
Reuse the same shortcode in any other form's Email Task. To update the wording everywhere, edit the article once.
Whichever method you choose, Smart Tags inside the shared content are still resolved per submission, so a single template stays fully dynamic across all your forms.
Include Submission Data in Emails
Smart Tags are dynamic placeholders wrapped in curly braces that insert real submission data into your email. The most useful ones for emails are:
{all_fields}: Outputs every submitted field with its label, formatted as simple HTML. This is the default Body content and the quickest way to include a full copy of the submission. It supports options you can combine in the same tag:{all_fields --hideLabels}: output values without labels.{all_fields --excludeEmpty}: skip fields the user left blank.{all_fields --excludeFields=text1,dropdown2}: skip specific fields by name.{all_fields --excludeTypes=hidden}: skip fields by type, e.g. hidden fields.
{field.NAME}: Outputs a single field's value, whereNAMEis the field's name. Use{field.NAME.label_}for its label (the trailing underscore is required),{field.NAME.html}for a clickable/HTML-friendly version (mailto, tel, file links, etc.), and{field.NAME.raw}for the unescaped raw value.{submission.id}: The unique submission ID, useful in subjects and reference numbers.{form.name}: The name of the form, helpful when one mailbox receives emails from several forms.
Customize the Email Body
The Body field is fully customizable:
- Using the Visual Editor: Type and format your message directly, mixing static text with Smart Tags.
- Applying HTML in the Body: Paste your own HTML for full control over layout, buttons, and structure.
- Applying CSS: Add CSS rules in the Email CSS Styles field. Convert Forms inlines them automatically for better compatibility across email clients. Enter rules only, with no
<style>tags. For a deeper guide, see Styling Emails with CSS.
If you also need a plain-text version for clients that don't render HTML, see Sending Plain-Text Alternative Body Emails.
Email Routing
The right recipient often isn't fixed; it depends on what the user submitted. Rather than hard-coding an address, you can have Convert Forms send each email to the right person based on the submission itself. Here are the most common ways to route your emails:
- Email the person who filled out the form: Set To to your Email Address field Smart Tag. Full guide: Email the Person Who Filled Out the Form.
- Email the author of the article: When one form appears on many articles, add a Hidden Field with its Default Value set to
{article.user.email}, then set To to that field's Smart Tag (e.g.{field.author}). The email goes to the author of whichever article the form was submitted from. - Email based on a dropdown selection: Store an address in each dropdown option's value and set To to the dropdown field. Full guide: Send Email Based on Drop Down Selection.
- Route emails using Conditional Logic: For anything more complex, create one Email Task per destination and gate each with conditions. See below.
Set the Reply-To Address
By default, when someone replies to one of your form emails, the reply goes to the From address. To send replies somewhere else, set the Reply To Email option on the Email Task.
The most common use is an admin notification: the email is sent from your site address, but you'd like to reply straight to the person who filled out the form. Set Reply To Email to your Email Address field Smart Tag, e.g. {field.email}, and hitting reply in your inbox will open a message addressed to the submitter.
You can also set a Reply To Name to pair a name with that address. If you leave Reply To Name empty, it falls back to the From Name, and if you leave Reply To Email empty, replies simply go to the From address.
Send Emails Conditionally
By default, an Email Task runs on every submission. Enable Conditional Logic on the task, and it runs only when the submission matches your rules, so you can send a copy only when an opt-in checkbox is ticked, email a department only when it's selected, or alert your team only for specific entries.
To set this up, scroll to the Conditional Logic section while editing the Email Task and switch on Run this task when certain conditions are met. For how conditions, operators, and condition groups work, see Conditional Logic in the Tasks guide.
For a worked email example that sends a copy only when the user opts in, see Send an Email Only When a Checkbox Is Checked.
Troubleshooting
Seeing problems with the delivery of your auto-responder or admin notification emails? Deliverability depends on many factors, but the fix is usually a mail-configuration or SMTP issue. If an Email Task isn't sending, check the following:
- Joomla mail sending is enabled under System → Global Configuration → Server → Mail.
- If your Mailer is set to PHP Mail, delivery depends on your server being correctly configured to send email. If messages aren't going out, contact your host to confirm the server can send mail.
- For the most reliable delivery, we strongly recommend sending through an SMTP provider instead. It's the most robust option and avoids most server-side delivery problems.
- Your SMTP settings are valid.
- The From address belongs to your domain or matches your SMTP account.
- The recipient address is valid.
- The task is activated and the form is saved.
- Any Conditional Logic on the task actually matches the submitted data.
- Run a test with the free mail-tester.com service to check whether your site's emails reach the inbox rather than the spam folder.
For a complete walkthrough, see Troubleshooting Email Delivery. To learn more about how tasks, triggers, actions, and Conditional Logic work, see Working with Tasks.
- Send an Email Notification
- Send Multiple Emails
- Send Emails to Multiple Recipients
- Send Different Emails to Different Recipients
- Attach Files to Emails
- Create Reusable Email Templates
- Include Submission Data in Emails
- Customize the Email Body
- Email Routing
- Set the Reply-To Address
- Send Emails Conditionally
- Troubleshooting


 Rated: