-
- Email the Person Who Filled Out the Form
- Set up Auto-Responder Emails
- Send an Email Only When a Checkbox Is Checked
- Attach the Submission PDF to Emails
- Send Email Based on Drop Down Selection
- Send Different Email Content Based on Form Responses
- Resending Emails
- Sending Plain-Text Alternative Body Emails
- Styling Emails with CSS
- Tracking Sent Emails
- Troubleshooting Email Delivery
-
- Browser Autocomplete for Form Fields
- Disable Submission Storage in Convert Forms
- Redirect to a Menu Item After Form Submission
- Tracking Form Lead Source
- Show a Form Only to Logged-In Users
- How to Increment a Count on Each Form Submission
- Adding an “Other” Option
- Adding a Unique ID to Each Form Submission
- Show or Hide Form Fields Based on User Joomla User Group
- Scroll the Page to the Top When a Long Form is Submitted
- Display Submissions Count for a Specific Form
- Populate Drop Down, Radio Buttons or Checkboxes with a CSV File
- Automatically Delete Submissions Older Than X Days
- Silently POST Submitted Data to Any API or URL
- Automatically Save Each Submission to a JSON file
- Create a Custom Login Form
- Auto-Populate Fields with Article Data
- Add a placeholder text to a Dropdown field
- Create Multilingual Forms in Joomla
- Redirect User to a URL After Form Submission
- Importing and Exporting Forms
- Export Submissions
- Display Convert Forms in a popup
-
- How to Create a Quiz Form
- Show Confirmation Popup After Submission
- Using the Conditional Content Shortcode in Convert Forms
- Copy Value From One Field to Another
- Submission Tasks
- Exporting Form Submissions with a Webhook URL
- Conditional Fields
- PDF Generator
- Input Masking
- Calculations
- Populate Fields Using Query String
- Smart Tags
-
- Minimum Time to Submit
- Restrict Form Submissions Based on IP
- Enforcing a Custom Password Policy in Convert Forms
- Add Cloudflare Turnstile to your Joomla Form
- Implement the Iubenda Consent Database in Joomla with Convert Forms
- Add Custom Validations to Fields and Forms
- Add Math Captcha to your Form
- Prevent a Field From Saving in the Database
- Add hCaptcha to your Form
- Enable Double Opt-in
- Allow Form Submissions in Specific Date Range
- Ensure a Unique Value is Entered Into a Field
- Block Form Submissions Containing Profanity (Bad Words)
- Block Email Addresses or Email Domains
- Honeypot
- Setting Up Google reCAPTCHA
- Create GDPR Compliant Forms
Send an Email Only When a Checkbox Is Checked
Sometimes you only want to send an email when the user asks for it, a classic example being a "Send a copy to me" checkbox. With Conditional Logic on the Email Task, the email runs only when the checkbox is ticked. No PHP, no separate forms, just one condition.
Run the Email Only When the Checkbox Is Ticked
To send the email conditionally, follow the steps below:
-
Go to Components → Convert Forms → Forms and edit your form.
-
Open the Tasks panel and create or edit the Email Task you want to gate. Configure the To, Subject, and Body as usual, for instance set To to
{field.email}so the copy goes to the submitter. -
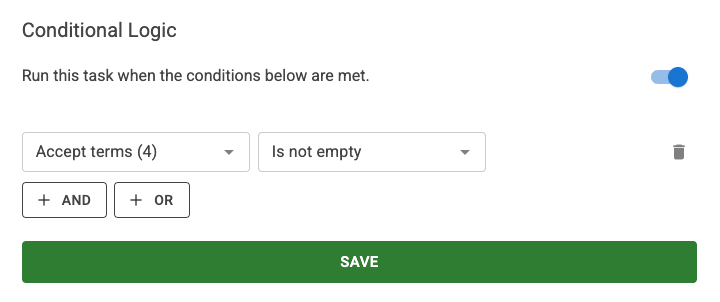
Scroll down to the Conditional Logic section and enable Run this task when certain conditions are met.
-
Click Add your first condition.
-
Set the condition so it matches a ticked checkbox:
- Trigger Value: the checkbox field, e.g. send_copy.
-
Operator: Is Not Empty (a checkbox stores a value only when it's checked, so "not empty" means "ticked").
-
Give the task a title, enable it, and click Save. Save the form.
Now the Email Task runs only when the user ticks the checkbox; on submissions where it's left unchecked, the task is skipped. For the full rundown of operators and combining several rules with condition groups, see Conditional Logic in the Tasks guide.
More Conditional Examples
The same approach powers many other rules. Swap the field and operator to fit your case:
- To alert your sales team only for larger enquiries, add a condition on a number field, set the operator to is greater than, and enter a value such as
1000. - To send an email only when a dropdown has a particular value, add a condition on that field with the is operator and the option you're checking for. If you'd rather route the message to different recipients depending on the dropdown, see Send Email Based on Drop Down Selection.
- To send a different message to each audience, create a separate Email Task for each one and give it its own condition. See Send Different Emails to Different Recipients.
Troubleshooting
- The email never sends. Make sure the condition references the checkbox by its correct field name and uses Is Not Empty. If a checkbox is required (always ticked), the condition will always pass, which may not be what you want.
- The email always sends. Confirm the Conditional Logic toggle is enabled on the task; a configured-but-disabled condition is ignored.
- Still stuck on delivery? See Troubleshooting Email Delivery.


 Rated: