-
- Managing Form Submissions
- Searching and Filtering Submissions
- Submission Context Tracking
- Customizing Submission Columns
- Editing Submissions
- Deleting Submissions
- Importing Submissions
- Exporting Submissions
- Exporting Submissions with a Webhook URL
- Tracking the User's IP Address
- Tracking the User's Country
- Disable Submission Storage
- Auto-Delete Old Submissions
- Auto-Save Each Submission to a JSON file
- Increment a Count on Each Submission
- Add a Unique ID to Each Submission
-
- Set up Auto-Responder Emails
- Email the Person Who Filled Out the Form
- Send an Email Only When a Checkbox Is Checked
- Attach the Submission PDF to Emails
- Send Email Based on Drop Down Selection
- Send Different Email Content Based on Form Responses
- Styling Emails with CSS
- Sending Plain-Text Alternative Body Emails
- Troubleshooting Email Delivery
- Tracking Sent Emails
- Resending Emails
-
- Browser Autocomplete for Form Fields
- Redirect to a Menu Item After Form Submission
- Show a Form Only to Logged-In Users
- Adding an “Other” Option
- Show or Hide Form Fields Based on User Joomla User Group
- Scroll the Page to the Top When a Long Form is Submitted
- Display Submissions Count for a Specific Form
- Populate Drop Down, Radio Buttons or Checkboxes with a CSV File
- Silently POST Submitted Data to Any API or URL
- Create a Custom Login Form
- Auto-Populate Fields with Article Data
- Add a placeholder text to a Dropdown field
- Create Multilingual Forms in Joomla
- Redirect User to a URL After Form Submission
- Importing and Exporting Forms
- Display Convert Forms in a popup
-
- Does Convert Forms Use Cookies?
- Minimum Time to Submit
- Restrict Form Submissions Based on IP
- Enforcing a Custom Password Policy in Convert Forms
- Add Cloudflare Turnstile to your Joomla Form
- Implement the Iubenda Consent Database in Joomla with Convert Forms
- Add Custom Validations to Fields and Forms
- Add Math Captcha to your Form
- Prevent a Field From Saving in the Database
- Add hCaptcha to your Form
- Enable Double Opt-in
- Allow Form Submissions in Specific Date Range
- Ensure a Unique Value is Entered Into a Field
- Block Form Submissions Containing Profanity (Bad Words)
- Block Email Addresses or Email Domains
- Honeypot
- Setting Up Google reCAPTCHA
- Create GDPR Compliant Forms
Styling Emails with CSS
Convert Forms allows you to style your email content using CSS, giving you full control over how your emails look. You can apply styles either directly in the Body using a <style> block or through the dedicated Email CSS Styles option.
Using <style> Blocks in the Email Body
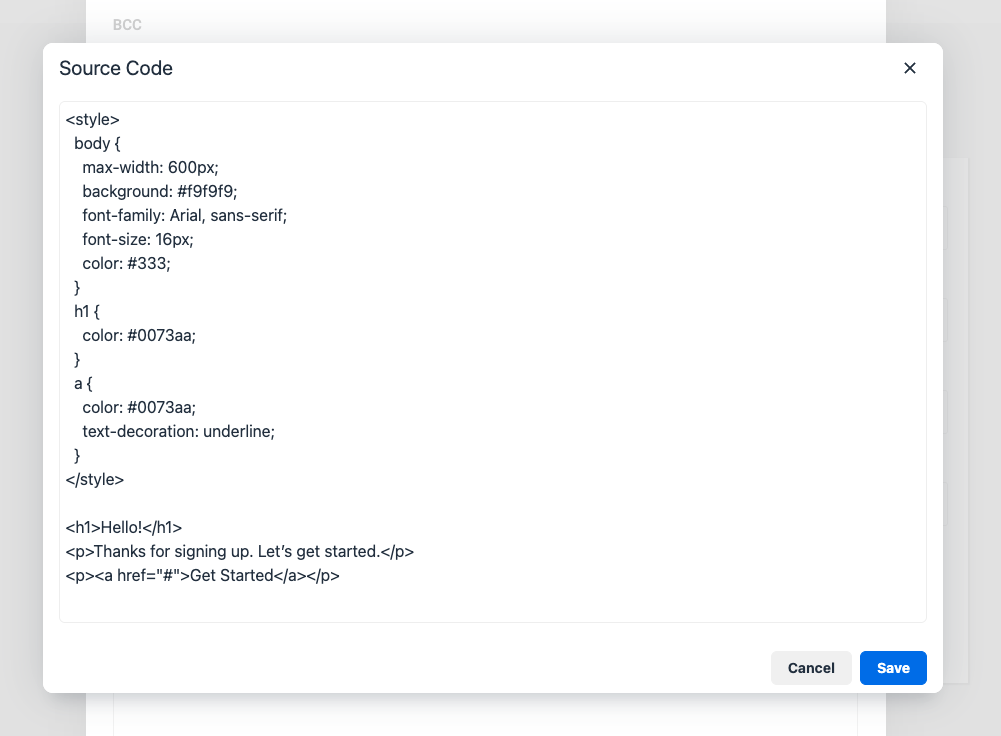
You can add a CSS <style> block directly into the Body of your email. To do so, while you're using Email Task, scroll down to the Body option, click the 3-dot icon, and then click the last button to open the Source Code dialog.

Next, enter your CSS rule using a <style> block like in the example below:
Advantages:
- Styles are visible in the editor preview, allowing you to see exactly how your email will look while editing.
- Helpful for fine-tuning the layout with live visual feedback.
Using the Email CSS Styles Option
Alternatively, you can use the Email CSS Styles field to enter your CSS rules without any <style> tags.

This is ideal if:
- You want to keep styling separate from your email content.
- You don’t want to deal with HTML or
<style>blocks. - You’re using dynamic content or shared templates across forms.
- You prefer a cleaner, more maintainable setup.
Example:
body {
  background-color: #f8f8f8;
  font-size: 16px;
}
a {
  color: #0073aa;
}
Convert Forms will automatically process this CSS and apply it as inline styles in the final email.
Example CSS Rules
Background Color
Changes the background color of your email from white to light gray.
body {
  background-color: #ccc;
}
Font Size
Sets a larger base font size for better readability.
body {
  font-size: 20px;
  line-height:24px;
}
Link Color
Set all links to have a blue color and be underlined.
a {
  color: blue;
  text-decoration: underline;
}
Set a Max Width and Center the Email
This ensures your email appears centered and doesn't stretch too wide on large screens.
body {
  max-width: 600px;
  margin: 0 auto;
}
How CSS Rules Work in Emails
Regardless of the method you choose, Convert Forms automatically inlines all CSS styles before sending the email. This ensures maximum compatibility with email clients, many of which ignore <style> tags but fully support inline styles.
Here’s how it works:
- Convert Forms scans your CSS rules and finds all matching HTML elements in your email content.
- It then applies those rules directly as inline styles (using the style attribute).
- If an element already has a style attribute, the new rules are merged instead of replaced.
If your CSS includes:
a {
  color: blue;
}
And your email contains:
<a href="#">My link</a>Convert Forms will transform it into:
<a href="#" style="color: blue;">My link</a>If the element already had inline styles:
<a href="#" style="text-decoration: none;">My link</a>It becomes:
<a href="#" style="text-decoration: none; color: blue;">My link</a>This process happens automatically in the background before the email is sent. You don’t need to manually inline your styles.
Final Notes
- All CSS is automatically converted to inline styles by Convert Forms before the email is sent—no manual steps required.
- You can target standard HTML elements like
body,html,a,p, etc. - Convert Forms automatically adds missing
<head>and<body>tags to your email if they’re not present—so you don’t need to worry about including them manually. - For the best results across different email clients, always test your emails before sending them to your audience.


 Rated: