-
- Managing Form Submissions
- Searching and Filtering Submissions
- Submission Tracking Data
- Customizing Submission Columns
- Editing Submissions
- Deleting Submissions
- Importing Submissions
- Exporting Submissions
- Exporting Submissions with a Webhook URL
- Tracking the User's IP Address
- Disable Submission Storage
- Auto-Delete Old Submissions
- Auto-Save Each Submission to a JSON file
- Increment a Count on Each Submission
- Add a Unique ID to Each Submission
-
- Set up Auto-Responder Emails
- Email the Person Who Filled Out the Form
- Send an Email Only When a Checkbox Is Checked
- Attach the Submission PDF to Emails
- Send Email Based on Drop Down Selection
- Send Different Email Content Based on Form Responses
- Styling Emails with CSS
- Sending Plain-Text Alternative Body Emails
- Troubleshooting Email Delivery
- Tracking Sent Emails
- Resending Emails
-
- Browser Autocomplete for Form Fields
- Redirect to a Menu Item After Form Submission
- Show a Form Only to Logged-In Users
- Adding an “Other” Option
- Show or Hide Form Fields Based on User Joomla User Group
- Scroll the Page to the Top When a Long Form is Submitted
- Display Submissions Count for a Specific Form
- Populate Drop Down, Radio Buttons or Checkboxes with a CSV File
- Silently POST Submitted Data to Any API or URL
- Create a Custom Login Form
- Auto-Populate Fields with Article Data
- Add a placeholder text to a Dropdown field
- Create Multilingual Forms in Joomla
- Redirect User to a URL After Form Submission
- Importing and Exporting Forms
- Display Convert Forms in a popup
-
- Minimum Time to Submit
- Restrict Form Submissions Based on IP
- Enforcing a Custom Password Policy in Convert Forms
- Add Cloudflare Turnstile to your Joomla Form
- Implement the Iubenda Consent Database in Joomla with Convert Forms
- Add Custom Validations to Fields and Forms
- Add Math Captcha to your Form
- Prevent a Field From Saving in the Database
- Add hCaptcha to your Form
- Enable Double Opt-in
- Allow Form Submissions in Specific Date Range
- Ensure a Unique Value is Entered Into a Field
- Block Form Submissions Containing Profanity (Bad Words)
- Block Email Addresses or Email Domains
- Honeypot
- Setting Up Google reCAPTCHA
- Create GDPR Compliant Forms
Display Convert Forms in a popup
Convert Forms makes it easy to create forms and embed them in Joomla articles and pages. This guide shows you how to display the forms in a lightbox, popup, or modal.
There are two ways to insert the form into the popup content:
- Using the form shortcode
- Using the CMS Content → Convert Forms dropdown
Both methods achieve the same result. The difference is how the form is inserted into the popup content.
Method 1: Display Convert Forms in a Popup using shortcode
To be able to display any of your forms in a popup you will need to install EngageBox, our Joomla Popup Builder.
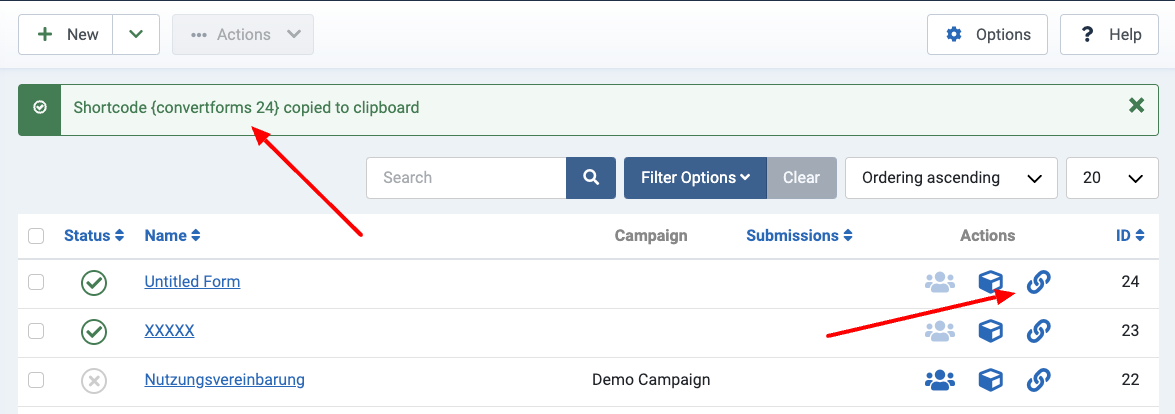
Next, go to Components → Convert Forms → Forms and copy the shortcode of the form you would like to embed in a popup.
Now that we have the shortcode copied into the clipboard, let's create our popup. To do so, go to Components → EngageBox. Click New and then select Blank Popup in the popup library.
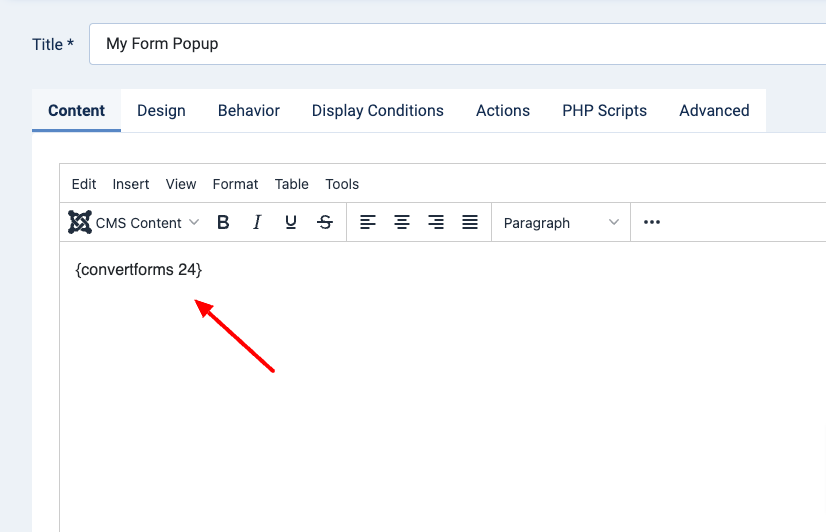
Finally, paste the shortcode into the editor in the Content tab and save your popup.
Congrats! Your form is now converted into a popup.
Method 2: Display Convert Forms in a Popup using CMS Content Dropdown
If you prefer a visual method without copying shortcodes, you can insert the form directly using the editor dropdown.
- Go to Components → EngageBox → List.
- Create or edit your popup.
- Inside the popup content editor, click CMS Content in the editor toolbar.
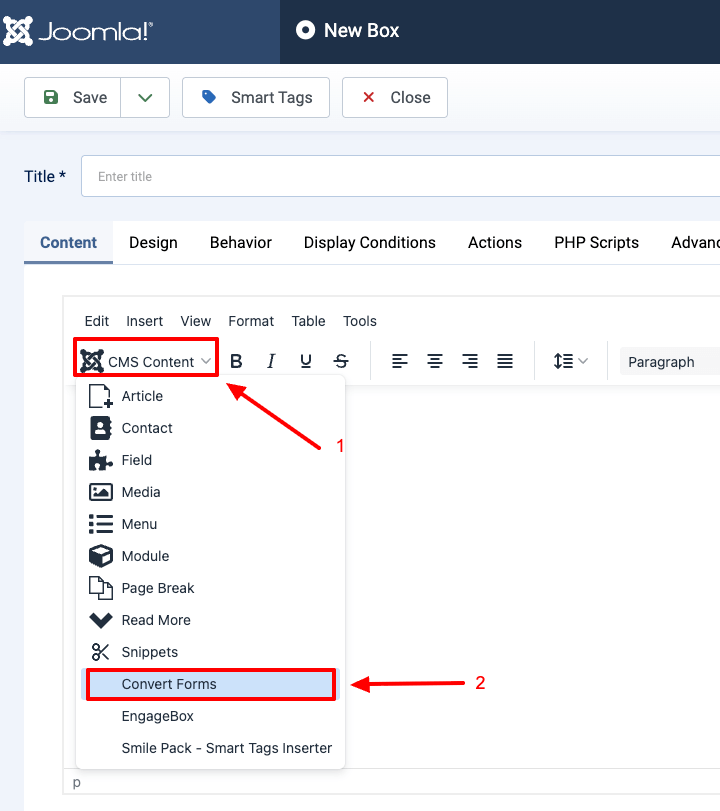
- Select Convert Forms.
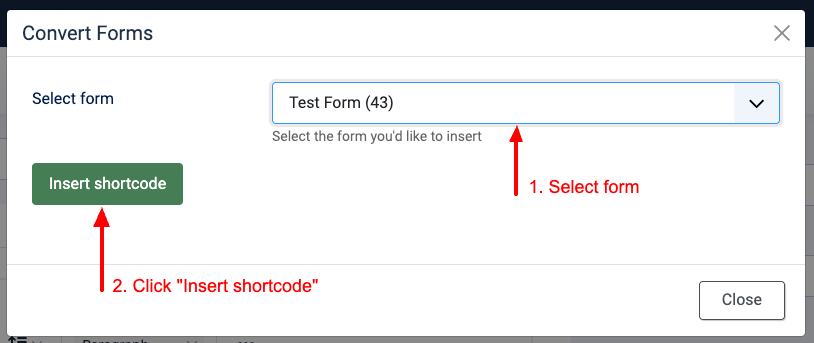
- Choose the form you want to insert.
- Click on "Insert shortcode"
- Save your popup.
Congrats! Your form is now converted into a popup.
How to open a popup when the form is submitted
Would you like to open a popup whenever someone submits your form without reloading the whole page? To make this happen, we will need to utilize the Convert Forms and EngageBox JS API.
The following code sample listens to the success event of form #2 and triggers popup #5 upon successful submission. Keep in mind that the popup must be present on the page.
ConvertForms.Helper.onReady(function() {
    let formID  = 2;
    let popupID = 5;

    // DO NOT EDIT BELOW
    var form = document.querySelector('#cf_' + formID);
    form.addEventListener('success', function(event) {
        EngageBox.getInstance(popupID).open();
    });
});
The above code can be placed into the Custom Code option in the Advanced panel in the form settings. Remember to wrap it with the <script> tag.


 Rated: