-
- Managing Form Submissions
- Searching and Filtering Submissions
- Submission Context Tracking
- Customizing Submission Columns
- Editing Submissions
- Deleting Submissions
- Importing Submissions
- Exporting Submissions
- Exporting Submissions with a Webhook URL
- Tracking the User's IP Address
- Tracking the User's Country
- Disable Submission Storage
- Auto-Delete Old Submissions
- Auto-Save Each Submission to a JSON file
- Increment a Count on Each Submission
- Add a Unique ID to Each Submission
-
- Set up Auto-Responder Emails
- Email the Person Who Filled Out the Form
- Send an Email Only When a Checkbox Is Checked
- Attach the Submission PDF to Emails
- Send Email Based on Drop Down Selection
- Send Different Email Content Based on Form Responses
- Styling Emails with CSS
- Sending Plain-Text Alternative Body Emails
- Troubleshooting Email Delivery
- Tracking Sent Emails
- Resending Emails
-
- Browser Autocomplete for Form Fields
- Redirect to a Menu Item After Form Submission
- Show a Form Only to Logged-In Users
- Adding an “Other” Option
- Show or Hide Form Fields Based on User Joomla User Group
- Scroll the Page to the Top When a Long Form is Submitted
- Display Submissions Count for a Specific Form
- Populate Drop Down, Radio Buttons or Checkboxes with a CSV File
- Silently POST Submitted Data to Any API or URL
- Create a Custom Login Form
- Auto-Populate Fields with Article Data
- Add a placeholder text to a Dropdown field
- Create Multilingual Forms in Joomla
- Redirect User to a URL After Form Submission
- Importing and Exporting Forms
- Display Convert Forms in a popup
-
- Does Convert Forms Use Cookies?
- Minimum Time to Submit
- Restrict Form Submissions Based on IP
- Enforcing a Custom Password Policy in Convert Forms
- Add Cloudflare Turnstile to your Joomla Form
- Implement the Iubenda Consent Database in Joomla with Convert Forms
- Add Custom Validations to Fields and Forms
- Add Math Captcha to your Form
- Prevent a Field From Saving in the Database
- Add hCaptcha to your Form
- Enable Double Opt-in
- Allow Form Submissions in Specific Date Range
- Ensure a Unique Value is Entered Into a Field
- Block Form Submissions Containing Profanity (Bad Words)
- Block Email Addresses or Email Domains
- Honeypot
- Setting Up Google reCAPTCHA
- Create GDPR Compliant Forms
Track Submissions with Google Tag Manager
If you run ads on Facebook, Google Ads, or other marketing platforms, tracking form submissions is essential to measure conversions. In this guide, you’ll learn how to track Convert Forms submissions with Google Tag Manager and identify which traffic sources generate leads.
Before You Start
- Google Tag Manager is installed on your site
- Your GTM container is published
- The Convert Forms form submits successfully
Method 1: Via Success Message Visibility
Use this method when your form does not redirect after submission and displays a success message inline. Convert Forms submits forms via AJAX and updates the page dynamically, so Google Tag Manager must detect when the success response becomes visible in the DOM.
GTM trigger setup
- Go to Triggers and click New
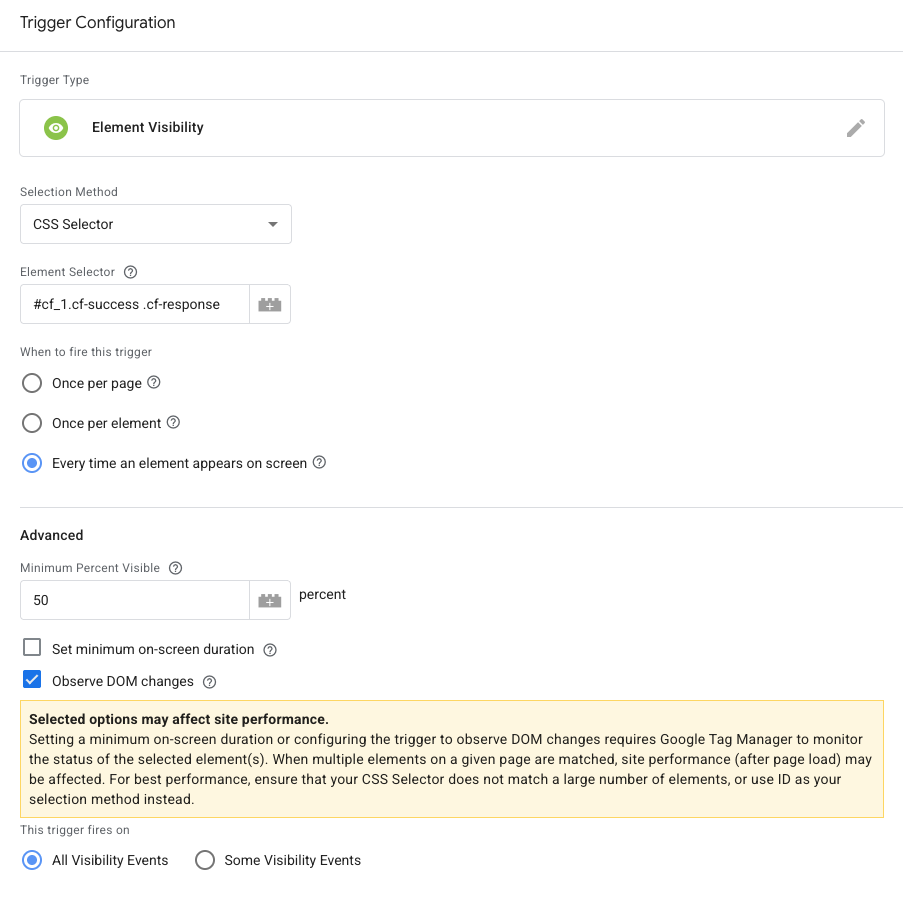
- Select Element Visibility as the trigger type
- Set Selection Method to CSS Selector
- Set Element Selector to
#cf_1.cf-success .cf-response(replace 1 with the ID of your form. This avoids false positives when multiple forms exist on the same page) - Enable Observe DOM changes. This is required as Convert Forms submits forms using AJAX and updates the DOM without reloading the page. If this option is disabled, GTM may never detect the success message.
- Attach the trigger to a tag such as a GA4 Event tag, a Google Ads conversion tag, or any third-party analytics tag. Always remember, triggers only detect events. Tags define what data is sent. Without a tag, no tracking data is recorded.
Method 2: Via Thank You Page (Page View Trigger)
Use this method when your form redirects visitors to a dedicated thank-you page after submission. This approach works well when you want a simple, reliable tracking setup based on page views and prefer managing conversions via URLs rather than JavaScript events.

How it works
After submission, the user is redirected to a thank-you page. GTM fires a tag when that page loads.
GTM trigger setup
- Create a new trigger
- Select Page View
- Set trigger type to Some Page Views
- Add condition:
Page URL contains /thank-you
Attach this trigger to your GA4 Event tag.
Method 3: Using the Convert Forms JavaScript API
Use this method when you need full control over submission tracking, want to track specific forms, or need to send additional data to Google Tag Manager. This approach is ideal for advanced analytics setups and works without relying on DOM visibility or page redirects.
Using Custom JS inside the form settings
You can place JavaScript directly inside Form → Design → Advanced → Custom JavaScript without touching templates or global scripts.
ConvertForms.Helper.onReady(() => {
    var form = document.querySelector('#cf_1');

    form.addEventListener('success', (event) => {
        window.dataLayer = window.dataLayer || [];
        window.dataLayer.push({
            event: 'convertforms_submission'
        });
    });
});
This code runs only when the specific form loads and pushes a custom event to the GTM dataLayer after a successful submission.
GTM trigger setup
- Go to Triggers and click New
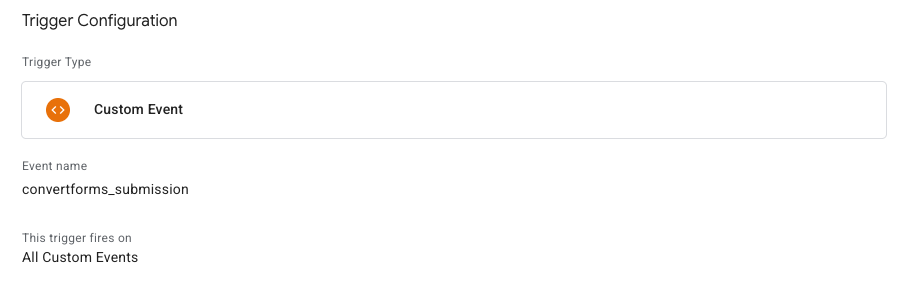
- Select Custom Event
- Set Event name to:
convertforms_submission Attach this trigger to your GA4 Event tag.


 Rated: