{all_fields} is deprecated. Use {submission.fields} instead, which produces the same output and supports more options. {all_fields} and {all_fields_filled} still work as aliases. Smart Tags are dynamic placeholders wrapped in curly braces, like {date} or {field.email}, that insert real data into your forms, emails, and notifications. Each time a submission is captured, they pull in details from the submission, the form, the visitor, and even site-wide information.
You’ve captured the submission. Now what? You’ll usually want to feed what people typed back to them: drop their name into a thank-you message, echo their answers in a confirmation email, or pass a value into a hidden field.
That’s what Field Smart Tags are for. The syntax is simple:
{field.NAME}where NAME is the field name from its settings. A field named Email becomes {field.email}, and on submit it outputs whatever the user entered.
Beyond the plain value, you can also pull the field’s label, an HTML-formatted version, or the raw unescaped content. Each variation is covered below.
Use this tag when you need to output a field’s label, so you don’t have to retype it manually.
{field.NAME.label_}Note: The trailing underscore _ is required.
Some fields provide an HTML-friendly version of their value. Useful when you want clickable links or formatted output.
{field.NAME.html}Supported fields include:
<a href="mailto:...">)<a href="tel:...">)<a href="/...">)<img> tag with the actual signatureUse this tag if you want the raw submitted value without any modifications. For example, to preserve HTML tags exactly as entered by the user.
{field.NAME.raw}Use these tags with Dropdown or Radio Button fields when you need the selected option’s label or its calculated value.
To output the label of the selected option, use:
{field.NAME.selected.label}Note that if you're populating the field's choices using PHP, the above Smart Tag will always output the value of the selected option instead of the label. This happens because the PHP script that populates the choices runs only during form rendering.
If you use Calculations, to output the calculation value of the selected option, use:
{field.NAME.selected.calcvalue}Field Smart Tags print one value at a time. That's fine for a field or two, but if your form has numerous fields, adding them one by one isn't clever.
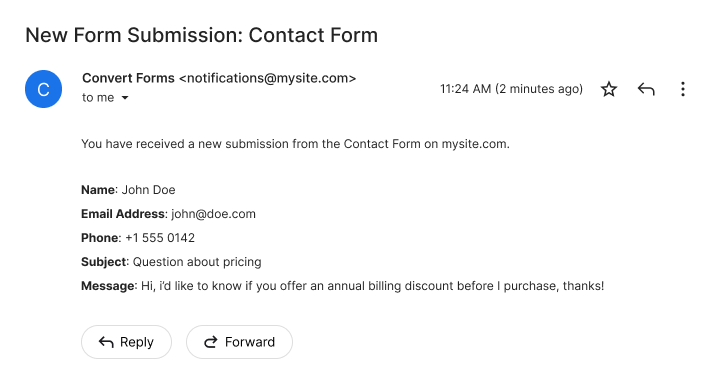
That's where {submission.fields} comes in. With a single Smart Tag you output all the values the visitor submitted. Very handy.
The syntax is simple. Use {submission.fields} and you get a label/value list like the one in the screenshot below:
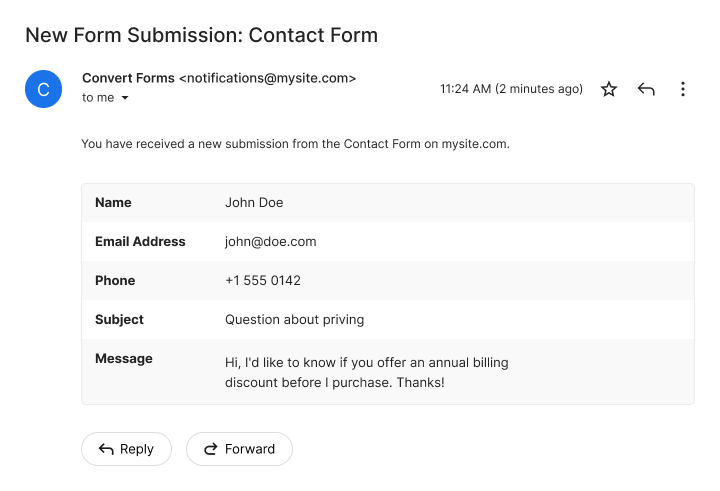
If that output doesn't fit your needs, this Smart Tag can also render the values in a tabular style, using the --tmpl=table modifier:
{submission.fields --tmpl=table}
Supported options:
| Option | What it does |
|---|---|
--hideLabels=true |
Output values only, without the field labels. |
--excludeEmpty=true |
Skip fields that have no value. |
--excludeFields=text1,dropdown2 |
Exclude specific fields by name. |
--excludeTypes=hidden |
Exclude fields by type. |
--excludeHiddenByLogic=true |
Exclude fields hidden by conditional logic at the time of submission. |
--tmpl=table |
Render as a table instead of the default list. |
--styles=false |
Output the bare table without inline CSS, so it inherits your own styling. Only applies when --tmpl=table is used. |
Options can be combined. For example, {submission.fields --excludeEmpty=true --excludeTypes=hidden} outputs only the fields that have a value and drops all Hidden fields.
{all_fields} is deprecated. Use {submission.fields} instead, which produces the same output and supports more options. {all_fields} and {all_fields_filled} still work as aliases.
{submission.fields} outputs only fields that capture a submitted value. Non-input elements, such as Heading and HTML fields, aren't included. To print one of those, add its own Smart Tag using {field.ID}, where ID is the ID of the non-input field. These tags output the submission's own identity: its ID and status, the dates it was received and last updated, and the form it belongs to. Each value is exposed as a {submission.<name>} Smart Tag.
| Title | Syntax | Description |
|---|---|---|
| ID | {submission.id} |
The unique ID of the submission. |
| Date Submitted | {submission.dateCreated} |
The date and time the submission was received. |
| Date Modified | {submission.dateModified} |
The date and time the submission was last updated. |
| Status | {submission.status} |
The submission status as a raw value: 1 for confirmed, 0 for unconfirmed. |
| Status Label | {submission.status_label} |
The submission status as a readable label: Confirmed or Unconfirmed. |
| Form ID | {submission.form_id} |
The ID of the form this submission belongs to. |
| Form Name | {submission.form_name} |
The name of the form this submission belongs to. |
{submission.identity} outputs the submission's identity in one go: its ID, the form it belongs to, its status, and the dates it was submitted and last modified. Internal notes are excluded.
It renders a label/value list by default, or a table when you add --tmpl=table.
Supported options:
| Option | What it does |
|---|---|
--hideLabels=true |
Output values only, without the detail labels. |
--excludeEmpty=false |
Include blank values. By default, details with no value are skipped. |
--exclude=status_label |
Exclude specific details by name. |
--tmpl=table |
Render as a table instead of the default list. |
--styles=false |
Output the bare table without inline CSS, so it inherits your own styling. Only applies when --tmpl=table is used. |
These tags output the context Convert Forms captures for each submission: who submitted it, where they came from, the device they used, and the campaign that brought them in. Each value is exposed as a {submission.<name>} Smart Tag, mirroring the details on the Submission Context Tracking screen.
| Title | Syntax | Description |
|---|---|---|
| Joomla User ID | {submission.user_id} |
The Joomla user ID of the submitter, when logged in. Use {submission.user_id.html} to link to the submitter's Joomla user profile. |
| Joomla User Login | {submission.user_login_name} |
The Joomla username of the submitter, when logged in. |
| Joomla User Name | {submission.user_name} |
The full name of the submitter, when logged in. |
| Joomla User Email | {submission.user_email} |
The account email of the submitter, when logged in. Use {submission.user_email.html} for a clickable mailto: link. |
| Visitor ID | {submission.visitor_id} |
An anonymous identifier for the visitor who submitted the form. |
| IP Address | {submission.ip} |
The IP address the submission was sent from. Requires IP address tracking to be enabled (it is by default). |
| Country Code | {submission.country_code} |
The two-letter country code resolved from the IP address. Requires Geolocation Features to be enabled; otherwise it stays empty. |
| Country Name | {submission.country_name} |
The full country name, derived from the Country Code. As long as a Country Code is stored, it resolves even if geolocation is later disabled. |
| Device Type | {submission.device} |
The device type detected: Desktop, Mobile or Tablet. |
| Operating System | {submission.os} |
The operating system detected from the user agent. |
| Browser | {submission.browser} |
The web browser detected from the user agent. |
| User Agent | {submission.user_agent} |
The raw browser user-agent string. |
| Source Page Title | {submission.page_title} |
The title of the page where the form was submitted. |
| Source URL | {submission.source_url} |
The URL of the page where the form was submitted. Use {submission.source_url.html} for a clickable link. |
| Source Domain | {submission.source_domain} |
The domain of the page where the form was submitted, parsed from the source URL (without www). |
| Source Path | {submission.source_path} |
The path of the page where the form was submitted, parsed from the source URL (without the domain or query string). |
| Referrer URL | {submission.referrer_url} |
The page the visitor came from before submitting. Use {submission.referrer_url.html} for a clickable link. |
| Referrer Domain | {submission.referrer_domain} |
The domain the visitor came from before submitting, parsed from the referrer URL (without www). |
| UTM Source | {submission.utm_source} |
The utm_source campaign parameter from the landing URL (e.g. google, newsletter). |
| UTM Medium | {submission.utm_medium} |
The utm_medium campaign parameter from the landing URL (e.g. cpc, email). |
| UTM Campaign | {submission.utm_campaign} |
The utm_campaign campaign parameter from the landing URL. |
| UTM Term | {submission.utm_term} |
The utm_term campaign parameter from the landing URL (paid keywords). |
| UTM Content | {submission.utm_content} |
The utm_content campaign parameter from the landing URL (A/B variant). |
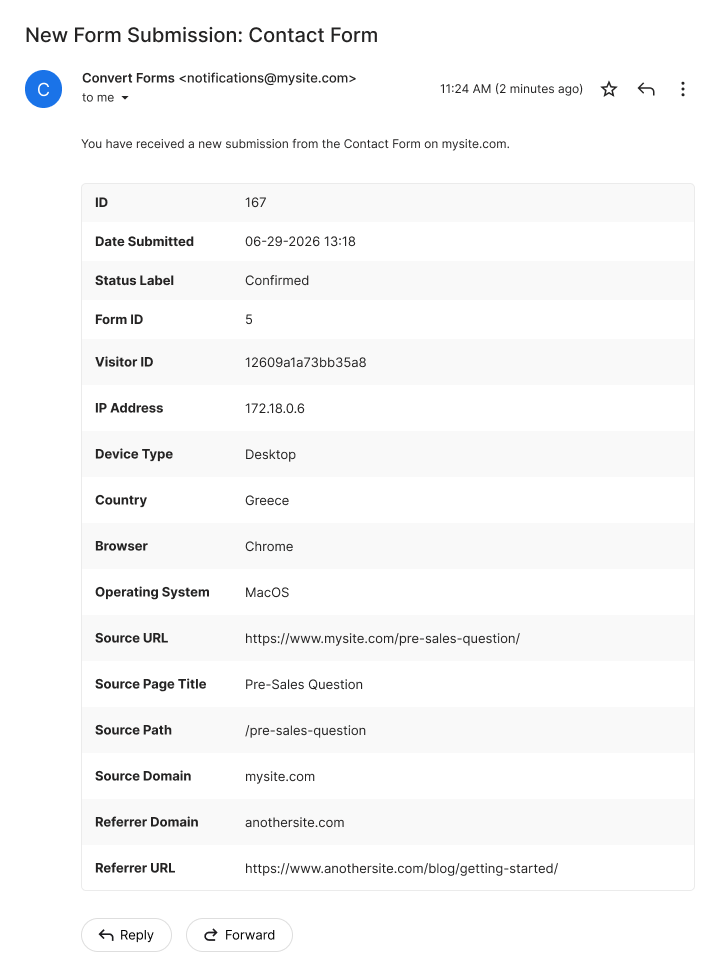
Convert Forms also auto-captures context about every submission, like the IP, browser, location, and the campaign that brought the visitor in, the same details listed in the table above.
Instead of printing them one by one, {submission.context} outputs the whole context block at once, as a label/value list like the one in the screenshot below:

If that output doesn't fit your needs, this Smart Tag can also render the values in a tabular style, using the --tmpl=table modifier:
Supported options:
| Option | What it does |
|---|---|
--hideLabels=true |
Output values only, without the detail labels. |
--excludeEmpty=false |
Include blank values. By default, details with no value are skipped. |
--exclude=ip,user_agent |
Exclude specific details by name. |
--tmpl=table |
Render as a table instead of the default list. |
--styles=false |
Output the bare table without inline CSS, so it inherits your own styling. Only applies when --tmpl=table is used. |
Tags that don't belong to the submission's identity or its tracked context: the admin's internal notes, the generated PDF, and a running submission count.
| Title | Syntax | Description |
|---|---|---|
| Submission Notes | {submission.notes} |
Internal notes added to the submission from the admin. |
{submission.pdf} |
The absolute URL of the submission's generated PDF file. Requires the PDF Form Submissions addon. Use it as an email attachment or as a download link. | |
| Submissions Count | {submissions.count} |
The total number of times the current form has been submitted. Great for social proof, e.g. "Join 3,482 people who already signed up." The number updates on its own as submissions come in. |
These tags provide access to form metadata and properties. They can be used either during form rendering or form submission.
| Title | Syntax | Description |
|---|---|---|
| Form ID | {form.id} |
The ID of the form that was just used. Useful for analytics tracking, database references, or API calls. |
| Form Name | {form.name} |
The name of the form that was just used. Handy in emails so recipients can tell which form was submitted, especially when several forms share one recipient or email template. |
Because the form is loaded into a Registry object, {form.NAME} can return any property of the form, not just the two above, as long as you know its key. Top-level properties are read directly, e.g. {form.state} or {form.created}. The form's Design settings are stored under params, so reach them with {form.params.KEY}, for example {form.params.bgcolor} for the form background color, {form.params.inputcolor} for the field text color, or {form.params.inputfontsize} for the field font size.
You've seen how submission and form Smart Tags pull in data tied to a specific submission. But there's another group that works no matter what the user submits, or whether a form was submitted at all.
Global Smart Tags add context from outside the form: where the visitor is, what page they're on, their IP, the logged-in user account, the date, and more. Because they apply everywhere on your site (not just inside Convert Forms), they're handy for personalizing content, tracking analytics, or enriching your notifications.
For a full list of what’s available, see the Global Smart Tags documentation guide.
Smart Tags work both after a form is submitted and during form rendering, for example to pre-populate a field with a value or to display dynamic content inside an HTML field.
You can use them in many places, including:
Here are some practical workflows, with links to relevant guides:
{querystring.NAME}.{randomid} to generate a unique reference number for every submission.{convertforms ID submissions_total}.{language.STRING} to build multilingual forms.{submission.pdf} to attach the generated PDF to an email or offer it as a download link.For security, Field Smart Tags escape their output by default. HTML tags are converted to entities, so user input can't inject markup into your emails or pages.
For example, if you accept user-generated content with a Rich Text Editor and the user submits:
<strong>Hello</strong>then {field.NAME} outputs:
<strong>Hello</strong>If you need the raw value with HTML preserved, use the .raw variation, {field.NAME.raw} (see Output Field Raw Value).
Usually one of three things: the field name is wrong (it must match the field's name exactly, not its label), you're using a submission tag somewhere it runs before the form is submitted, or there's a typo in the curly braces. Double-check the field name in its settings.
Open the field in the form editor and look at its Name setting (not the label). A field named email is used as {field.email}.
Field Smart Tags escape their output by default for security, so HTML turns into entities. If you trust the source and want the raw HTML preserved, use the .raw variation, {field.NAME.raw}.
{field.NAME} outputs the value as safe, escaped text. {field.NAME.raw} outputs the exact value with no escaping. {field.NAME.html} outputs a formatted version for supported fields (a clickable email, phone, or URL link, a signature image, and so on).
Some tags depend on optional features. Country and location tags need Geolocation enabled, the IP tag needs IP tracking on, and the Joomla account tags are only filled when the visitor was logged in.
Yes. Drop them into the subject line or message body, and submission data gets inserted automatically when the email sends.
Use {submission.pdf} in the Email Task's Attachments field. It returns the URL of the generated PDF and requires the PDF Form Submissions addon.
Use {field.NAME.selected.label}. For the calculation value of the selected option, use {field.NAME.selected.calcvalue}.


 Rated: