Unlock this and dozens of other powerful features by upgrading to Convert Forms Pro.
Unlock this feature
-
- Managing Form Submissions
- Searching and Filtering Submissions
- Submission Tracking Data
- Customizing Submission Columns
- Editing Submissions
- Deleting Submissions
- Importing Submissions
- Exporting Submissions
- Exporting Submissions with a Webhook URL
- Tracking the User's IP Address
- Disable Submission Storage
- Increment a Count on Each Submission
- Auto-Delete Old Submissions
- Auto-Save Each Submission to a JSON file
-
- Set up Auto-Responder Emails
- Email the Person Who Filled Out the Form
- Send an Email Only When a Checkbox Is Checked
- Attach the Submission PDF to Emails
- Send Email Based on Drop Down Selection
- Send Different Email Content Based on Form Responses
- Styling Emails with CSS
- Sending Plain-Text Alternative Body Emails
- Troubleshooting Email Delivery
- Tracking Sent Emails
- Resending Emails
-
- Browser Autocomplete for Form Fields
- Redirect to a Menu Item After Form Submission
- Show a Form Only to Logged-In Users
- Adding an “Other” Option
- Adding a Unique ID to Each Form Submission
- Show or Hide Form Fields Based on User Joomla User Group
- Scroll the Page to the Top When a Long Form is Submitted
- Display Submissions Count for a Specific Form
- Populate Drop Down, Radio Buttons or Checkboxes with a CSV File
- Silently POST Submitted Data to Any API or URL
- Create a Custom Login Form
- Auto-Populate Fields with Article Data
- Add a placeholder text to a Dropdown field
- Create Multilingual Forms in Joomla
- Redirect User to a URL After Form Submission
- Importing and Exporting Forms
- Display Convert Forms in a popup
-
- Minimum Time to Submit
- Restrict Form Submissions Based on IP
- Enforcing a Custom Password Policy in Convert Forms
- Add Cloudflare Turnstile to your Joomla Form
- Implement the Iubenda Consent Database in Joomla with Convert Forms
- Add Custom Validations to Fields and Forms
- Add Math Captcha to your Form
- Prevent a Field From Saving in the Database
- Add hCaptcha to your Form
- Enable Double Opt-in
- Allow Form Submissions in Specific Date Range
- Ensure a Unique Value is Entered Into a Field
- Block Form Submissions Containing Profanity (Bad Words)
- Block Email Addresses or Email Domains
- Honeypot
- Setting Up Google reCAPTCHA
- Create GDPR Compliant Forms
Conditional Fields
Show or hide fields based on the value of another field to create dynamic forms that adapt to user input, improving clarity and streamlining the experience.

Conditional Fields is available in Pro
People don't like filling out long forms. By only asking relevant questions, you can create the illusion that your form is short. With Conditional Fields, you can easily create smart and dynamic Joomla forms that react to your users' actions.
With Convert Forms Conditional Fields, you can create rules to:
Show and hide fields

Change values in fields
Add and remove items to/from a list

How to use the Conditional Fields Builder
In this guide, you will learn how conditional logic for fields works and how to utilize it to create dynamic fields and personalized forms.
Note: To proceed with this guide, you must enable Convert Forms Pro and the Conditional Logic Plugin.
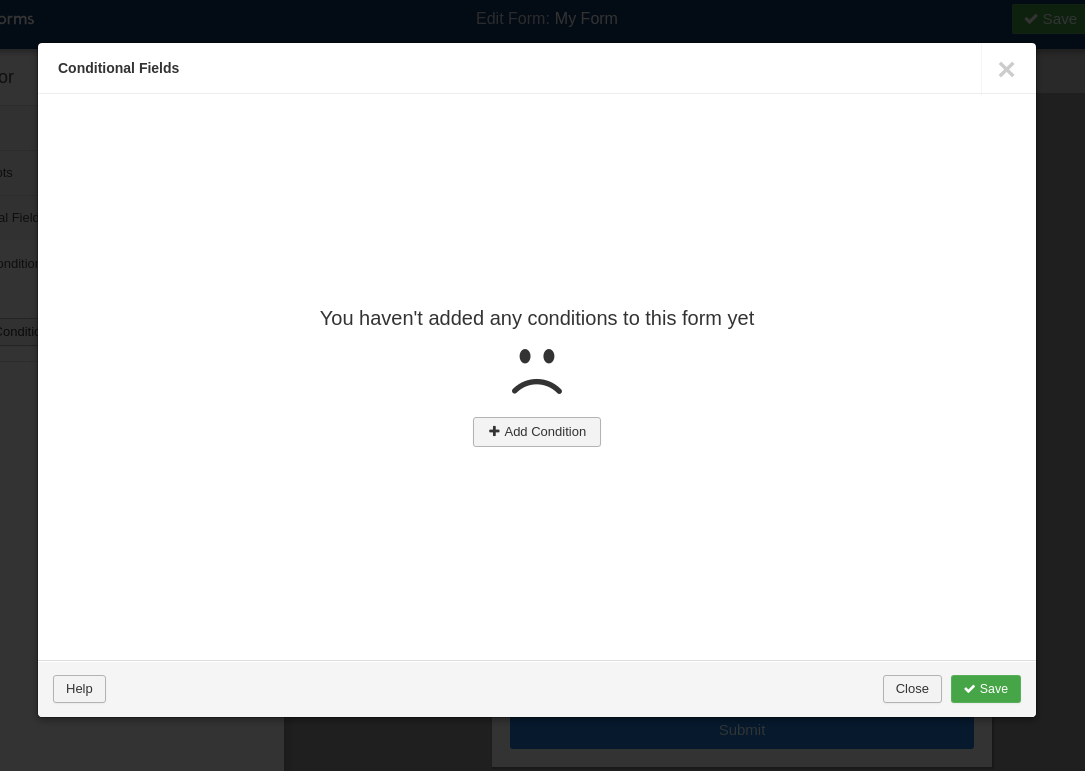
Convert Forms manages conditional fields centrally, under the Behavior tab in the left settings panel. You must enable the Conditional Logic option first and then click Setup Conditions to open the simple yet powerful condition builder environment.

Once the builder opens up for the first time, you will be greeted with a message that says, “You haven't added any conditions to this form yet”. Click ‘Add Condition’ to add your first condition to the form.
After at least one condition is configured, you should be able to see more options. The builder is divided into two parts: the Conditions List and the Condition Settings.
The left sidebar shows all the form conditions you've created at a glance. Think of it as a menu that helps you easily navigate through each condition's settings.
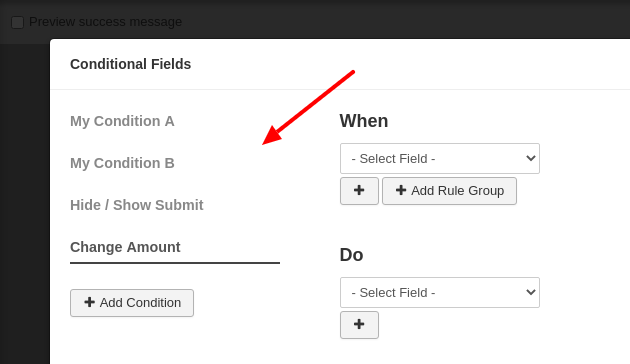
When you click on an item on the list, the respective condition settings appear at the right. This is helpful, especially with complex forms where you must focus on one condition at a time.
Each item on the list can have a unique label so you can easily distinguish each condition. Just click on an item, and its label will be turned into editable input. You can write anything you want, as the label appears only in the backend.
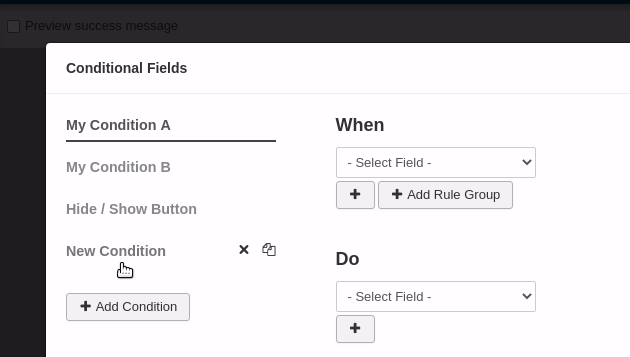
Additionally, when you hover over an item, a toolbar with two buttons appears that helps you delete and copy a condition.
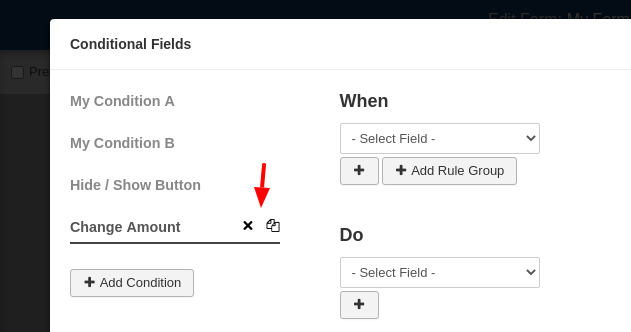
To add a condition, you click on the Add Condition button. Although there's no limit on how many conditions a form can have, it is recommended to keep it to the minimum for performance reasons, especially if your form consists of many fields. Read Does conditional logic impact performance? FAQ to learn more. Lastly, conditions are independent and do not interact with one another.
The magic happens in the right area of the builder. There, you can set up each condition's rules and actions. A condition is organized into the following three sections.
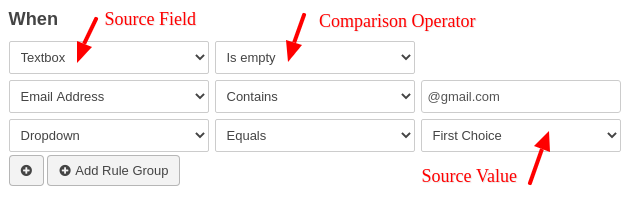
1. When (Rules)
These are the rules that need to be met to execute actions. A rule is always based on the value of a field and consists of three options: the Source Field, the Comparison Operator, and the Source Value.
To better understand what each option does, let's see an example of a dead-simple condition in plain English.
WHEN FIELD1 equals to 123 SHOW FIELD2The FIELD1 equals to 123 part is our rule. Where FIELD1 is the Source Field, equals to is the Comparison Operator, and 123 represents the Source Value.
Source Field
The field of the form that accepts the user input will affect the fields in which we want to behave dynamically. Fields that do not require user input, such as HTML and Submit Button, won't be included.
Comparison Operator
Configure how to compare the expected value set in the Source Value with the user input. The options shown in this dropdown may vary depending on the type of the selected Source Field. For instance, the Has Selected option will appear in the list only if the selected Source Field is a Dropdown or Checkbox field.
Here’s a list of all supported operators.
| Operator | Description |
|---|---|
| Is empty | Returns true if the field is empty |
| Equals | Returns true if field equals to x. The case is ignored. |
| Updates | It fires every time the field value changes. |
| Has selected | Returns true if the field has selected the x option. It appears on option-based fields such as the Checkbox field. |
| Contains | Returns true if the field contains x. Appears on text-based fields only. The case is ignored. |
| Starts with | Returns true if the field starts with x. The case is ignored. |
| Ends with | Returns true if the field ends with x. The case is ignored. |
| Matches Regex | Returns true if the field matches the regular expression. The Regular Expression is initialized with no flags. Το Provide flags using # at the end following the Regex flags. Eg: string#igm Read more about Regular Expressions. |
| Is not empty | Returns true if the field is not empty. |
| Does not equal | Returns true if the field does not equal x. The case is ignored. |
| Has not selected | Returns true if the field has not selected the x option. It appears on option-based fields such as Dropdowns, Checkboxes, and Radio Buttons. |
| Does not contain | Returns true if the field does not contain x. Appears on text-based fields only. The case is ignored. |
| Does not start with | Returns true if the field does not start with x. The case is ignored. |
| Does not end with | Returns true if the field does not end with x. The case is ignored. |
| Does not match Regex | Returns true if the field does not match the regular expression. |
| Less than | Returns true if the field is less than x. |
| Less than or equal to | Returns true if field is less than or equal to x. |
| Greater than | Returns true if field is greater than x. |
| Greater than or equal to | Returns true if the field is greater than or equal to x. |
| Is checked | Returns true if the field is checked. It appears in single checkbox fields such as the Terms of Service field. |
| Is not checked | Returns true if the field is not checked. It appears in single checkbox fields such as the Terms of Service field. |
| Total checked equals | Returns true if the total checked items is equal to x. Appears on Checkboxes only. |
| Total checked less than | Returns true if the total checked items are less than x. Appears on Checkboxes only. |
| Total checked less than or equal to | Returns true if the total checked items are less than or equal to x. Appears on Checkboxes only. |
| Total checked greater than | Returns true if the total checked items are greater than x. Appears on Checkboxes only. |
| Total checked greater than or equal to | Returns true if the total checked items are greater than or equal to x. Appears on Checkboxes only. |
All text-based comparisons are not case-sensitive. That means both goodmorning and goodMORNING values will be treated the same. If you need to match the exact letter case, use the RegEx comparison with the i flag.
Source Value
The expected value of the Source Field will make the rule valid. The display of this option varies depending on the type of the selected Source Field and the selected Comparison Operator. For example, if the selected Source Field is a type of Radio Buttons and the Operator is set to Equals, you should see a dropdown populated with the field's choices while with the Operator set to Starts With, the Source Value will be turned into a free text waiting for a custom value.
Read How Conditional Logic Rules are Processed to learn more technical details about how rules are evaluated and processed
2. Do (Actions)
This is where you configure what actions to execute when the condition is met, like showing or hiding a field or changing its value. An action consists of two options: the Field and the Action options.
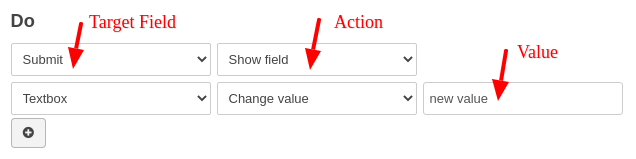
Target Field
This represents the field of the form to execute the action if the condition is satisfied. Since configuring conditional logic for a field based on its values is not supported, you cannot select a field used in the Rules section.
Action
In this option, you select from a predefined list of actions how the selected field will be affected. The options in the dropdown will vary depending on the chosen field type. For instance, if the selected field is a type of Dropdown, you should see actions that run on options such as Show Option and Hide Option.
Value
This option is only available when the Action is set to Change Value, and it represents the value we'd like the field to get when the action is executed.
Here’s a list of all supported actions.
| Action Name | Description |
|---|---|
| Show field | Make a field visible. |
| Hide field |
Make a field hidden. When a field is hidden by conditional logic, the following happens to it under the hood.
|
| Change value | Change the value of the field. This option is available for text-based fields only. |
| Select option | Select a field option. This option is available for dropdown, checkbox, and radio button field types. |
| Deselect option | Deselect a field option. This option is available for Checkboxes and Radio Button field types. |
| Show option | Make an option visible. Available with Dropdown, Checkboxes, and Radio Button field types. |
| Hide option | Make an option hidden. Available with Dropdown, Checkboxes, and Radio Button field types. |
| Copy Value From | Copy the field value to another field. |
Do you have questions about this process? Are you missing an Action that will make your life easier? Let us know.
3. If the condition is not met
Lastly, you can optionally define what to do when the rules defined in the When section are unmet. This is rather useful for two reasons. First, it ensures your conditional fields have a default state when the form appears initially on the page load. Second, it saves you time, as you don’t need to create a separate condition for the actions that need to run when the condition is not met.
How Conditional Logic Rules are Processed
Rules are organized into sets of rules called groups. Rules inside a group are evaluated using the AND operator, while Rule Groups are evaluated using the OR operator. That means a condition is met when all rules inside at least one group are valid.
When a group is found to be valid, the processing or rules stop to prevent unnecessary workload on the browser, as the condition has already been met.
Both rules and rule groups are processed from top to bottom as configured in the backend.
Basic Conditional Logic
The most common use of conditional logic is to show or hide fields based on a user’s selection. Let's look at an example.
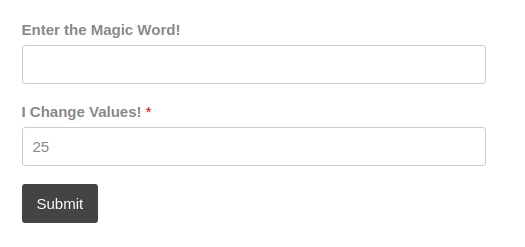
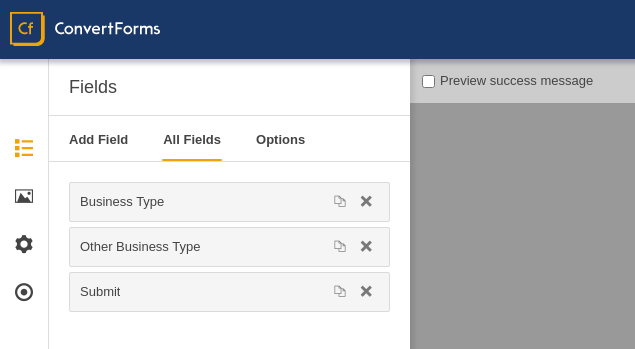
Suppose you have a dropdown called “Business Type” with 3 options: Retail, Food Service, or Other. You also have a textfield called “Other Business Type” which you would like to show only when the “Other” option is selected in the Business Type dropdown.
Here's how our conditional logic rule formula would be in plain English:
WHEN BUSINESS TYPE EQUALS TO OTHER SHOW OTHER BUSINESS TYPELet's see how we can implement that formula using Convert Forms Conditional Fields.
Start by opening the form builder. Go to Behavior → Conditional Fields, and click Setup Conditions. On the open window, click Add Condition to add your first condition.
For this scenario, we will need a condition with a single rule. In the When section, in the first dropdown, select Business Type as our Source Field, set the Operator to Equals, and in the 3rd dropdown, choose Other.

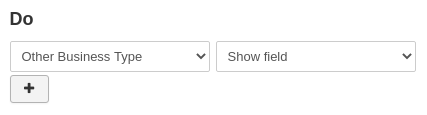
Next, we must define the action to execute when the rule is met. In our case, we want the field Other Business Type to appear. To do so, in the “Do” section, in the first dropdown, select Other Business Type and set the Action option to Show Field.
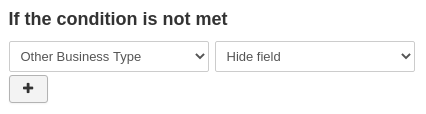
Lastly, we want the same field to disappear when the user doesn’t select the Other option in the Business Type field. In the "If the condition is not met" section, click on the button with the plus icon to add an action, select the Other Business Type field from the 1st dropdown, and set the Action to Hide Field.
Click Save, and you're done. You have now applied conditional logic to your form!
Complex Conditional Logic
You may find that a single conditional logic rule isn’t complex enough for some situations. However, you can add as many conditions as you’d like.
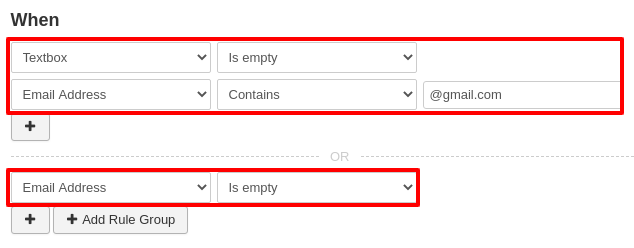
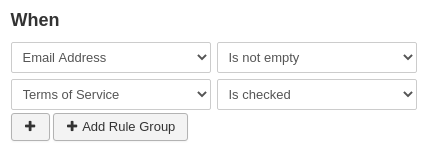
For example, we’ll ask users to subscribe to our retail marketing newsletter. However, we only want to display the submit button if they’ve shared an email address and accepted our terms and conditions.
To set this up, we must add an Email Address field and a Terms of Service field to our form.
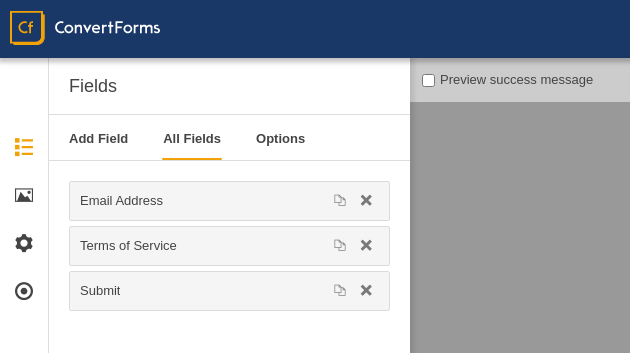
Next, we’ll repeat the process from the previous section to enable conditional logic and add our rules. This time, we are going to use 2 rules which will state:
WHEN EMAIL ADDRESS IS NOT EMPTY AND TERMS OF SERVICE IS CHECKED SHOW SUBMITGo to Behavior → Conditional Logic, open the conditional logic builder, and click Add Condition to a new condition.
The first rule concerns the Email field, which is required not to be empty. Select Email Address in the fields dropdown, and set the Comparison Operator to Is not empty. Next, click on the first button with the plus icon to add a second rule. From the fields dropdown, select Terms of Service and set the Operator to Is checked.
Our rules should look like in the screenshot below:
When adding multiple conditions, be careful that they don’t conflict with one another. Testing your form before adding it to a live page or module is always a good idea.
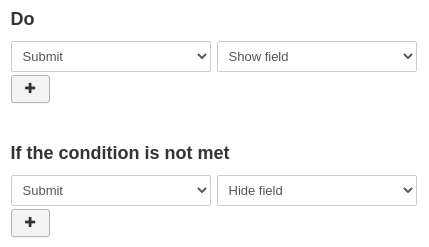
Next, we'll need to set the actions for our condition to show the submit button when it is met and hide it when it is not met. Therefore, our actions should look like in the screenshot below:
Click save, and you’re done. You have now applied a more complex conditional logic to your form.
Behavior of Conditional Logic
Keep the following behavior in mind as you work with conditional logic in your forms:
- Target fields will be only included in the submission data if they are displayed when the form is submitted.
- Target fields are only required if they are displayed when the form is submitted.
- Editing the Values of list-based fields such as Dropdown, Radio Buttons, and Checkboxes used in your conditional logic may affect existing rules.
- If you remove a field from the form, associated conditional logic may also be removed.
- When more than one logic rule affects a target field, the field will be shown when any rules are satisfied.
Initially Hide All Fields
Sometimes, you may want your form to start by showing only one field, such as a Dropdown or Radio Buttons field, and reveal additional fields based on the user’s selection. To achieve this, you can use Conditional Fields to initially hide all the other fields.
To do this, create a new conditional rule and move it to the top of the list so it runs first when the form loads. In this group, add all the fields you want to have initially hidden in the "Do" section.
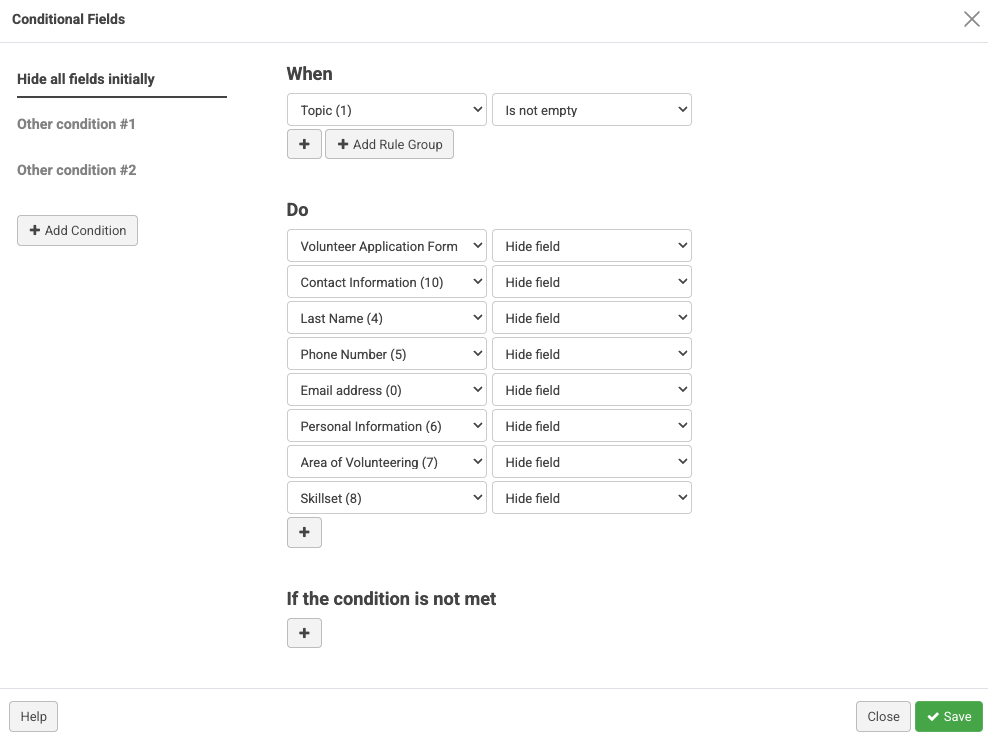
Since every conditional rule requires a trigger, you’ll need to define one that fits your case. If your only visible field (for example, Topic) has no default value, meaning it starts empty, you can use the trigger When “Topic” is not empty. In the "Do" section, select all the other fields you want to hide. This way, when the form loads, the condition is not met because the Topic field is empty, so all the selected fields remain hidden. Once the user makes a selection, the condition becomes true, and the other conditional rules will handle showing the relevant fields.
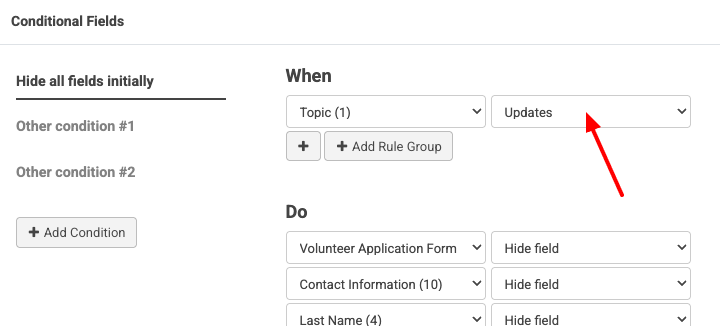
If your visible field already has a default value, you can’t use the "Is not Empty" operator because that condition will be true immediately on page load. Instead, use the "Updates" operator. For example, set the rule to When "Topic" Updates → Do → Hide Fields A, B, C, etc. The "Updates" operator fires when the field updates, which also happens when the form first renders, ensuring your "hide" actions run as soon as the form loads.
After setting up the first conditional rule, continue by creating additional conditional rules to control when specific fields appear, such as Show Sales Fields when Topic equals Sales or Show Support Fields when Topic equals Support.
If your form contains many fields, such as 50 or more, selecting them all in the "Do" section might feel inefficient. Unfortunately, there’s currently no built-in way to bulk-hide fields unless you’re familiar with JavaScript. In that case, you could add a small custom script that hides all fields except the one you want to show initially.
Preventing Field Flickering (FOUC)
When using conditional logic, fields may briefly appear visible before being hidden by JavaScript, creating a "flash" effect known as FOUC (Flash of Unstyled Content). This happens because the conditional logic runs after the page loads, so fields are initially visible until the JavaScript determines they should be hidden.
To prevent this flickering effect, you can manually hide fields that should be initially hidden by adding the cf-hide CSS class to each field using the CSS Class option in the field settings.
Compare One Field with Another
So far, we’ve seen how you can show or hide fields based on fixed values you enter in the backend. For example, showing a field when “Country equals Greece” or “Topic equals Support.”
But what if you want your comparison to depend on the value of another field instead of a static value? That’s now possible using the {field.FIELD_NAME} Smart Tag.
With this feature, you can compare one field’s value against the live value of another field in the same form. This allows you to build forms that react dynamically to user input, creating much more flexible and intelligent behavior.
Here's how it works.
When defining a conditional rule, use the Smart Tag of another field inside the comparison value. For example:
Show "Field X" when "FIELD Y" equals {field.otherField}Convert Forms replaces {field.otherField} with the actual value of the field and evaluates the rule in real time as the user types.
This unlocks new possibilities that go beyond static comparisons.
For example, you can now check if two fields have identical input, such as verifying a user’s email or password confirmation. This helps ensure the data entered is consistent before submission.
Show "Submit Button" when "Confirm Email" equals {field.email}
In larger forms, you might reuse the same reference value in multiple conditions. Instead of updating every rule manually, you can now reference a single field. If the field value changes, all related conditions update automatically.
Instead of typing “50” in multiple comparisons, use {field.min_budget}, and changing that field instantly affects all related conditions.
This feature lets your forms respond to relationships between inputs, not just fixed thresholds.
- Show a warning if Minimum Budget > Maximum Budget
- Display extra options if Start Date equals End Date
- Reveal a password confirmation field only when both password inputs match
At this stage, field-to-field comparisons support only the equals (=) comparator. You can still mix them freely with static comparisons, and your existing rules will continue to work the same.
Tips for using Conditional Logic
Use these tips to create more versatile rules with conditional logic:
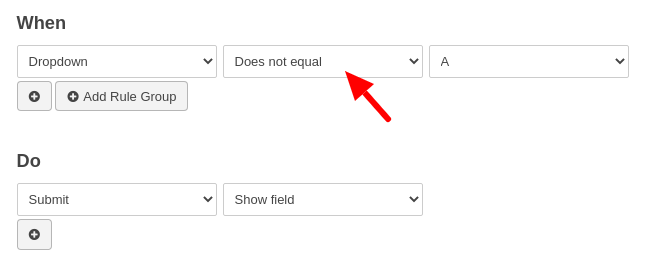
Choose an appropriate operator
If you want to display a target field in more cases than not, listing all of those cases can be inefficient. Instead, accomplish the same result with a shorter condition than using inverse operators such as Does not equal. For instance, if you want to display the Submit button in all cases except when value "A" is selected in a dropdown field, you can use the following rule:
Nested Logic
A target field can also be a source field, allowing you to create nested logic. For example, the answer to Question 1 can cause the form to display Question 2, and the answer to Question 2 can cause the form to display Question 3. If the answer to Question 1 changes such that Question 2 is not shown, then Question 3 will not be displayed either.
Frequently Asked Questions
Can I integrate conditional logic with Email Notifications?
To send emails conditionally, use the Email app in the Tasks section.
Can I conditionally send submissions to 3rd-party apps like MailChimp or HubSpot?
Yes, use the Tasks section.
How do I display a different success message based on a field value?
To do so, you must use PHP in the PHP Scripts → After Form Submission area. To learn how to do that, visit the respective section on the PHP Scripts doc page.
Can I create calculations based on field values?
You don't need conditional logic to create calculations based on field values. You need to enable the Calculations option found in the field settings. To learn more details, visit the Calculations guide. Additionally, after you’ve set up your calculations, you can set up conditional logic based on the calculated values.
Can I create a rule based on the length of a field value?
Not yet. This feature is on the to-do list. When implemented, you can show or hide a field based on its value. For example, if “FIELD A” is shorter than 7 characters, show “FIELD B.”
Can I create conditional logic with dates?
Not yet. This is on the to-do list as well.
Can I create conditional logic with File Upload fields?
Not yet. This is on the to-do list as well.
Is there any limitation on the number of conditions a form can have?
No, there’s no limit on the number of conditions or rules you can have on a form. However, it is recommended to keep it to a minimum for browser performance reasons.
Does conditional logic impact performance?
Conditional logic evaluation is done on the client side (the browser) using JavaScript, and sometimes browsers don't perform these tasks very quickly. The browser must process all fields associated with the rules to evaluate conditional logic and know which fields to display or hide, along with any other JS scripts you may have on the page. Also, some conditional logic use cases can add extra work to the browser, e.g., if you’re using conditional logic to show/hide a field and using this same field as a value in another field's conditional logic.
In most cases, you won’t notice any performance impact, but if you have a huge form with lots of fields, you may experience slowness in the form display or usage; this is something expected due to the explanation above. In this case, the only workaround for improving the conditional logic performance would be to reduce the number of fields or split your form into many smaller forms.
Why do my Conditional Fields not work?
There are different reasons why your conditional fields are not working. Here are the most common cases:
- You recently changed Field Names of your fields or changed your Field Choice Values (for radio/checkbox/dropdown fields). In this case, you must re-configure your Conditional Fields.
- You've added HTML tags in your Radio/Checkbox/Dropdown field choice labels. You should remove the HTML tags or specify unique choice values for each choice.
Conditional Fields is available in Pro
Unlock this and dozens of other powerful features by upgrading to Convert Forms Pro.
Unlock this feature
Last updated on Dec 15th 2025 14:12
In This Article
- How to use the Conditional Fields Builder
- How Conditional Logic Rules are Processed
- Basic Conditional Logic
- Complex Conditional Logic
- Behavior of Conditional Logic
- Initially Hide All Fields
- Preventing Field Flickering (FOUC)
- Compare One Field with Another
- Tips for using Conditional Logic
- Frequently Asked Questions
- Can I integrate conditional logic with Email Notifications?
- Can I conditionally send submissions to 3rd-party apps like MailChimp or HubSpot?
- How do I display a different success message based on a field value?
- Can I create calculations based on field values?
- Can I create a rule based on the length of a field value?
- Can I create conditional logic with dates?
- Can I create conditional logic with File Upload fields?
- Is there any limitation on the number of conditions a form can have?
- Does conditional logic impact performance?
- Why do my Conditional Fields not work?
Tassos offers a premium suite of Joomla extensions with 7 products and over 2.2 million downloads, providing reliable solutions since 2014.


 Rated:
Copyright © 2014 - 2026 - Smile Motive Development LP. All Rights Reserved.