-
- Redirect to a Menu Item After Form Submission
- Tracking Form Lead Source
- Show a Form Only to Logged-In Users
- How to Increment a Count on Each Form Submission
- Adding an “Other” Option
- Adding a Unique ID to Each Form Submission
- Show or Hide Form Fields Based on User Joomla User Group
- Disabling Browser Autocomplete for Form Fields
- Scroll the Page to the Top When a Long Form is Submitted
- Display Submissions Count for a Specific Form
- Populate Drop Down, Radio Buttons or Checkboxes with a CSV File
- Automatically Delete Submissions Older Than X Days
- Silently POST Submitted Data to Any API or URL
- Automatically Save Each Submission to a JSON file
- Create a Custom Login Form
- Auto-Populate Fields with Article Data
- Add a placeholder text to a Dropdown field
- Create Multilingual Forms in Joomla
- Redirect User to a URL After Form Submission
- Importing and Exporting Forms
- Exporting Form Submissions
- Display Convert Forms in a popup
-
- How to Create a Quiz Form
- Show Confirmation Popup After Submission
- Using the Conditional Content Shortcode in Convert Forms
- Copy Value From One Field to Another
- Submission Tasks
- Exporting Form Submissions with a Webhook URL
- Conditional Fields
- PDF Generator
- Input Masking
- Calculations
- Populate Fields Using Query String
- Smart Tags
-
- Minimum Time to Submit
- Restrict Form Submissions Based on IP
- Enforcing a Custom Password Policy in Convert Forms
- Add Cloudflare Turnstile to your Joomla Form
- Implement the Iubenda Consent Database in Joomla with Convert Forms
- Add Custom Validations to Fields and Forms
- Add Math Captcha to your Form
- Prevent a Field From Saving in the Database
- Add hCaptcha to your Form
- Enable Double Opt-in
- Allow Form Submissions in Specific Date Range
- Ensure a Unique Value is Entered Into a Field
- Block Form Submissions Containing Profanity (Bad Words)
- Block Email Addresses or Email Domains
- Honeypot
- Setting Up Google reCAPTCHA
- Create GDPR Compliant Forms
Set up Auto-Responder Emails
Send email notifications to users and admins after successful submission. Customize content, sender, and subject to match your brand.

Would you like to send an auto-responder (automatic reply) e-mail whenever a user submits one of your forms? Convert Forms makes it super easy to set up automated email notifications such as welcome emails, autoresponse emails, auto-reply emails, confirmation emails or automatic replies that get sent as soon as a user submits a form on your site. Let's see how you can make that happen.
Setup an Email Notification
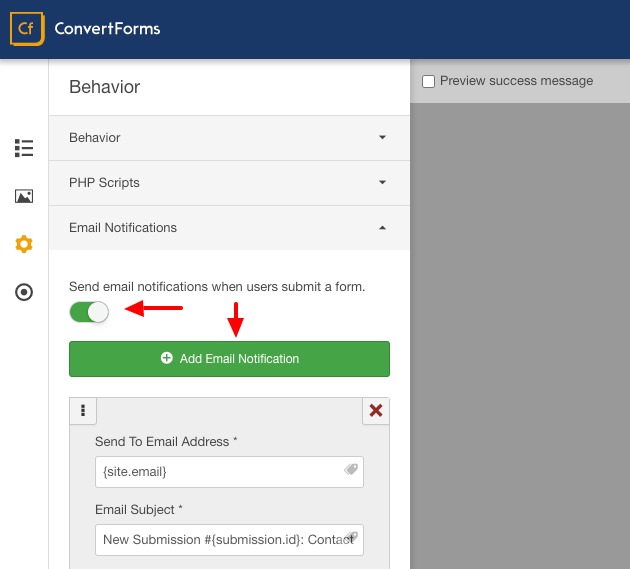
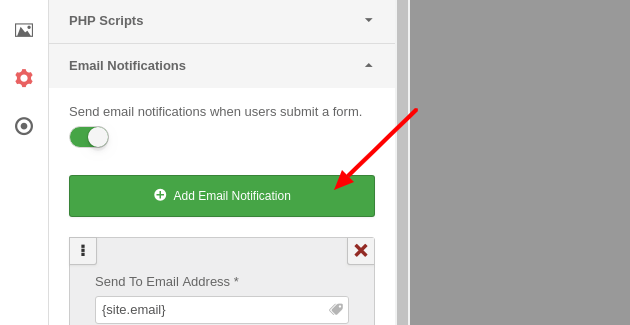
To setup an Email Notification, create new form and edit an existing one and go to Behavior » Email Notifications where you can manage all form email notifications. The very first thing you will need to do is to turn the Send email notifications when users submit a form option on. Then, click Add Email Notification as shown in the picture below.
There are several fields you’ll need to fill out when setting up a form email, and we’ll go into more detail for each below.
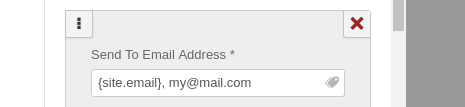
Send to Email Address
This field is where we add the email of the notification's recipients. It can be one email address or a comma separated email addresses.
By default the Send To Email Address will be set to the {site.email} Smart Tag, which pulls the administrator email from your Joomla configuration settings. However, you can replace this or add additional emails if you'd like.
To learn how to send an automatic email to the person who has filled out the form read the Email the Person Who Filled Out the Form section.
Email Subject
This field is where we type the subject of the email notification. There aren't any restrictions on what you write here. You can also choose to mix in a Smart Tag like we did in the example. The Smart Tag {submission.id} represents the unique ID of the submission.

From Name
This field is where we fill in the name of the sender. By default, your forms will set the From Name to the {site.name} Smart Tag which pulls the Site's Name from your Joomla configuration settings.

If you'd like to change this to the name of the person filled the form, you will need to use the respective field-based Smart Tag.
From Email
This field is where we type the email of the sender. By default, your forms will set the From Email to the {site.email} Smart Tag which pulls the administrator email from your Joomla configuration settings.
Reply-To Email
If your recipient clicks “reply” from this email message, most email clients will automatically send the reply to the email address specified here instead of the “FROM ADDRESS.
This option serves the purpose of being the default reply email address when a user clicks the Reply button in their email program or webmail. It may be useful to set this to a Smart Tag that pulls the user's email from the submission.
There can only be one Reply-To email address and if it's left empty, it will default to the From Email.
Reply-To Name
This is where you define the Name that will be used in conjunction with the Reply-To Email option. If it's left empty, the Reply-To Name will default to the From Name.
Message
Here, you can create the body of your email.
By default, the Message will contain the {all_fields} Smart Tag, which displays all user-entered fields plus hidden fields and their labels.
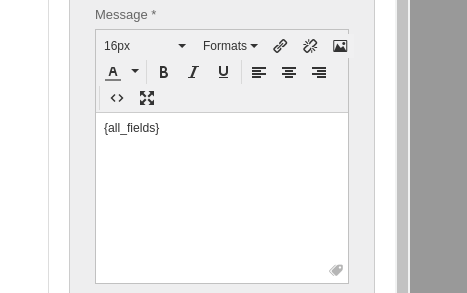
If instead of every field on the form, you only want specific fields to appear, click to open the Smart Tags Box and select your fields from the list.
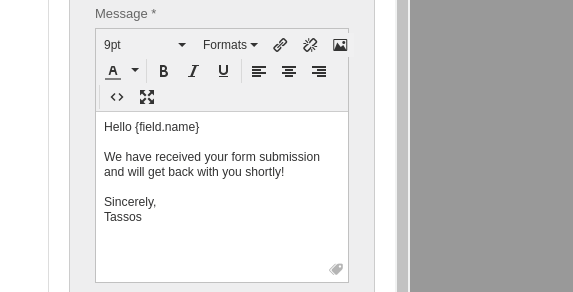
If you’d like to customize the notification content further, you can add additional text, Smart Tags, and even HTML or inline CSS to this Message field.
Attachments
In this option, you can define files that are going to be included as attachments to the email notification. This option accepts only local paths relative to the root of your webspace. To define multiple files, separate by a comma.

In case, you have setup a File Upload field in your form and you want to include as attachments the files uploaded by the person who filled the form, check the Including File Attachments to Emails section below.
Multiple Email Notifications
Convert Forms makes it easy to create additional and more customized email notifications for a form. To add an additional notification email, make sure you’re still on Behavior » Email Notifications. Then, click the Add Email Notification button.
Email the Person Who Filled Out the Form
Sending a confirmation email to the user who submitted the form is a great way to quickly acknowledge that you've received their entry.
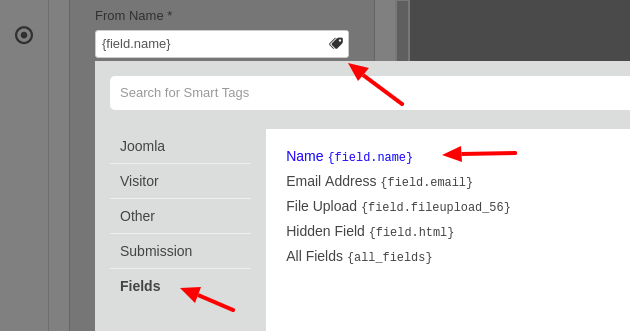
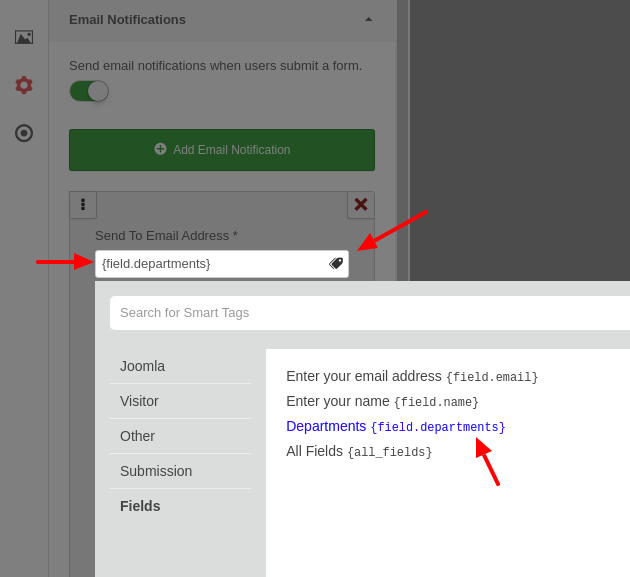
To set this up, edit your form builder and go to Behavior » Email Notifications. Click Add Email Notification to setup a new email or edit an existing one. Then, click on the icon at the right side of the Send To Email Address field.
This link will open a list of all available Smart Tags. Click on Fields and then select the respective Smart Tag that represents the email address field as shown in the picture below.
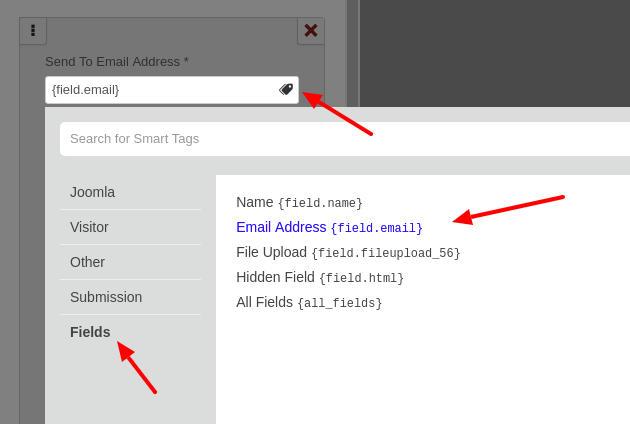
When the email is sent, this Smart Tag will automatically pull the email that the user entered into the form.
Send Email based on drop down selection
Sending an email based on a dropdown field value is really simple with the use of a Smart Tag just like we did in the Email the Person Who Filled Out the Form guide.
First, we need to add a dropdown field to the form. Then, in the Choices section of the dropdown settings, we need to configure the dropdown labels and their respective values which will represent the email addresses. In the example below, we've created a dropdown with the name 'departments' with 3 options.
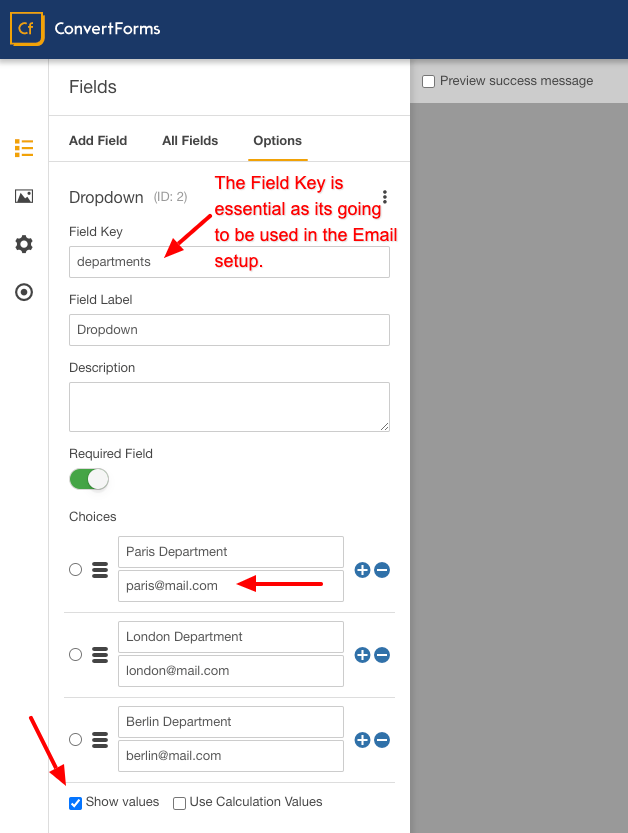
Once we are done with the dropdown configuration, go to Behavior » Email Notifications. Click Add Notification or edit an existing one. Then, click on the icon at the right side of the Send To Email Address field to open the Smart Tags selection box. Click on Fields to show field-based Smart Tags only and select the Department Smart Tag we created in the previous step.
You're done! Now, every time a user selects Paris Department or Berlin Department, an email notification will be sent to the [email protected] and [email protected] email addresses, respectively.
Email the Author of the Article
If you use one form on several articles and you'd like to email the author of each article where the form is viewed, follow the steps below:
- Edit your form.
- Add a Hidden Field to the form. Let's call it "author".
- Set the "Default Value" option to the {article.user.email} Smart Tag. This will pull the email address of the current article.
- Go to the email settings and set the recipient to the {field.author} Smart Tag. This will pull the value of the hidden field representing the article's author.
Including File Attachments to Emails
There are cases where you've configured your form with a File Upload field and you'd like to include the files uploaded by the user as attachments to the auto-response emails.
To do so, click on the icon at the right sider of the Attachments option. When the Smart Tags Box opens, click on Fields at the left side and then select the Smart Tag that represents the File Upload field.
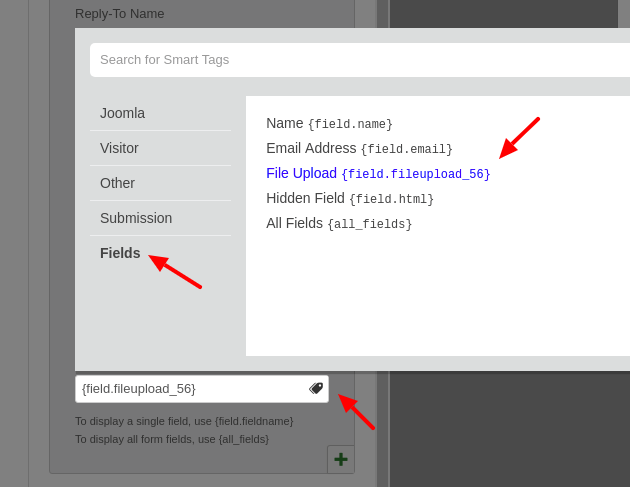
To include multiple file attachments, separate your file upload fields, or point to files from the root directory of your Joomla site using a comma, example:
{field.upload1}, {field.upload2}, images/avatar.pngSend an Email only when a Checkbox is checked
Would you like to send an email only when a checkbox is checked or a field has a certain value? To do so, copy and paste the following PHP snippet into the PHP Scripts -> After Form Submission option in your form settings.
// Proceed only if a certain field is checked or has a certain value
if (!$submission->params['ENTER_FIELD_NAME'])
{
    return;
}

$email = [
    'from_name'  => '{site.name}',
    'from_email' => '{site.email}',
    'recipient'  => '[email protected]',
    'subject'    => 'New Contact Request #{submission.id}',
    'body'       => 'Here are the details: {all_fields}'
];

// DO NOT EDIT BELOW
// Replace Smart Tags in the email object
$email = ConvertForms\SmartTags::replace($email, $submission);

// Send the email
$mailer = new NRFramework\Email($email);

if (!$mailer->send())
{
    // In case of an error, display the error in the form.
    throw new \Exception($mailer->error);
}
Troubleshooting Email Notifications
Are you seeing issues with delivery of your form's autoresponder/autoreply emails? There are many factors that can contribute to email deliverability, but in most cases the solution is to adjust notification settings or set up an SMTP. To troubleshoot notification emails in Convert Forms visit the Troubleshooting Form Notification Emails guide.


 Rated: