-
- Managing Form Submissions
- Searching and Filtering Submissions
- Submission Tracking Data
- Customizing Submission Columns
- Editing Submissions
- Deleting Submissions
- Importing Submissions
- Exporting Submissions
- Exporting Submissions with a Webhook URL
- Tracking the User's IP Address
- Disable Submission Storage
- Auto-Delete Old Submissions
- Auto-Save Each Submission to a JSON file
- Increment a Count on Each Submission
- Add a Unique ID to Each Submission
-
- Set up Auto-Responder Emails
- Email the Person Who Filled Out the Form
- Send an Email Only When a Checkbox Is Checked
- Attach the Submission PDF to Emails
- Send Email Based on Drop Down Selection
- Send Different Email Content Based on Form Responses
- Styling Emails with CSS
- Sending Plain-Text Alternative Body Emails
- Troubleshooting Email Delivery
- Tracking Sent Emails
- Resending Emails
-
- Browser Autocomplete for Form Fields
- Redirect to a Menu Item After Form Submission
- Show a Form Only to Logged-In Users
- Adding an “Other” Option
- Show or Hide Form Fields Based on User Joomla User Group
- Scroll the Page to the Top When a Long Form is Submitted
- Display Submissions Count for a Specific Form
- Populate Drop Down, Radio Buttons or Checkboxes with a CSV File
- Silently POST Submitted Data to Any API or URL
- Create a Custom Login Form
- Auto-Populate Fields with Article Data
- Add a placeholder text to a Dropdown field
- Create Multilingual Forms in Joomla
- Redirect User to a URL After Form Submission
- Importing and Exporting Forms
- Display Convert Forms in a popup
-
- Minimum Time to Submit
- Restrict Form Submissions Based on IP
- Enforcing a Custom Password Policy in Convert Forms
- Add Cloudflare Turnstile to your Joomla Form
- Implement the Iubenda Consent Database in Joomla with Convert Forms
- Add Custom Validations to Fields and Forms
- Add Math Captcha to your Form
- Prevent a Field From Saving in the Database
- Add hCaptcha to your Form
- Enable Double Opt-in
- Allow Form Submissions in Specific Date Range
- Ensure a Unique Value is Entered Into a Field
- Block Form Submissions Containing Profanity (Bad Words)
- Block Email Addresses or Email Domains
- Honeypot
- Setting Up Google reCAPTCHA
- Create GDPR Compliant Forms
Setting Up Google reCAPTCHA
Needless to say, the safety of your website is important. The service that is widely known and combines security with ease of use is reCAPTCHA. It is a free Google service that protects your website from spam and abuse.
reCAPTCHA is easy to use, but it is hard to be managed by automated malicious software. Convert Forms extension includes reCAPTCHA v2 (checkbox and invisible), and reCAPTCHA v3; you can configure it with just a few steps.
Add reCAPTCHA v3
The reCAPTCHA v3 differs from the v2 Checkbox and v2 Invisible by running in the background and generating a score based on the user's interaction within your site. The higher the score, the more likely the user is human.
Generate reCAPTCHA Keys
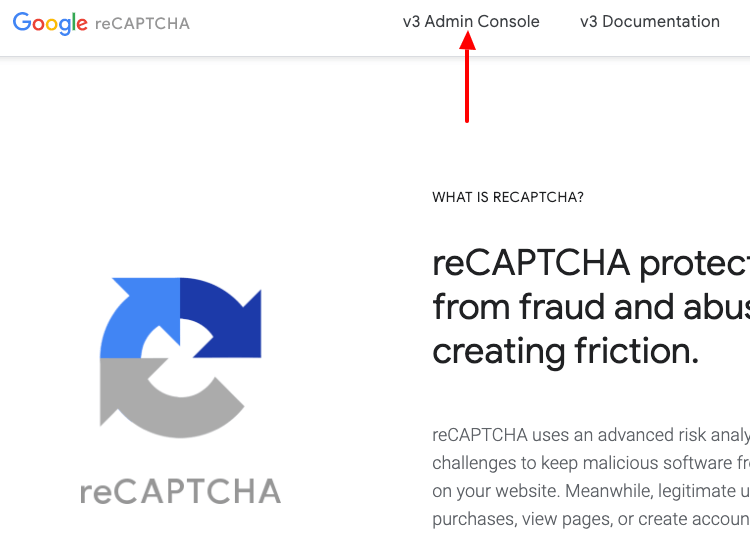
To generate the required keys, you will have to log into your Google account by visiting the Admin Console: https://www.google.com/recaptcha/admin
Click on the v3 Admin Console button.
After logging in, you will have to click on the + (Plus) button to register a new site.

After clicking the + (Plus) icon you will be redirected to add a new Site and after you fill in all fields, you will be able to copy your API keys.
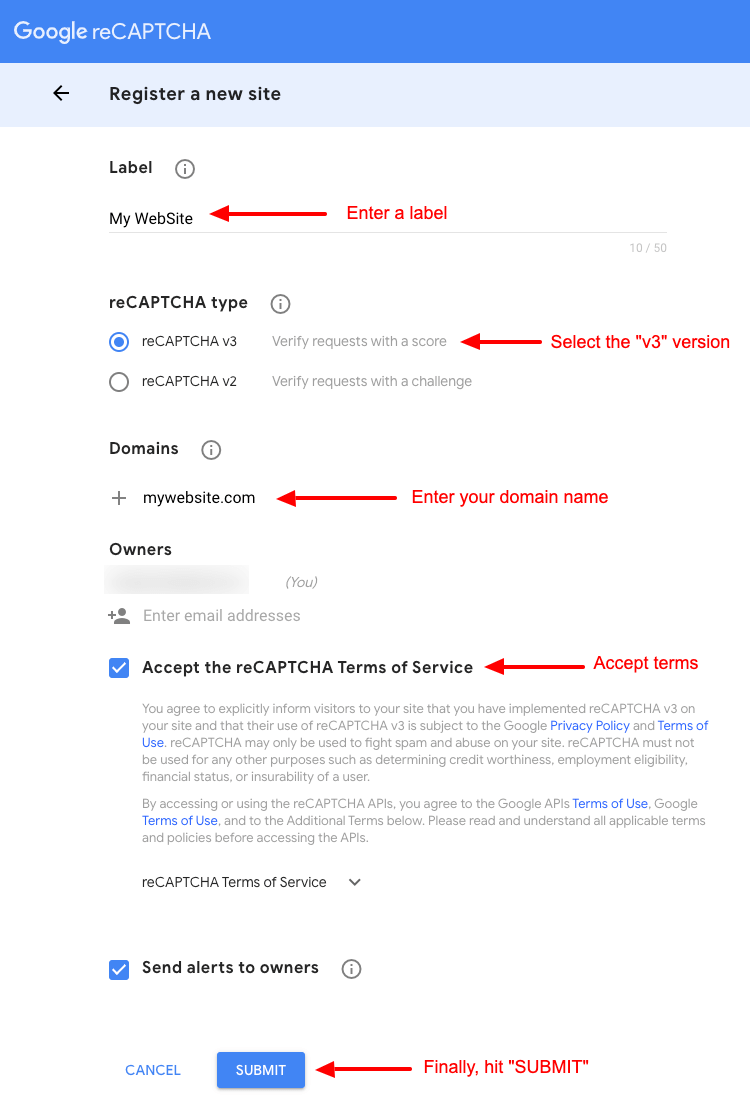
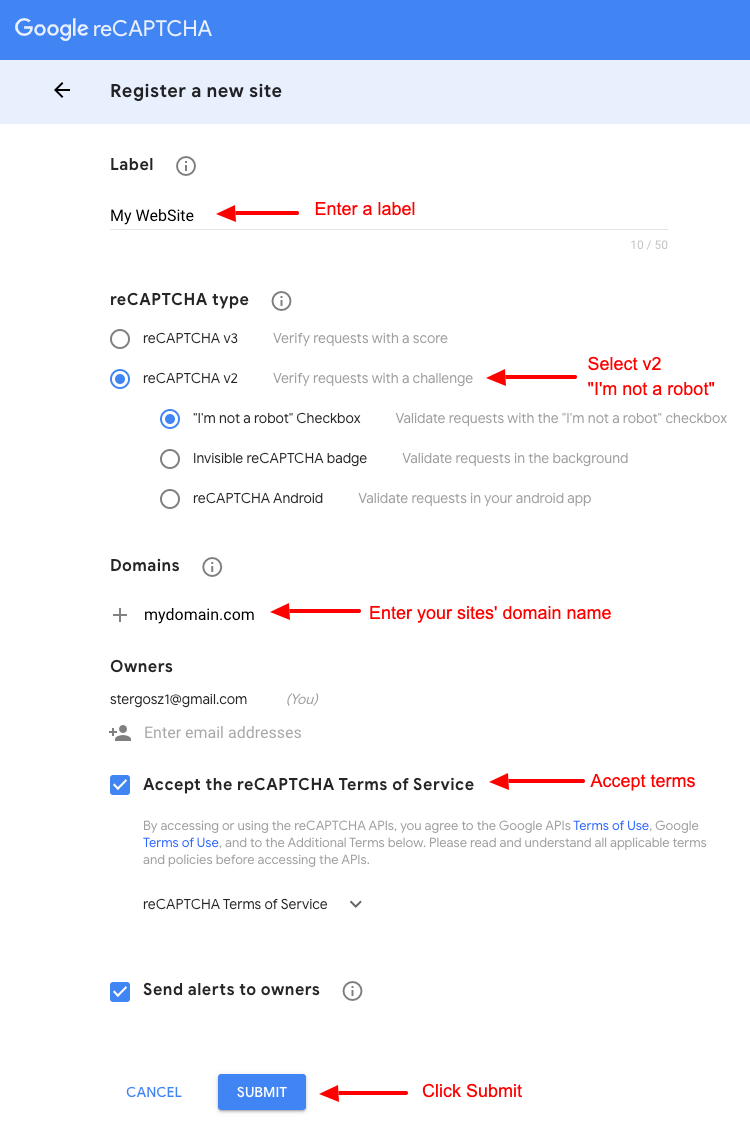
Completing the following fields, you will have the required keys that you need to include in your website so that you can enable the service.
- Set your Site's Name in the Label field
- Choose the "reCAPTCHA v3" option from the reCAPTCHA type
- Add your domain name
- Accept the reCAPTCHA Terms of Service
- Click on the SUBMIT button
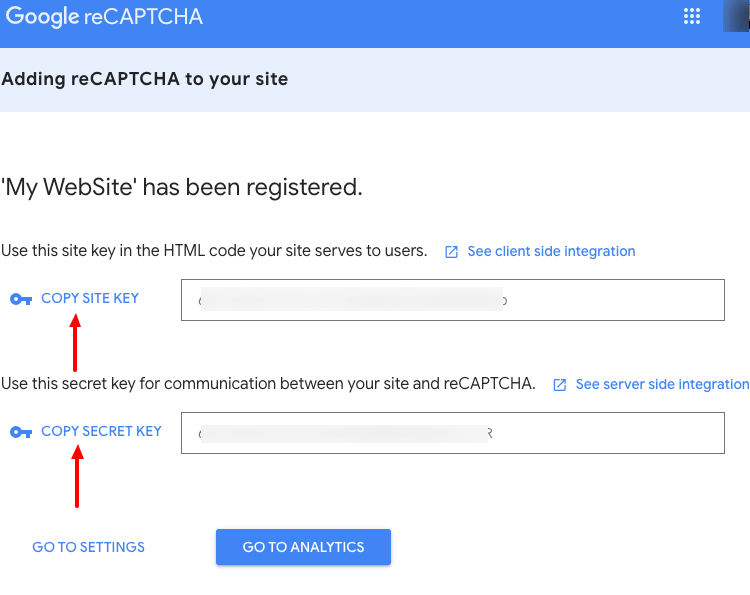
Your keys are ready! The Site key and the Secret key are what you need.
Add reCAPTCHA v3 Field to your form
In Joomla administration environment click on Global Configuration → Convert Forms and click on the "reCAPTCHA" tab.
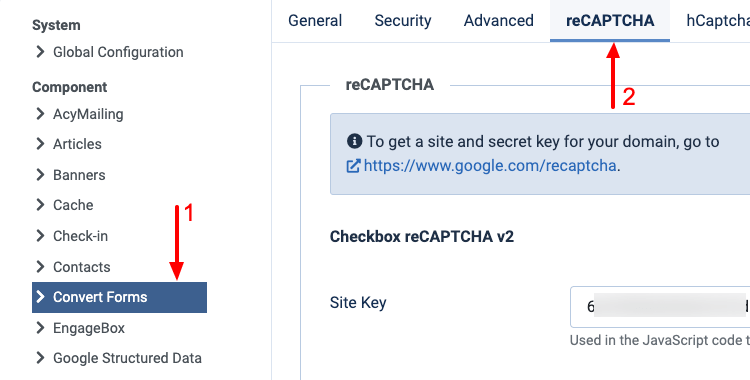
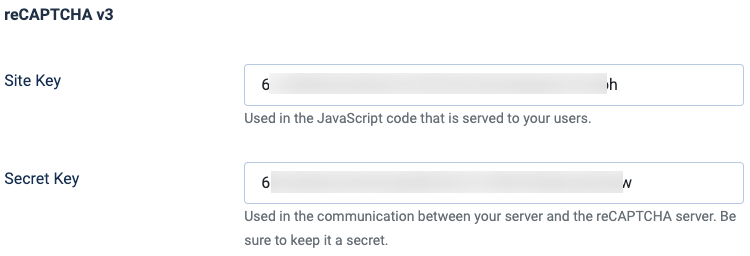
Locate the "reCAPTCHA v3" section and type both your "Site key" and "Secret key" in the respective fields using the corresponding keys that Google has provided you.
Next, go to the main administration menu: Components → Convert Forms and then click on Forms.
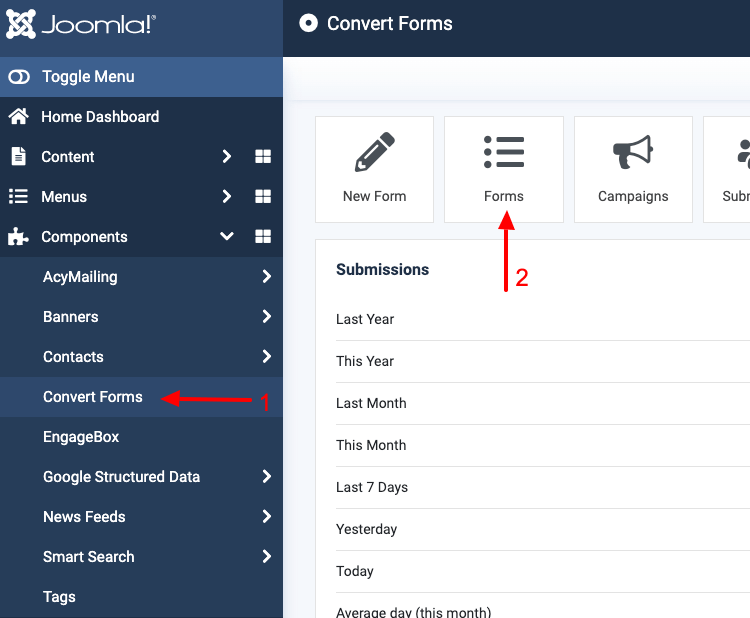
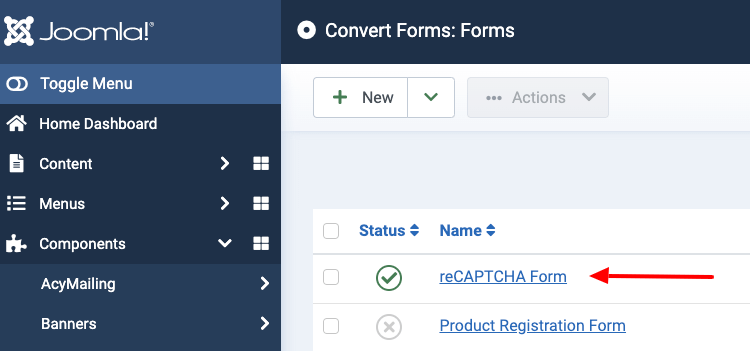
And choose the form you want to edit.
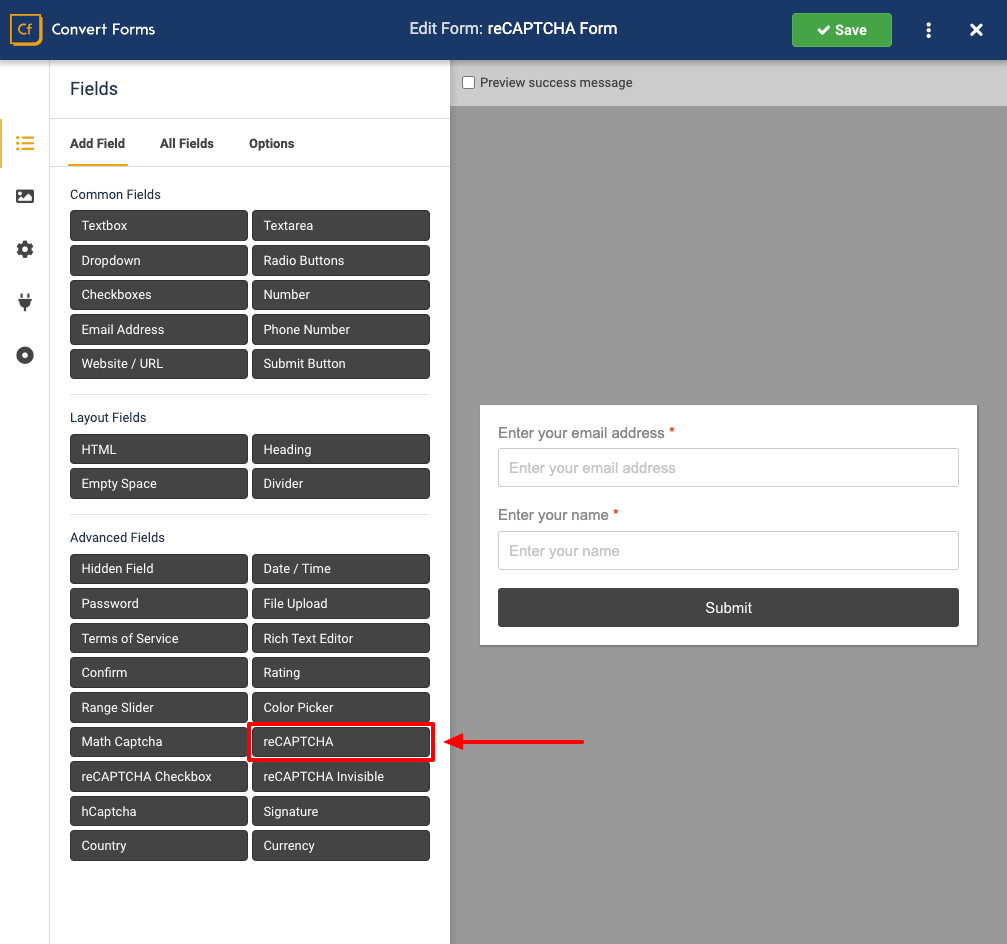
Choose the tab "Add Field" and click on the reCAPTCHA field in the Captcha Fields category. Save your work.
Subsequently, select the v3 reCAPTCHA version, and more options about appearance are given where you can optionally choose the reCAPTCHA badge in the field options.
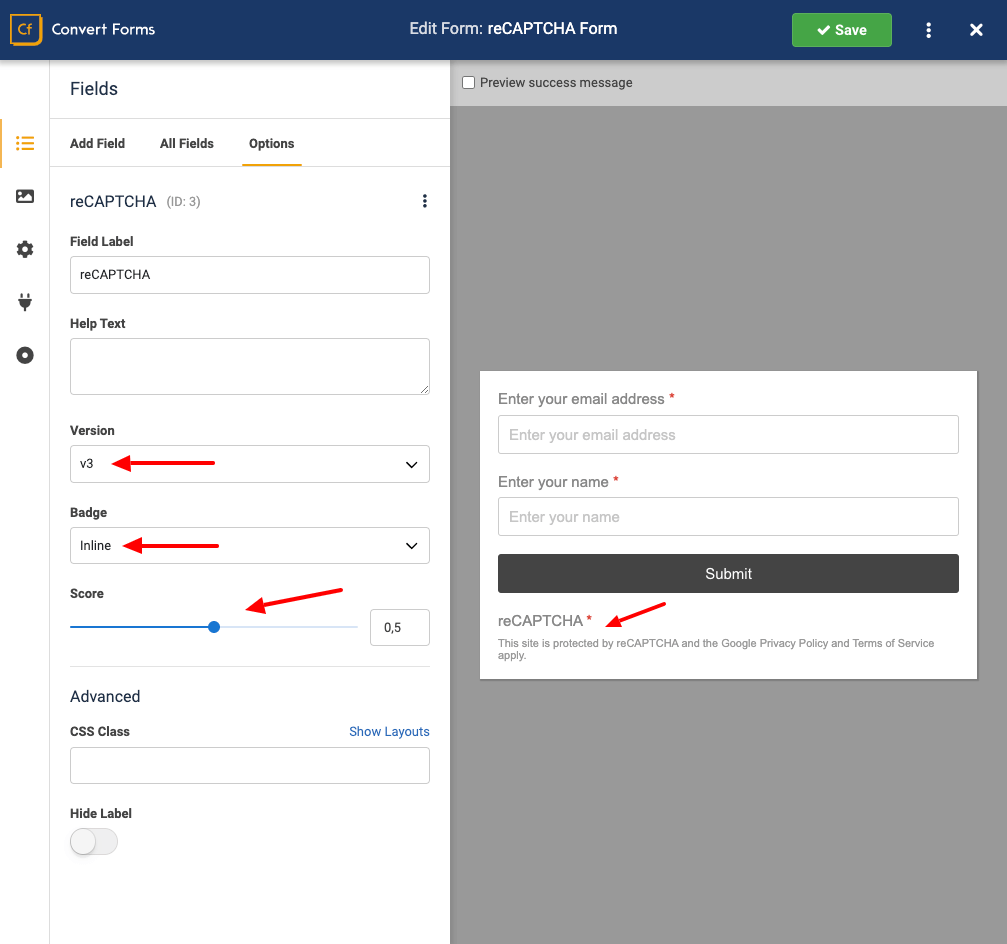
reCAPTCHA v3 comes with the Inline, and Bottom Right badges as you can see in the screenshot below:
This site is protected by reCAPTCHA and the Google Privacy Policy and Terms of Service apply.
![]()
Finally, after all the changes save your work. Your reCAPTCHA v3 field is ready!
Add Checkbox reCAPTCHA v2
The "I'm not a robot" Checkbox requires the user to click a checkbox indicating the user is not a robot. This will either pass the user immediately (with No CAPTCHA) or challenge them to validate whether or not they are human.
Generate reCAPTCHA Keys
To generate the required keys, you will have to login into your Google account by visiting the Admin Console: https://www.google.com/recaptcha/intro/v3.html
Click on the v3 Admin Console button.
After logging in, you will have to click on the + (Plus) button to register a new site.
After clicking the + (Plus) icon you will be redirected to add a new Site and after you fill in all fields, you will be able to copy your API keys.
Completing the following fields, you will have the required keys that you need to include in your website so that you can enable the service.
- Set your Site's Name in the Label field
- Choose the reCAPTCHA v2 "Im not a robot" Checkbox from the reCAPTCHA type
- Add your domain name
- Accept the reCAPTCHA Terms of Service
- Click on the SUBMIT button
Your keys are ready! The Site key and the Secret key are what you need.
Add Checkbox reCAPTCHA Field to your form
In Joomla administration environment click on Global Configuration → Convert Forms and click on the "reCAPTCHA" tab.
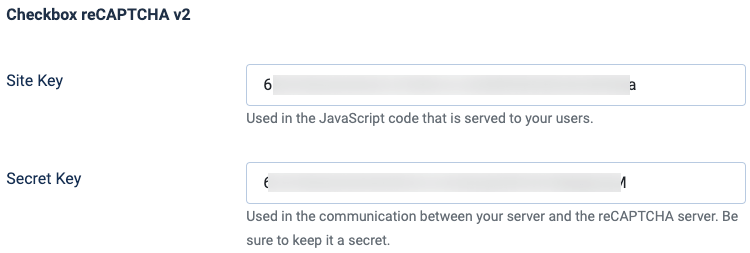
Locate the "Checkbox reCAPTCHA v2" section and type both your "Site key" and "Secret key" in the respective fields using the corresponding keys that Google has provided you.
Next, go to the main administration menu: Components → Convert Forms → Forms.
And choose the form you want to edit.
Choose the tab "Add Field" and click on the reCAPTCHA field in the Captcha Fields category. Save your work.
Subsequently, you can select the reCAPTCHA version, in our case, v2 Checkbox, and more options about appearance are given where you can optionally choose the reCAPTCHA theme and size in the respective field options.
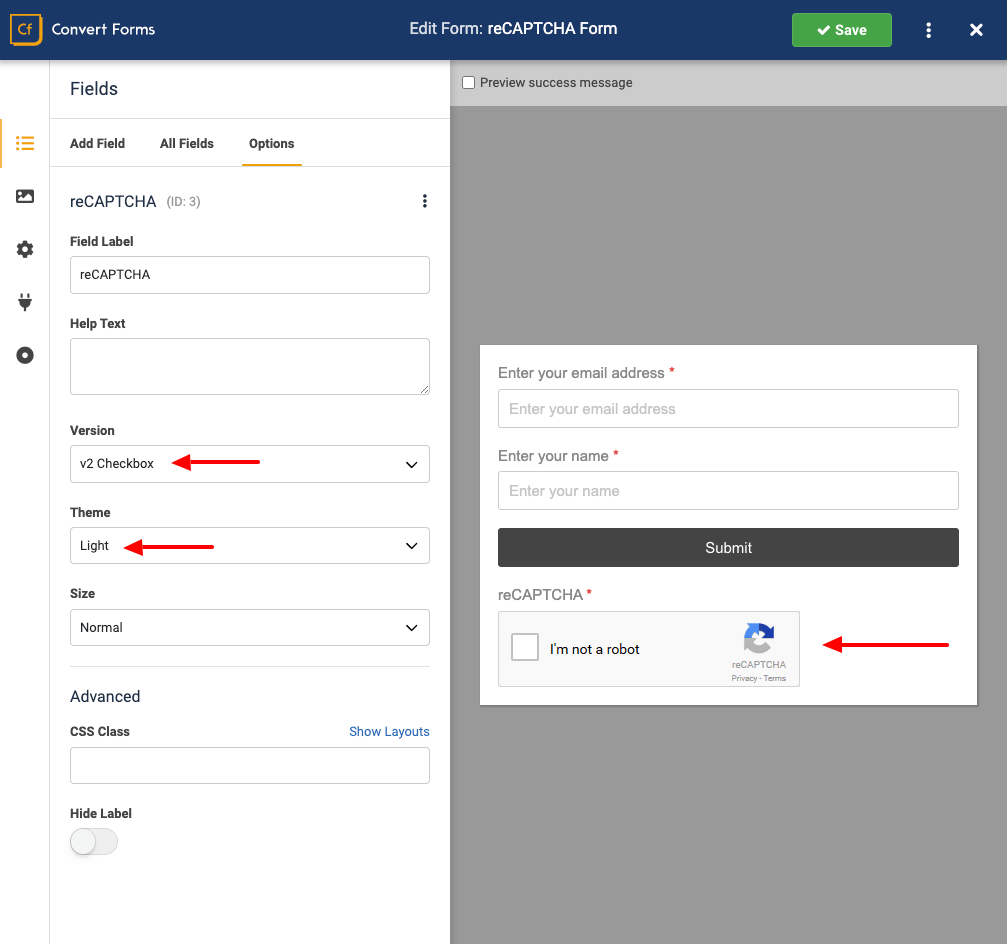
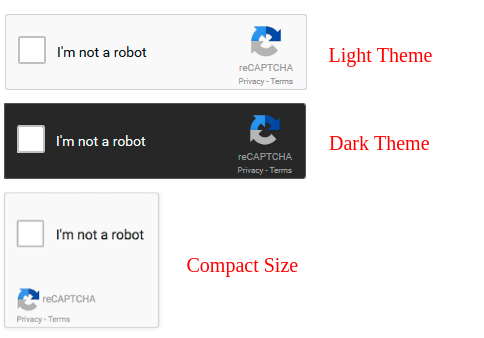
reCAPTCHA v2 Checkbox comes with the Light and Dark themes and in a Normal and Compact size as you can see in the screenshot below:
Finally, after all the changes save your work. Your reCAPTCHA field is ready!
Add Invisible reCAPTCHA v2
The invisible reCAPTCHA does not require the user to click on a checkbox, instead it may display a challenge to the user if it detects any spam behavior when a user submits your form.
Generate reCAPTCHA Keys
To generate the required keys, you will have to login into your Google account by visiting the Admin Console: https://www.google.com/recaptcha/intro/v3.html
Click on the v3 Admin Console button.
After logging in, you will have to click on the + (Plus) button to register a new site.
After clicking the + (Plus) icon you will be redirected to add a new Site and after you fill in all fields, you will be able to copy your API keys.
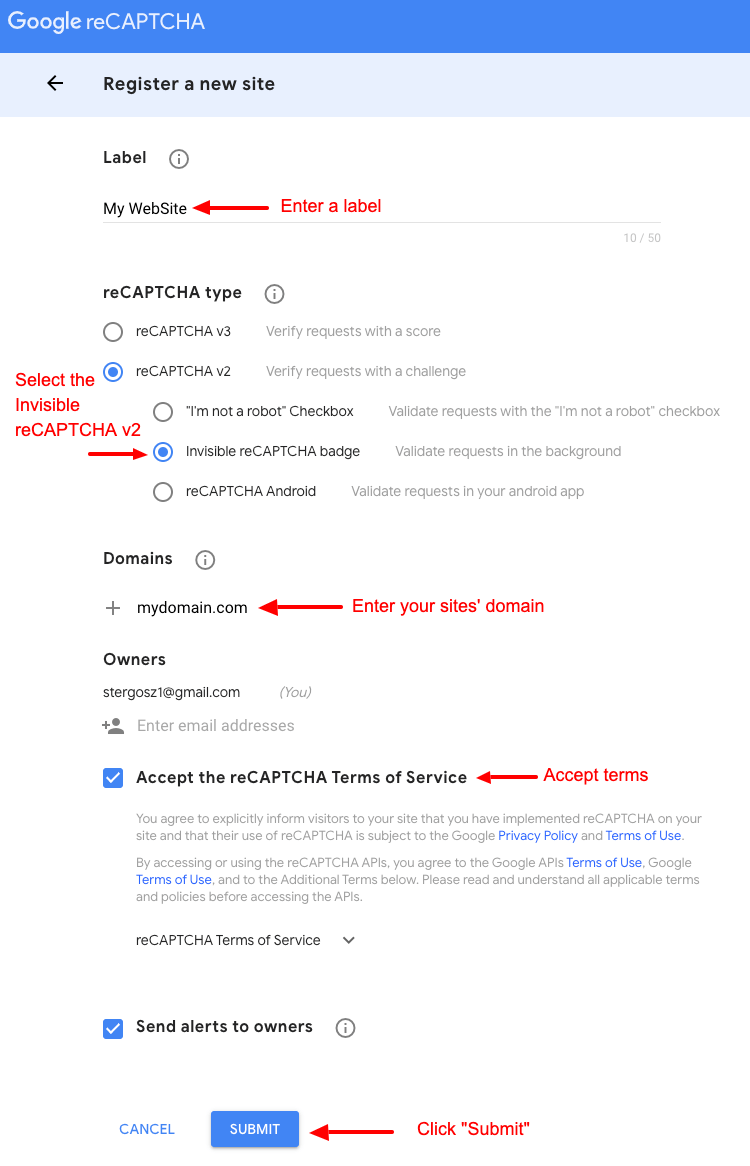
Completing the following fields, you will have the required keys that you need to include in your website so that you can enable the service.
- Set your Site's Name in the Label field
- Choose the reCAPTCHA v2 Invisible reCAPTCHA badge from the reCAPTCHA type
- Add your domain name
- Accept the reCAPTCHA Terms of Service
- Click on the SUBMIT button
Your keys are ready! The Site key and the Secret key are what you need.
Add Invisible reCAPTCHA Field to your form
In Joomla administration environment click on Global Configuration → Convert Forms and click on the "reCAPTCHA" tab.
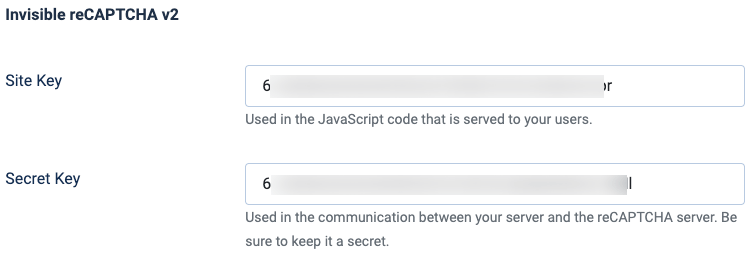
Locate the "reCAPTCHA v3" section and type both your "Site key" and "Secret key" in the respective fields using the corresponding keys that Google has provided you.
Next, go to the main administration menu: Components → Convert Forms → Forms.
And choose the form you want to edit.
Choose the tab "Add Field" and click on the reCAPTCHA field in the Captcha Fields category. Save your work.
Subsequently, select the v2 Invisible reCAPTCHA version, and more options about appearance are given where you can optionally choose the reCAPTCHA badge in the field options.
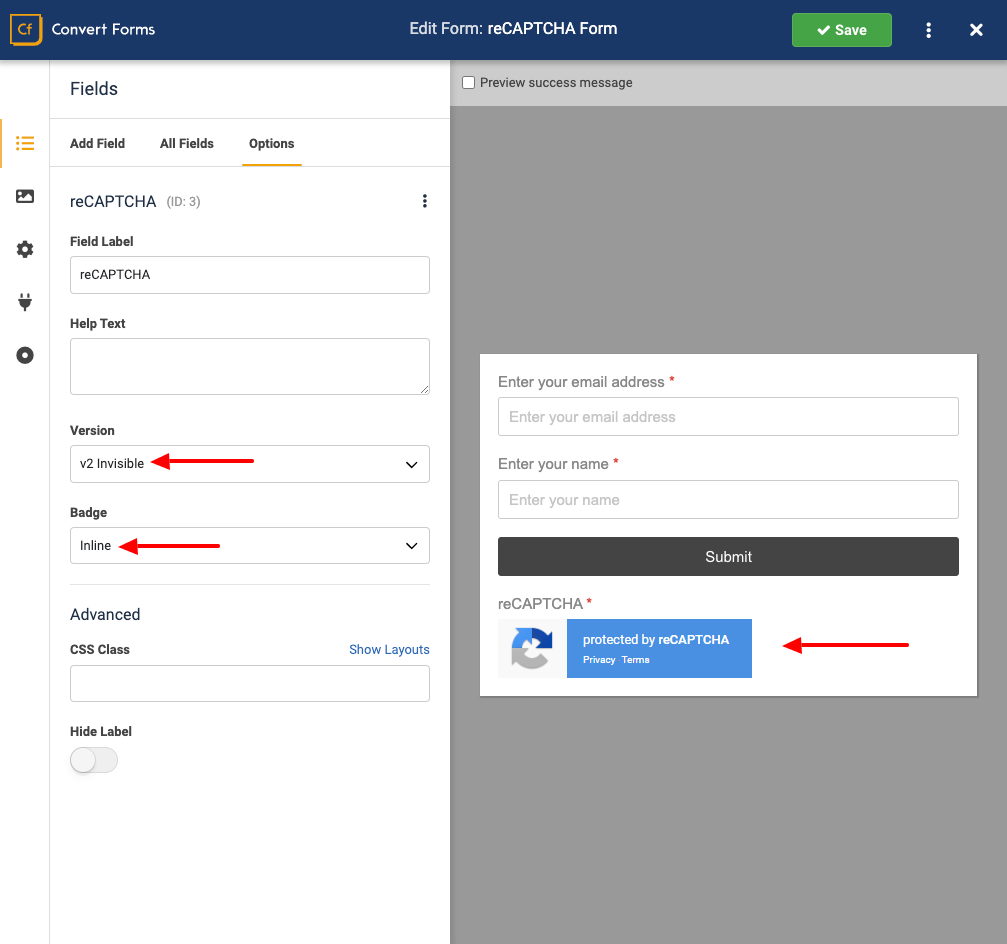
reCAPTCHA v2 Invisible comes with the Inline, Bottom Right and Bottom Left badges as you can see in the screenshot below:

Finally, after all the changes save your work. Your reCAPTCHA Invisible field is ready!
Why you probably don’t need Google reCAPTCHA
Without you having to do a thing, Convert Forms is already protecting your forms from spam submissions. A honeypot field is automatically added to each form by default. It's designed to catch spammers in the same way an actual pot of honey would catch flies. It's just a hidden field placed into every form and it's purpose is to make form submission fail if anything is entered into it.
Read more here: Native Convert Forms Anti-spam Protection with Honeypot
Tips:
- Don’t forget to store your keys.
- Different versions of reCAPTCHA have different keys.
Frequently Asked Questions
Does this require the Joomla CAPTCHA plugins to be enabled?
Convert Forms reCAPTCHA fields do not require the Joomla core reCAPTCHA plugins to be enabled and configured.
Why we did not rely on Joomla CAPTCHA plugins
While Joomla offers CAPTCHA plugins, we took a different approach to Convert Forms. We developed custom CAPTCHA integrations to ensure the best possible user experience and maintain complete control over form security.
Here's why building our own CAPTCHAs benefits you:
- Faster Bug Fixes: Encountering a CAPTCHA issue? We can address it swiftly without relying on external developers or Joomla updates. This minimizes downtime and frustration for your users.
- Optimized Performance: Our custom CAPTCHAs are built specifically for Convert Forms, leading to smoother operation than generic Joomla plugins.
- Clear Ownership: If a CAPTCHA-related issue arises, you can be confident we take full responsibility for a swift resolution. Unlike relying on third-party plugins, where troubleshooting can be cumbersome, and finger-pointing can occur.
Troubleshooting
How to fix the "Please validate" error
When you see this error, it means that the form was submitted, but reCAPTCHA didn't get the chance to verify the user initially.
Reasons why this may happen:
- You have a Cookie Consent plugin, and the visitor didn't accept your cookies. Hence, reCAPTCHA couldn't load its assets properly. The visitor must accept the cookies for reCAPTCHA to initialize properly and validate whether the user is a robot or not.
How to fix the "Couldn't validate submission. Invalid score." error
This error occurs only when using reCAPTCHA v3. The user score (automatically determined by reCAPTCHA v3 based on user interaction) doesn't pass the score threshold set within your reCAPTCHA v3 field settings. This means that reCAPTCHA thinks the user is a bot and they must try again later.
To resolve this particular error message, we need to ensure that both the reCAPTCHA v3 field as well as your reCAPTCHA v3 admin console is properly set up.
Whitelist your domain on your reCAPTCHA v3 settings
Within your Google reCAPTCHA admin console, in the reCAPTCHA v3 set of keys, you must whitelist your domain name. This helps Google identify your site and validate the reCAPTCHA field you've placed in your forms.
Set up your reCAPTCHA v3 settings
You must properly set up your reCAPTCHA v3 keys within Convert Forms. Click here to read more.
Other reasons
While your form may throw this error, we've seen that it works for other users, so your issue may be related to your local environment. Google reCAPTCHA v3 validates the user based on their interaction on your site. We've seen a lot of false positives where Google may not allow a perfectly normal user who interacts with their site to submit their forms. Eventually, this error should go away.
How to fix the "Couldn't validate submission. No score found"
To resolve this issue, please follow the suggestions listed below:
- Ensure you've set correct reCAPTCHA credentials under Global Configuration > Convert Forms > reCAPTCHA > v3 keys
- Ensure you've whitelisted your site on your reCAPTCHA admin console
- Ensure that you have the cURL PHP extension enabled on your host.


 Rated: