-
- Email the Person Who Filled Out the Form
- Set up Auto-Responder Emails
- Send an Email Only When a Checkbox Is Checked
- Attach the Submission PDF to Emails
- Send Email Based on Drop Down Selection
- Send Different Email Content Based on Form Responses
- Resending Emails
- Sending Plain-Text Alternative Body Emails
- Styling Emails with CSS
- Tracking Sent Emails
- Troubleshooting Email Delivery
-
- Browser Autocomplete for Form Fields
- Disable Submission Storage in Convert Forms
- Redirect to a Menu Item After Form Submission
- Tracking Form Lead Source
- Show a Form Only to Logged-In Users
- How to Increment a Count on Each Form Submission
- Adding an “Other” Option
- Adding a Unique ID to Each Form Submission
- Show or Hide Form Fields Based on User Joomla User Group
- Scroll the Page to the Top When a Long Form is Submitted
- Display Submissions Count for a Specific Form
- Populate Drop Down, Radio Buttons or Checkboxes with a CSV File
- Automatically Delete Submissions Older Than X Days
- Silently POST Submitted Data to Any API or URL
- Automatically Save Each Submission to a JSON file
- Create a Custom Login Form
- Auto-Populate Fields with Article Data
- Add a placeholder text to a Dropdown field
- Create Multilingual Forms in Joomla
- Redirect User to a URL After Form Submission
- Importing and Exporting Forms
- Export Submissions
- Display Convert Forms in a popup
-
- How to Create a Quiz Form
- Show Confirmation Popup After Submission
- Using the Conditional Content Shortcode in Convert Forms
- Copy Value From One Field to Another
- Submission Tasks
- Exporting Form Submissions with a Webhook URL
- Conditional Fields
- PDF Generator
- Input Masking
- Calculations
- Populate Fields Using Query String
- Smart Tags
-
- Minimum Time to Submit
- Restrict Form Submissions Based on IP
- Enforcing a Custom Password Policy in Convert Forms
- Add Cloudflare Turnstile to your Joomla Form
- Implement the Iubenda Consent Database in Joomla with Convert Forms
- Add Custom Validations to Fields and Forms
- Add Math Captcha to your Form
- Prevent a Field From Saving in the Database
- Add hCaptcha to your Form
- Enable Double Opt-in
- Allow Form Submissions in Specific Date Range
- Ensure a Unique Value is Entered Into a Field
- Block Form Submissions Containing Profanity (Bad Words)
- Block Email Addresses or Email Domains
- Honeypot
- Setting Up Google reCAPTCHA
- Create GDPR Compliant Forms
Using the Form Builder
Convert Forms' goal is to be able to create magnificent forms without having to know any kind of coding.
The Form Builder provides a great deal of flexibility on how you'd like your form to appear on your frontend. What's unique about the Form Builder is that the end result will be exactly as you see it. The only way for the form to appear slightly different on your frontend is only when your template has taken some extreme measures style-wise and overwrites everything, but that's very rarely the case.
The sections of the Form Builder
The Form Builder consists of the Design/Behavior/Submission Options at the left of your screen and the Preview at the right of your screen. In the preview you get to see the changes of your form LIVE. This means that the changes you do through the Design Options are being taken into account instantly. You could say that it is some kind of an improved WYSIWYG (What You See Is What You Get) editor.
The Design Options
The Design Options are split into the following parts:
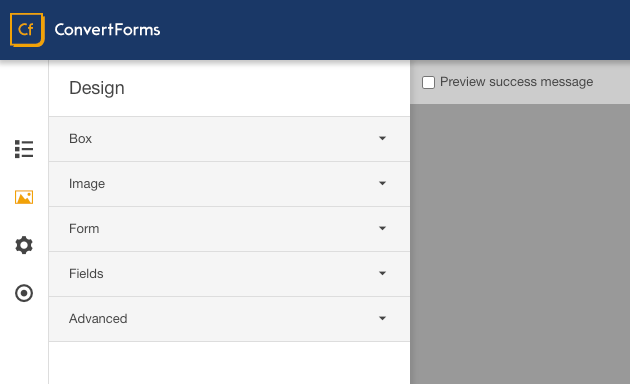
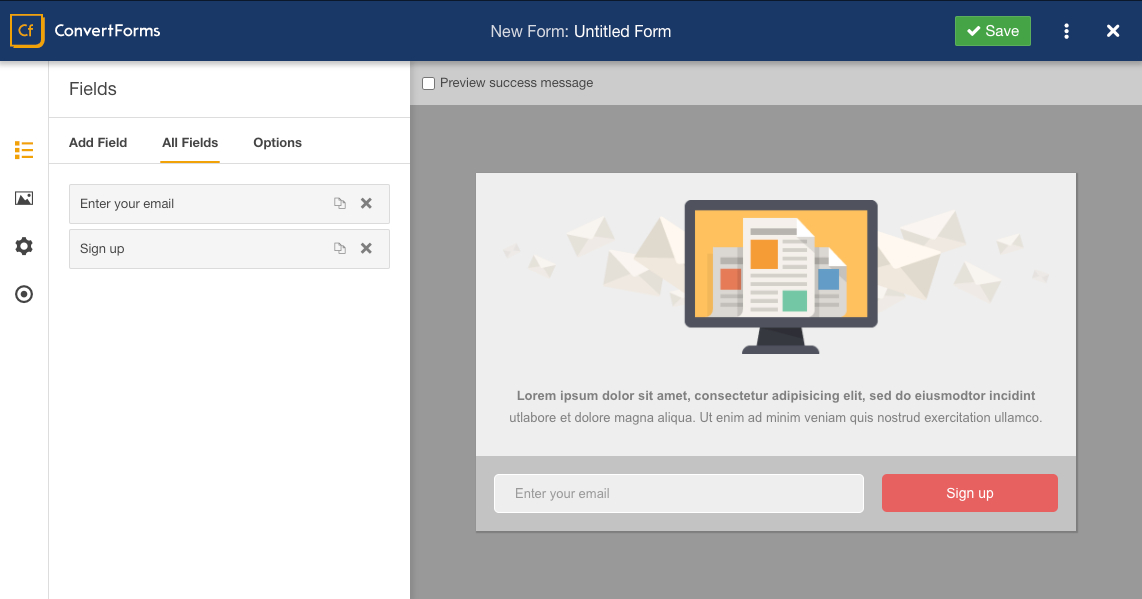
- Box: This part is responsible for the entirety of the form along with its informational part, which is a combination of a text and an image. Here you are able to name the form and style it with almost any styling option available.
- Text: You can accompany your form with an informational text. Choose a carefully thought-out message to entice visitors to use your form.
- Image: Together with the text you can choose an image to accompany your whole concept. An image is word a thousand words they say and we believe them 100%!
- Form: In this part you are able to choose a layout for your form and position it in relation to its informational part. Just remember that the actual form is the collection of fields and that is what you are able to adjust in this part.
- Fields: This part is where you are able to add/remove/position/style any number of fields for your form. In case you are using a Campaign with third-party integration like MailChimp, this is where you should add your email_address, FNAME and LNAME fields.
- Advanced: Finally, the Advanced part is for our fellow developers who would like to add their own flavour of CSS and Class sufixes. Of course there's also the option of adding a Form Footer which basically is a way to add a bit of text at the bottom of your form.
The Behavior Options
At the moment you are able to change the Status of your form.
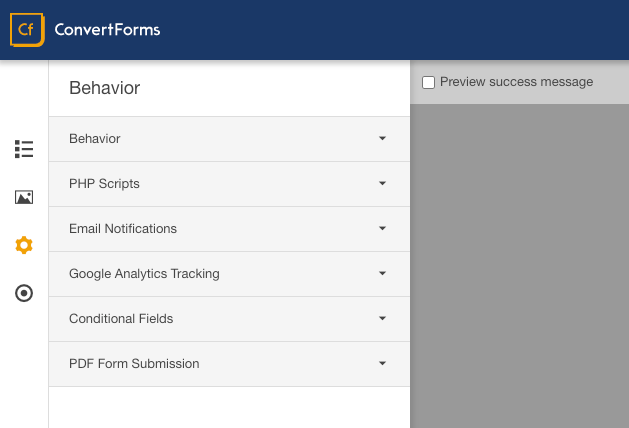
The Behavior Options contain the following sections:
- Behavior: Allows you set the status of your form(Published or Unpublished) as well as set whether to use the Honeypot anti-spam system which is enabled by default helping you get rid of spam messages.
- Behavior: Convert Forms contains 4 sections that are trigger on certain events. These are Form Prepare, Form Display, Form Process and After Form Submission. These sections help you add your own PHP scripts to run based on events that you are interested in. Read more on our PHP Scripts documentation.
- Email Notifications: Create multiple email notifications for you and your users to receive whenever a user submits a form. Read more on our detailed documentation, How to set up Email Notifications
- Google Analytics Tracking: Track your form's events using Google Analytics has never been easier! Simply grab your tracking code, enter it in our plugin and enable Google Analytics within this section. Read more on this on our doc, How to Track Form Events with Google Analytics
The Submission Options
The most significant option here is to assign the form to a campaign you've previously created. In case you haven't created a campaign then the form will save all its leads only locally.
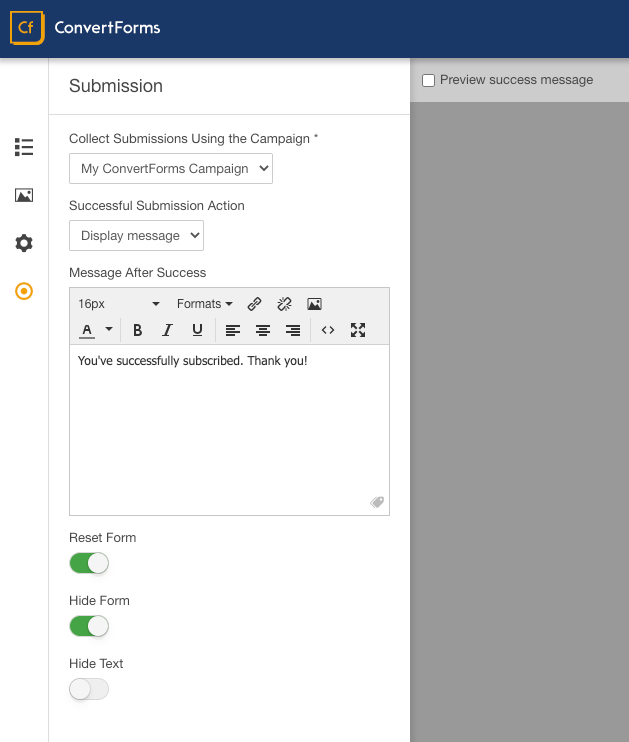
You can also choose what the form should do once it is submitted. You can display a success or fail message or redirect your visitor to a different URL with the ability to pass the form data as well.


 Rated: