Unlock this and dozens of other powerful features by upgrading to Convert Forms Pro.
Unlock this feature
-
- Managing Form Submissions
- Searching and Filtering Submissions
- Submission Context Tracking
- Customizing Submission Columns
- Editing Submissions
- Deleting Submissions
- Importing Submissions
- Exporting Submissions
- Exporting Submissions with a Webhook URL
- Tracking the User's IP Address
- Disable Submission Storage
- Auto-Delete Old Submissions
- Auto-Save Each Submission to a JSON file
- Increment a Count on Each Submission
- Add a Unique ID to Each Submission
-
- Set up Auto-Responder Emails
- Email the Person Who Filled Out the Form
- Send an Email Only When a Checkbox Is Checked
- Attach the Submission PDF to Emails
- Send Email Based on Drop Down Selection
- Send Different Email Content Based on Form Responses
- Styling Emails with CSS
- Sending Plain-Text Alternative Body Emails
- Troubleshooting Email Delivery
- Tracking Sent Emails
- Resending Emails
-
- Browser Autocomplete for Form Fields
- Redirect to a Menu Item After Form Submission
- Show a Form Only to Logged-In Users
- Adding an “Other” Option
- Show or Hide Form Fields Based on User Joomla User Group
- Scroll the Page to the Top When a Long Form is Submitted
- Display Submissions Count for a Specific Form
- Populate Drop Down, Radio Buttons or Checkboxes with a CSV File
- Silently POST Submitted Data to Any API or URL
- Create a Custom Login Form
- Auto-Populate Fields with Article Data
- Add a placeholder text to a Dropdown field
- Create Multilingual Forms in Joomla
- Redirect User to a URL After Form Submission
- Importing and Exporting Forms
- Display Convert Forms in a popup
-
- Does Convert Forms Use Cookies?
- Minimum Time to Submit
- Restrict Form Submissions Based on IP
- Enforcing a Custom Password Policy in Convert Forms
- Add Cloudflare Turnstile to your Joomla Form
- Implement the Iubenda Consent Database in Joomla with Convert Forms
- Add Custom Validations to Fields and Forms
- Add Math Captcha to your Form
- Prevent a Field From Saving in the Database
- Add hCaptcha to your Form
- Enable Double Opt-in
- Allow Form Submissions in Specific Date Range
- Ensure a Unique Value is Entered Into a Field
- Block Form Submissions Containing Profanity (Bad Words)
- Block Email Addresses or Email Domains
- Honeypot
- Setting Up Google reCAPTCHA
- Create GDPR Compliant Forms
Webhooks Integration
Send form submission data instantly to other websites and apps, not just Joomla. Connect your forms to automation platforms or custom APIs in real-time.

Webhooks Integration is available in Pro
A webhook (otherwise known as a web callback or HTTP push API) allows you to automatically send real-time information from your form to some other service or tool outside of your Joomla site without writing a single line of code. In addition, you can trigger a webhook conditionally based on a user’s choice within a form — making your forms extremely intuitive.
The Webhooks app is a fantastic choice if the endpoint you seek to use is not currently available within the app’s actions or if there is no direct integration for your favorite service. It can be a great alternative to our Zapier addon for technical users. You can send GET and POST requests to any external API and create custom integrations. With some technical know-how, this opens up the doors to continuous integrations!
This tutorial will show you how to use the Webhooks app with Convert Forms.
Setting Up a Webhook
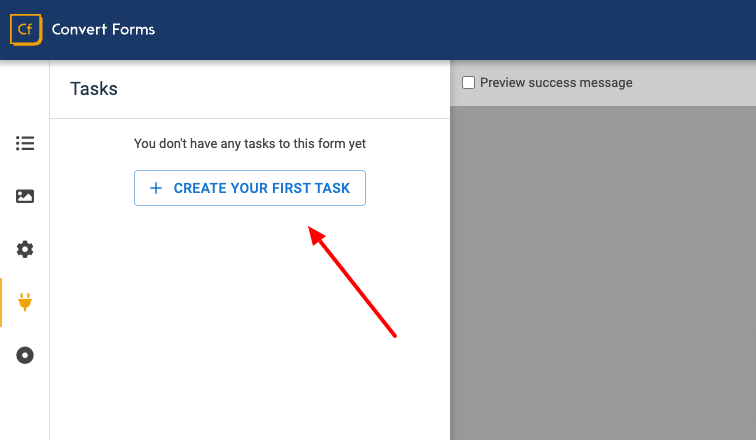
To get started, you’ll need to create a new form or edit an existing one. After opening the form builder, go to the Tasks panel and click Create Your First Task. This starts the process of creating a new task.
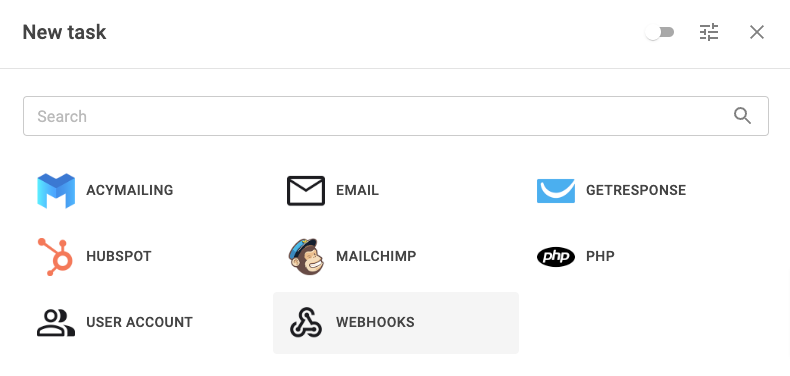
Upon opening the pop-up dialog, you will see a list of apps. Search for the webhook app. Your screen should look like this:
Next, we must choose the proper trigger to fire the task at the right time.
- Select New Submission in the Trigger option.
- Select Send Webhook in the Action option.
Your screen should look like this:

In the next screen, you will see all available settings to configure the webhook. We’ve outlined what each of these does below.
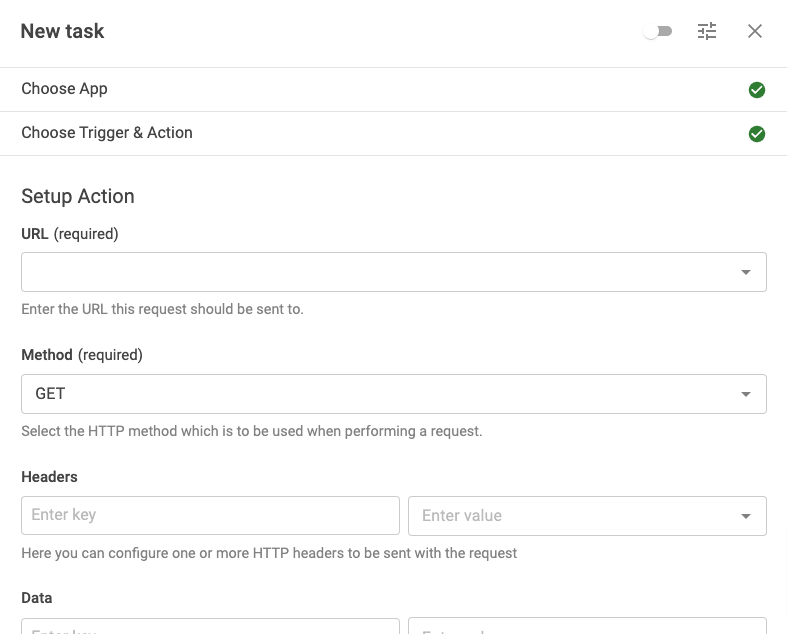
URL
The URL that will connect Convert Forms to the external app. You can usually get this URL from the service or tool’s API you want to connect to.
Method
The method option allows you to select the HTTP method representing the webhook's desired action. The primary or most-commonly-used HTTP verbs (or methods, as they are properly called) are GET and POST. There are some other verbs, too, but they are utilized less frequently.
- GET: Requests a representation of the specified resource. The request should only retrieve data.
- POST: Submits an entity to the specified resource.
- PUT: Replaces all current representations of the target resource with the request payload.
- PATCH: Applies partial modifications to a resource.
- HEAD: Asks for a response identical to a GET request but without the response body.
- DELETE: Deletes the specified resource.
- OPTIONS: Describes the communication options for the target resource.
- TRACE: Performs a message loop-back test along the path to the target resource.
Headers
The Headers option allows you to define the HTTP request header’s keys and values to be sent with your webhook request.
Data
Similar to the Headers, the Data setting lets you define the keys and values that will be sent in the body of your webhook’s request.
Unflatten
The Unflatten option in Webhook actions allows you to create nested data from a key with two underscores.
For example, if you have this key and value for data:
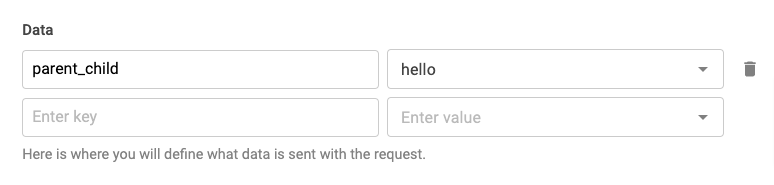
If you select Yes for Unflatten and JSON for Payload Type, that data will ultimately get sent like this:
{
  parent: {
    child: hello
  }
}
To opt out of this functionality, select "no" for the "Unflatten" option, which will send the data like this:
{
  parent__child: hello
}
Format
The Format option will communicate to your server what type of data is sent through your webhook. This will also set the Content-Type header value for your data.
There are two different request format types available:
- JSON: The JSON method will format your data in an application/json format and set the content type as charset=utf-8.
- FORM: The FORM method will format your data in an application/x-www-form-urlencoded format, and will set the content type as charset=utf-8.
Example: Using Webhooks to Create an Article
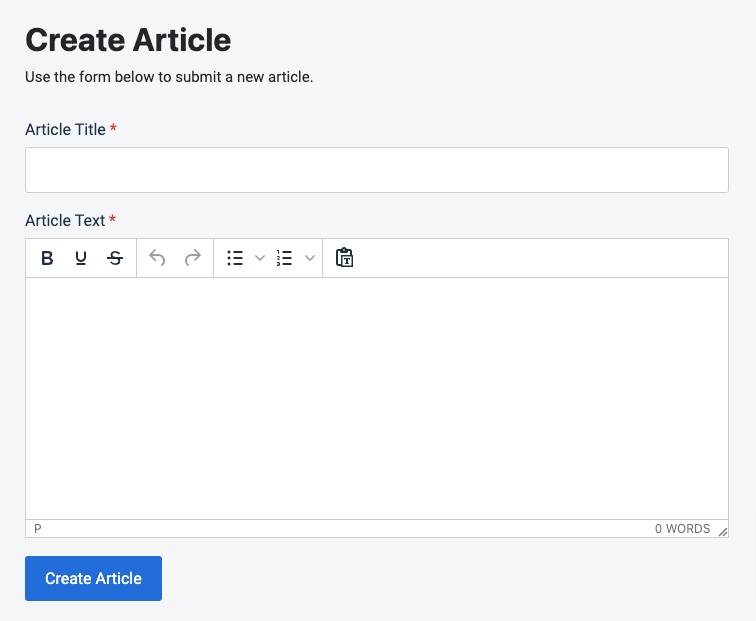
This example will walk you through configuring a form that sends a webhook to a remote Joomla 4 site and creates a new article based on user input. The webhook will talk to a specific API endpoint exposed by Joomla 4’s new Web Services API. The form will consist of two fields, one textbox field for the article’s title and one text editor field for the article’s text. The form should look like this:
Note: In this example, where you see the word "site" we will refer to the website where Convert Forms is installed, and where you see the word “remote site” we will refer to the website where we want to create the new article.
Requirements
To use this example, the remote site must meet the following requirements:
- The site runs on Joomla 4.
- The site is publicly accessible.
- The site is not password protected with htaccess.
- You have Super User access.
- The following plugins are installed and enabled:
- User - Joomla API Token: Allows remote access to your site.
- API Authentication - Web Services Joomla Token: Allows token-based authentication to Web services.
- Web Services - Content: Adds article routes to the API.
Step 1: Get your Super User Joomla API Token
Joomla 4 Web Services API enables a site to talk to other sites and services via API call requests. Every request requires authentication (unless designated a public URL). In our case, we are going to use API token authentication.
To get your API token, follow the steps below:
- Log into the remote site backend as a Super User.
- Go to the User Menu (top right of screen).
- Select Edit Account.
- Click on the Joomla API Token tab.
- Click Copy next to the Token option.
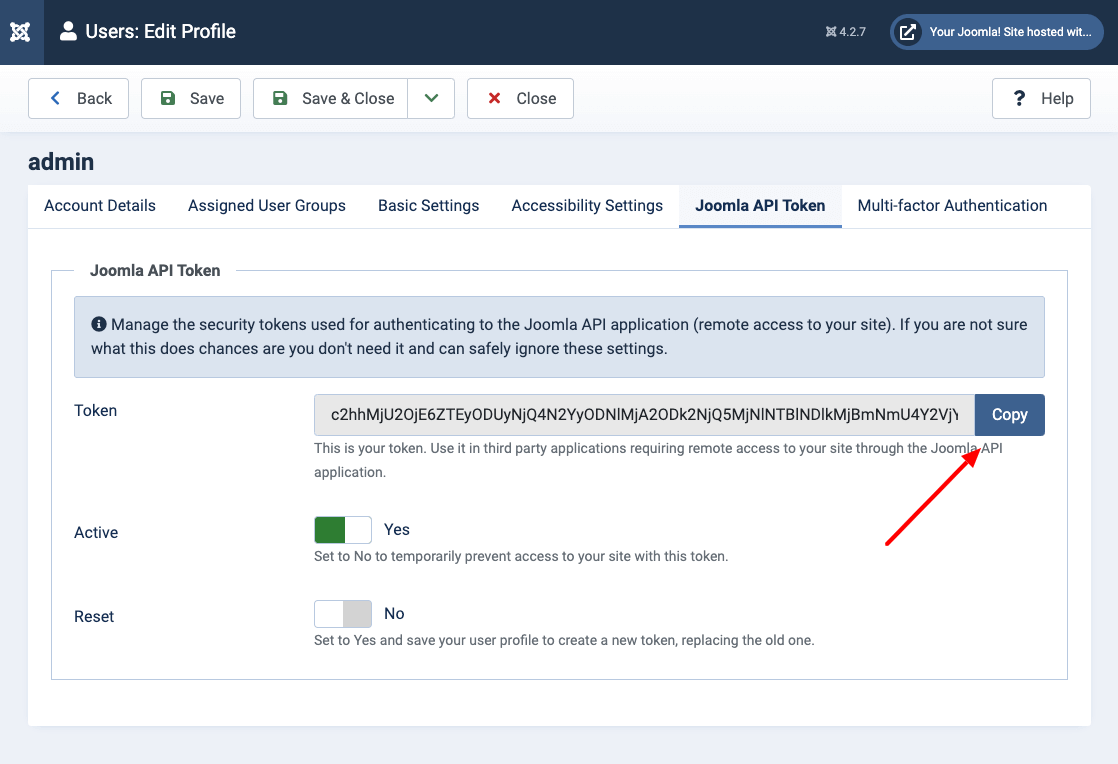
Keep in mind that on the same screen, you can copy your token, enable or disable it, and reset it if you need to revoke access and generate a new token.
Step 2: Prepare the Webhook
Now that you have copied your API token let’s configure your form to send the webhook to the appropriate API endpoint to the remote site whenever someone submits the form. The first steps are the same as in the Setting Up a Webhook section above.
- Open the form builder on your site
- Go to the Tasks panel and click Create Task.
- In the dialog that opens up, search for the webhook app and click it to continue.
In the next screen, you need to select the task’s trigger and action.
- Select New Submission in the Trigger option.
- Select Send Webhook in the Action option.
- Click Continue.
Step 3: Setup the Webhook
The next and last screen is where the magic happens. Here are the settings we need to configure.
URL
The API endpoint responsible for creating a new article is /api/index.php/v1/content/articles. Assuming the URL of the remote site is https://mysite.com, the webhook’s URL option must be set to:
https://mysite.com/api/index.php/v1/content/articles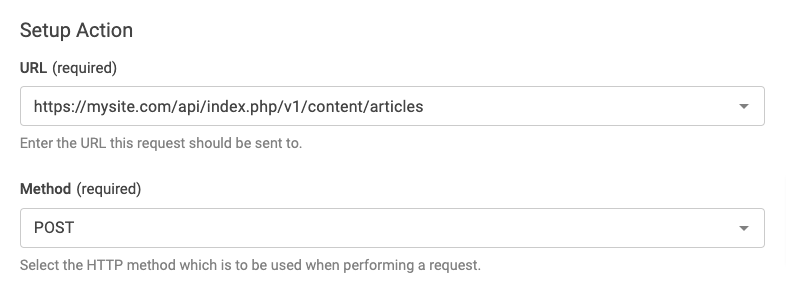
Method
Since we will create a new record in the remote site database, we select POST in the Method option.
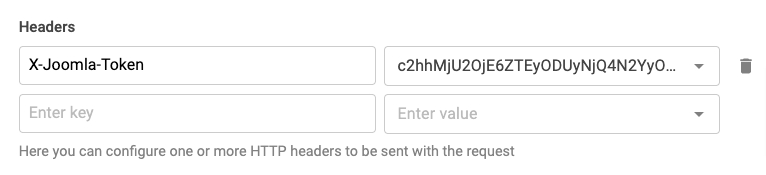
Headers
The Web Services API expects to see the API token in the request HTTP headers. To do so, create a new row in the Headers option and enter X-Joomla-Token as the header key and the API Token you copied previously as the header’s value.
The Headers option should look like this:
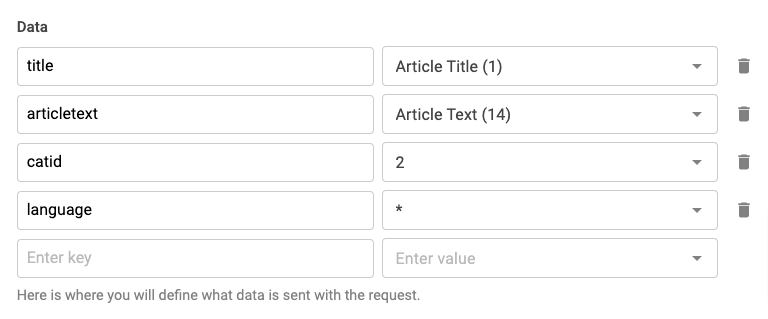
Data
In this option, we define what data will be sent with the request in key-value format or, in other words, what will be our article's title and text. In our case, we will pass the minimum required properties by the Create Article endpoint, which are the following:
- title: This represents the title of the article. Map this option with the Article Title field from the dropdown.
- articletext: This represents the text of the article. Map this option with the Article Text field from the dropdown.
- catid: This is the ID of the category we want to assign the article. In our case, we will use the fixed value 2, which is the ID of Joomla’s Uncategorized category.
- Language: The endpoint also expects to see the language property in the request. For this example, we will not assign the article to any language; therefore, enter * for its value.
Your Data option should look like this:
Now, you would ask, what about custom fields? Can we also set article custom fields via the same webhook? The answer is yes. For the endpoint to recognize a custom field value, it expects to see a key matching the custom field's alias(age, color).
For example, let's say you have two custom fields for Age and Color. The Data option should be like this:

Additionally, the Create Articles endpoint also supports passing the intro and full-text images using the images__image_intro and images__image_fulltext keys, respectively:

To add tags to an article, pass the Tags property as an array. Each value can be either the ID or the name of the tag.
If the tag already exists, provide the IDs of the tags. For example, the example in the screenshot below will add the tags with IDs 3 and 2 to the article:

The Create Article endpoint also supports adding tags by name, regardless of their existence. To pass a tag by name, prefix the tag with #new#. For instance, the example below associates the tag myTag with the article. If the tag doesn't exist, it will be created. If a tag with the same name already exists, it won't be duplicated.

Remember that the Unflatten option should be set to Yes.
Final Steps
The final step is to enable our task. To do so, click the toggle on the dialog’s top right corner, as shown in the screenshot below.

Finally, click Save to save the task, close the dialog, and then click Save from the top right corner of the form builder to save the changes on the form.
Step 4: Test Your Form
Now, it’s time to verify our form works. Publish your form on the front end and make a test submission. You should see a new article created on the remote site if everything is configured properly.
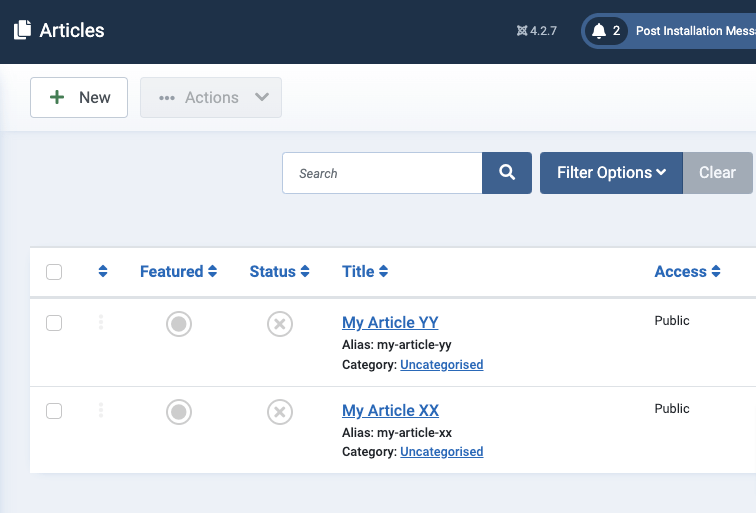
Congratulations! You’ve successfully created a form that creates a new article on a remote site every time it is submitted!
Frequently Asked Questions
Why do I get "Unable to open webhook.0-HTTP/2 stream 1 reset by server (error 0x1 PROTOCOL_ERROR)"?
Your data was sent and saved fine, however the receiving server (often a Google Apps Script connected to Google Sheets) just closed the connection in a way that's reported as an error. To stop it from blocking your form, turn on Silent Fail for the Webhook task:
- Edit your form → Tasks.
- Open the Webhook task.
- Enable Silent Fail and save.
Webhooks Integration is available in Pro
Unlock this and dozens of other powerful features by upgrading to Convert Forms Pro.
Unlock this feature
Last updated on Jun 23rd 2026 11:06
Tassos offers a premium suite of Joomla extensions with 7 products and over 2.2 million downloads, providing reliable solutions since 2014.


 Rated:
Copyright © 2014 - 2026 - Smile Motive Development LP. All Rights Reserved.