 Tassos Docs
-
- AcyMailing
- Browser
- City
- Component Condition
- Continent Condition
- Convert Forms Conditions
- Cookie Condition
- Country Condition
- Date Condition
- Day of Week
- Device Condition
- Display Conditions
- E-Commerce Conditions (VirtueMart - HikaShop)
- EngageBox - Viewed Another Popup Condition
- Homepage
- IP Address Condition
- Joomla! Content Article Condition
- Joomla! Content Category Condition
- Joomla! Content Component View Condition
- K2 Category
- K2 Item
- K2 Page Type
- K2 Tag
- Language
- Menu Item
- Month
- New/Returning Visitor Condition
- Operating System
- Pageviews Condition
- PHP
- Referrer URL Condition
- Region
- Time on Site
- Time Range
- Trigger based on URL match
- URL Condition
- User Access Level Condition
- User Condition
- User Group
-
- Show a Floating Button After Popup is Closed
- Create Multilingual Popups
- Randomly Rotate Popups on a Page
- Αdd Sound Effects to Popup
- Make Accessible Popups
- Add Countdown Timer to Popup
- Limit impressions per unique visitor
- Test the responsiveness of your boxes for various devices and viewports
- Open a box by clicking on a menu item
- Trigger based on the minimum time visitor spent on the site
- Auto-Close Popup After a Specific Time
- Control Popup using HTML Attributes
Click Trigger
The "Click" Trigger fires when the visitor clicks on specified element(s). Below you can find how to set up a popup with "Click" trigger, all supported settings for this trigger explained as well as how to trigger it with the JavaScript Events API.
How to create a click popup in Joomla
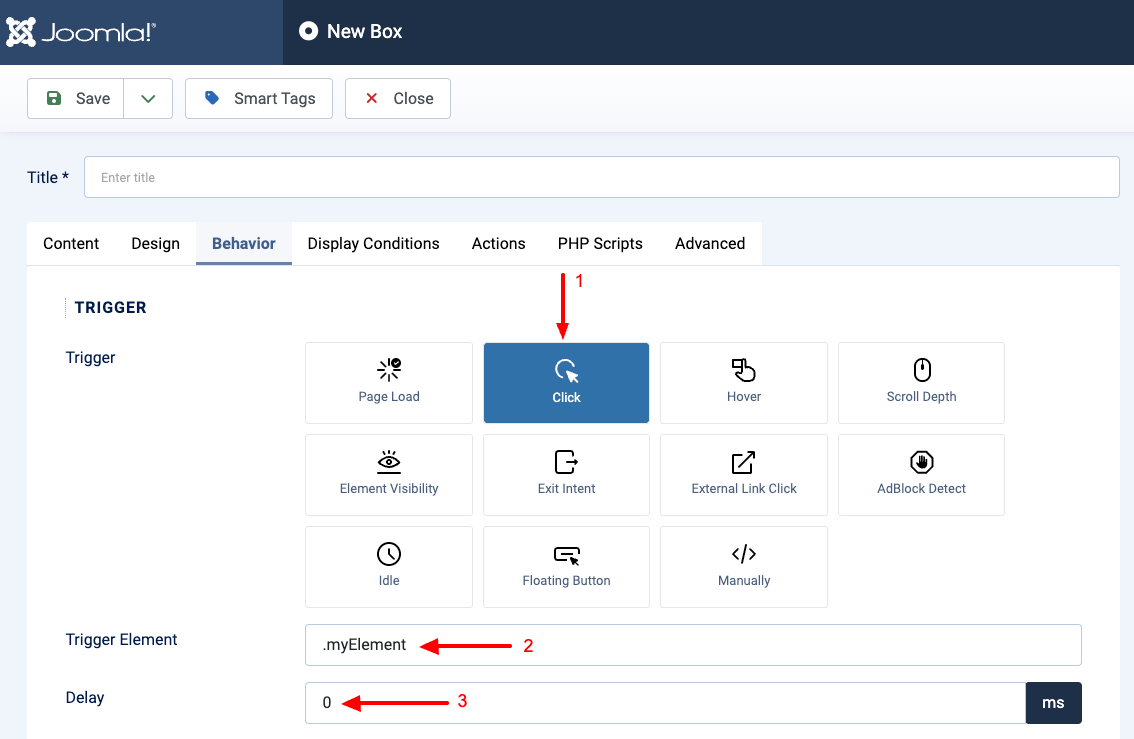
To set up your popup to trigger on Click go to your popup settings > Behavior Tab > Trigger Section and apply the following settings:
- Under the Trigger setting, select Click.
- Set the Trigger Element by specifying the ID or the Class of the element(s) that should fire this trigger. You can specify multiple elements separated by comma.
- Set the delay of the trigger by entering a number in milliseconds in the Delay setting.
Trigger Settings
Below, you can find all configurable settings when you select the "Click" Trigger.
| Setting | Value | Description |
|---|---|---|
| Trigger | Click | Triggers when the visitor clicks on an element on the page. |
| Trigger Element | .myElement | Specify the ID or the Class of the element(s) that should fire this trigger. You can specify multiple elements separated by comma. Example 1: .item-100, .item-101 Example 2: #logo Keep in mind that query selectors must always begin with an underscore (_), a hyphen (-), or a letter(a–z), followed by any number of hyphens, underscores, letters, or numbers |
| Delay | 0 | Delay trigger in miliseconds. Leave 0 for immediate execution or enter 2000 for 2 seconds delay. If the trigger is set to onElementHover then this value is used to delay or prevent the accidental firing of the popup and attempts to determine the user's intent. It is recommended to use at least 30 ms. |
Troubleshooting
If your popup doesn’t open when using the Click Trigger, review the following common causes and fixes.
The selector is incorrect
If your popup doesn’t open at all, the most common cause is an incorrect selector. Make sure the selector you entered in the Click Trigger settings matches an element that actually exists on the page at the time it’s clicked.
For example, if your button HTML looks like this:
<button class="cta-button">Open Popup</button>Then your selector should be .cta-button
The click event is blocked by another script
If you’ve set a specific selector and notice that the popup works for some elements but not for others, even though they share the same CSS class, another script may be preventing EngageBox from detecting the click.
This happens when the developer of that element or extension uses one of the following in their code:
e.stopPropagation();
e.stopImmediatePropagation();
return false;
These stop the event from bubbling up to the document level, where EngageBox listens for clicks.
You can confirm this by opening your browser console and testing it by running this snippet:
(function() {
  const orig = Event.prototype.stopPropagation;
  Event.prototype.stopPropagation = function() {
    console.warn('Propagation stopped for', this.type, 'on', this.target);
    orig.call(this);
  };
})();
Then click the element again. If you see a "Propagation stopped" message, another script is blocking the event.
Fix for developers
If you maintain that element or extension, replace those calls with e.preventDefault(), which blocks the default link behavior but still allows the click event to bubble:
element.addEventListener('click', function(e) {
  // your custom logic
  e.preventDefault();
});
This simple change ensures EngageBox can detect the click and trigger the popup.
Workaround for site admins
If you don’t control the code of that element (for example, it comes from another Joomla extension), wrap the element inside another container and use that container as your Click Trigger selector.
<div class="popup-trigger">
  <button class="third-party-btn">Click Me</button>
</div>
Then, set the selector in the Click Trigger settings to .popup-trigger
This allows the click event to bubble to the wrapper, enabling EngageBox to detect it and open the popup as expected.


 Rated: