Unlock this and dozens of other powerful features by upgrading to EngageBox Pro.
Unlock this feature
EngageBox
v7.1.3
-
- AcyMailing
- Browser
- City
- Component Condition
- Continent Condition
- Convert Forms Conditions
- Cookie Condition
- Country Condition
- Date Condition
- Day of Week
- Device Condition
- Display Conditions
- E-Commerce Conditions (VirtueMart - HikaShop)
- EngageBox - Viewed Another Popup Condition
- Homepage
- IP Address Condition
- Joomla! Content Article Condition
- Joomla! Content Category Condition
- Joomla! Content Component View Condition
- K2 Category
- K2 Item
- K2 Page Type
- K2 Tag
- Language
- Menu Item
- Month
- New/Returning Visitor Condition
- Operating System
- Pageviews Condition
- PHP
- Referrer URL Condition
- Region
- Time on Site
- Time Range
- Trigger based on URL match
- URL Condition
- User Access Level Condition
- User Condition
- User Group
-
- Show a Floating Button After Popup is Closed
- Create Multilingual Popups
- Randomly Rotate Popups on a Page
- Αdd Sound Effects to Popup
- Make Accessible Popups
- Add Countdown Timer to Popup
- Limit impressions per unique visitor
- Test the responsiveness of your boxes for various devices and viewports
- Open a box by clicking on a menu item
- Trigger based on the minimum time visitor spent on the site
- Auto-Close Popup After a Specific Time
- Control Popup using HTML Attributes
Time Range Condition
Schedule publishing based on a time range.
Time Range Condition is available in Pro
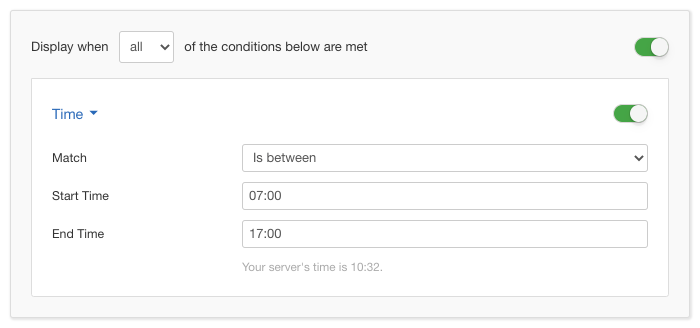
The Time Condition gives you the chance to have a fine control on exactly which time periods of the day you need the box to be displayed. You can choose the starting time and the end time with an easy to use timepicker.
Options
In the table below you can see which options are available to setup the Time Condition.
| Name | Description |
|---|---|
| Match | Set whether to match or not the selected times. |
| Start Time | The Start Time is a timestamp in the following format Hour:Minute using the 24-hour type. You can either type it in manually or you can click on the time icon at the right end of the textfield and select your time with an intuitive timepicker. |
| End Time | The End Time can be configured in exactly the same way as the Start Time. |
Use Case
A very common use case for the Time Condition is assigning a box which is targetted at the audience reaching your website on peak hours. Of course for each website the peak hours are different but that is easily distinguishable nowadays just by taking a glance at your analytics.
Useful Notes
It should be pointed out that ommitting anyone of the Times is counter-intuitive and counter-productive as there's no time period this way and the box will always be displayable. It is highly recommended that you use both of them.
Time Range Condition is available in Pro
Unlock this and dozens of other powerful features by upgrading to EngageBox Pro.
Unlock this feature
Last updated on Nov 26th 2024 12:11
In This Article
Tassos offers a premium suite of Joomla extensions with 7 products and over 2.3 million downloads, providing reliable solutions since 2014.


 Rated:
Copyright © 2014 - 2026 - Smile Motive Development LP. All Rights Reserved.