Unlock this and dozens of other powerful features by upgrading to EngageBox Pro.
Unlock this feature
EngageBox
v7.1.3
-
- AcyMailing
- Browser
- City
- Component Condition
- Continent Condition
- Convert Forms Conditions
- Cookie Condition
- Country Condition
- Date Condition
- Day of Week
- Device Condition
- Display Conditions
- E-Commerce Conditions (VirtueMart - HikaShop)
- EngageBox - Viewed Another Popup Condition
- Homepage
- IP Address Condition
- Joomla! Content Article Condition
- Joomla! Content Category Condition
- Joomla! Content Component View Condition
- K2 Category
- K2 Item
- K2 Page Type
- K2 Tag
- Language
- Menu Item
- Month
- New/Returning Visitor Condition
- Operating System
- Pageviews Condition
- PHP
- Referrer URL Condition
- Region
- Time on Site
- Time Range
- Trigger based on URL match
- URL Condition
- User Access Level Condition
- User Condition
- User Group
-
- Show a Floating Button After Popup is Closed
- Create Multilingual Popups
- Randomly Rotate Popups on a Page
- Αdd Sound Effects to Popup
- Make Accessible Popups
- Add Countdown Timer to Popup
- Limit impressions per unique visitor
- Test the responsiveness of your boxes for various devices and viewports
- Open a box by clicking on a menu item
- Trigger based on the minimum time visitor spent on the site
- Auto-Close Popup After a Specific Time
- Control Popup using HTML Attributes
Floating Button Trigger
Floating Button is available in Pro
The "Floating Button" Trigger displays a button in any corner of your page, which, when clicked, opens the popup. Below, you’ll find instructions for setting up a popup with the "Floating Button" trigger, along with all supported settings for this trigger.
How to create a floating button popup in Joomla
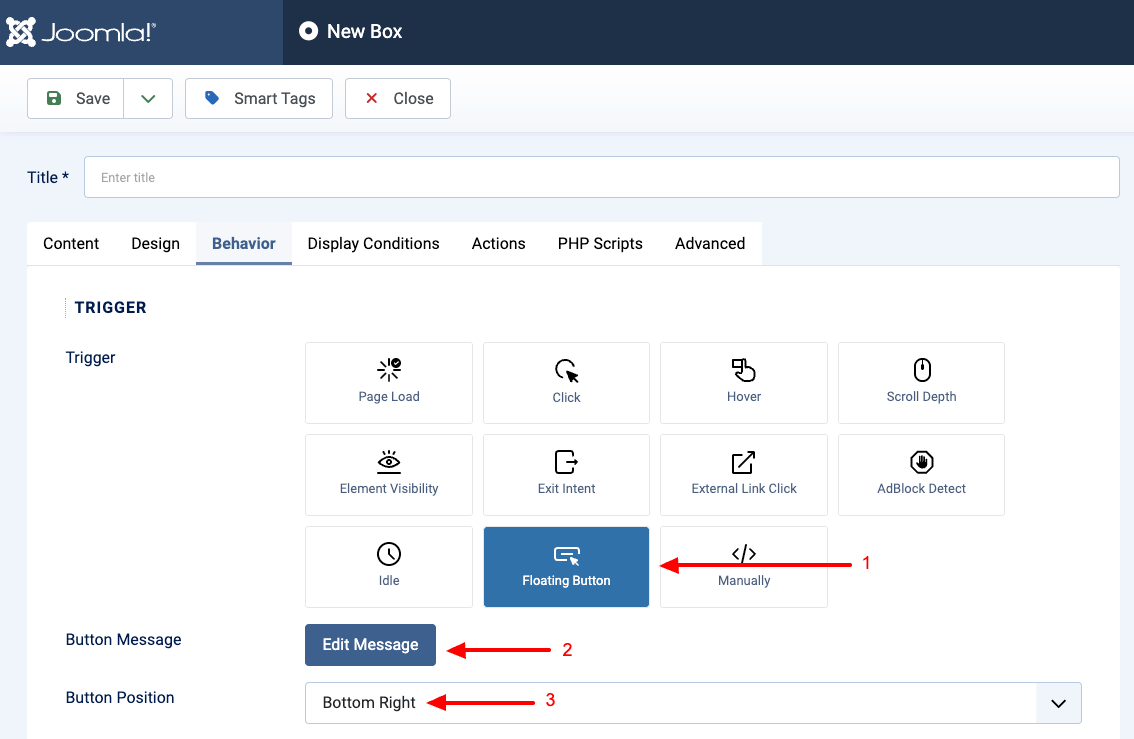
To set up your popup to trigger via a Floating Button go to your popup's settings > Behavior Tab > Trigger Section and apply the following settings:
- Under Trigger, select Floating Button.
- Click on "Edit Message" to customize the floating button label, font size, and colors.
- Select the floating button position via the "Floating Button Position" dropdown.
How to customize the floating button
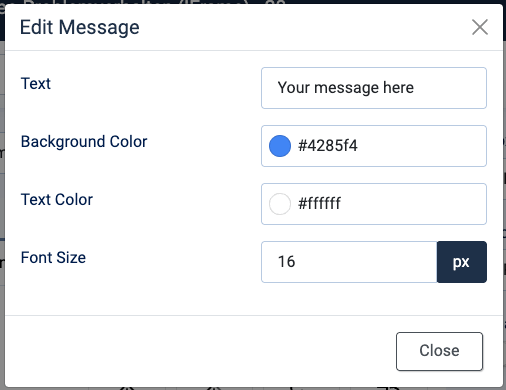
After clicking on Button Message > Edit Message, you will be presented with a modal that allows you to customize the floating button. You can see the text of the button, font size, text color, as well as the background color. When you're finished customizing the floating button, click on "Close".
Trigger Settings
Below you can find all settings that are configurable when you choose the "Floating Button" Trigger.
| Setting | Value | Description |
|---|---|---|
| Trigger | Floating Button | Fires the popup after the visitor has clicked on the floating button that appears on any corner/side of the page. |
| Button Message | Customize the look and feel of the floating button. Set the label, font size, and colors. | |
| Button Position | Select in which side/corner the floating button will appear on your site. |
Use Cases
Open popup when the user clicks a floating button
A use case would be to add a small, always-visible button on the corner of your page that invites users to interact. For example, you can place a “Contact Us” or “Get a Quote” button that stays visible as users scroll. When clicked, it triggers a popup with a contact form, live chat, or any content you want, making it easy for visitors to engage without navigating away from the page.
Floating Button is available in Pro
Unlock this and dozens of other powerful features by upgrading to EngageBox Pro.
Unlock this feature
Last updated on Sep 9th 2025 14:09
Tassos offers a premium suite of Joomla extensions with 7 products and over 2.3 million downloads, providing reliable solutions since 2014.


 Rated:
Copyright © 2014 - 2026 - Smile Motive Development LP. All Rights Reserved.