-
- AcyMailing
- Browser
- City
- Component Condition
- Continent Condition
- Convert Forms Conditions
- Cookie Condition
- Country Condition
- Date Condition
- Day of Week
- Device Condition
- Display Conditions
- E-Commerce Conditions (VirtueMart - HikaShop)
- EngageBox - Viewed Another Popup Condition
- Homepage
- IP Address Condition
- Joomla! Content Article Condition
- Joomla! Content Category Condition
- Joomla! Content Component View Condition
- K2 Category
- K2 Item
- K2 Page Type
- K2 Tag
- Language
- Menu Item
- Month
- New/Returning Visitor Condition
- Operating System
- Pageviews Condition
- PHP
- Referrer URL Condition
- Region
- Time on Site
- Time Range
- Trigger based on URL match
- URL Condition
- User Access Level Condition
- User Condition
- User Group
-
- Show a Floating Button After Popup is Closed
- Create Multilingual Popups
- Randomly Rotate Popups on a Page
- Αdd Sound Effects to Popup
- Make Accessible Popups
- Add Countdown Timer to Popup
- Limit impressions per unique visitor
- Test the responsiveness of your boxes for various devices and viewports
- Open a box by clicking on a menu item
- Trigger based on the minimum time visitor spent on the site
- Auto-Close Popup After a Specific Time
- Control Popup using HTML Attributes
Set the Display Order of Your Popups
When you have multiple popups on a page, you might notice that some appear on top of others. This happens because each popup has a stacking order, determining which is displayed in front. This stacking order is controlled by a CSS property called z-index. By adjusting this value, you can ensure that the most important popup appears above the rest.
Control Which Popup Shows First
In our popup builder, every popup is assigned a default z-index value of 99999, which places it above most other elements on the page. However, when multiple popups are present, they all share the same default value, making it difficult to control which one should be on top.
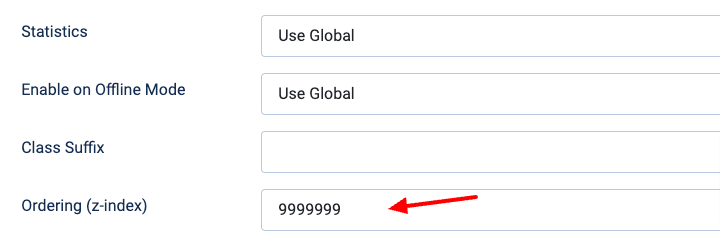
With the Ordering (z-index) option, you can manually set the stacking order of your popups. A higher value means the popup will appear in front of those with a lower value. To adjust the ordering of each popup, follow the steps below:
- Edit the popup you want to adjust the stacking order
- Go to the Advanced tab
- Find the Ordering (z-index) option and set a Value – Enter a higher number to bring the popup to the front or a lower number to place it behind others.
- Save and Test – Preview your page to see how the popups stack up and make adjustments if needed.


 Rated: