Unlock this and dozens of other powerful features by upgrading to EngageBox Pro.
Unlock this feature
EngageBox
v7.1.1
-
- AcyMailing
- Browser
- City
- Component Condition
- Continent Condition
- Convert Forms Conditions
- Cookie Condition
- Country Condition
- Date Condition
- Day of Week
- Device Condition
- Display Conditions
- E-Commerce Conditions (VirtueMart - HikaShop)
- EngageBox - Viewed Another Popup Condition
- Homepage
- IP Address Condition
- Joomla! Content Article Condition
- Joomla! Content Category Condition
- Joomla! Content Component View Condition
- K2 Category
- K2 Item
- K2 Page Type
- K2 Tag
- Language
- Menu Item
- Month
- New/Returning Visitor Condition
- Operating System
- Pageviews Condition
- PHP
- Referrer URL Condition
- Region
- Time on Site
- Time Range
- Trigger based on URL match
- URL Condition
- User Access Level Condition
- User Condition
- User Group
-
- Show a Floating Button After Popup is Closed
- Create Multilingual Popups
- Randomly Rotate Popups on a Page
- Αdd Sound Effects to Popup
- Make Accessible Popups
- Add Countdown Timer to Popup
- Limit impressions per unique visitor
- Test the responsiveness of your boxes for various devices and viewports
- Open a box by clicking on a menu item
- Trigger based on the minimum time visitor spent on the site
- Auto-Close Popup After a Specific Time
- Control Popup using HTML Attributes
AcyMailing Integration
Create an AcyMailing popup in Joomla. Integrate with AcyMailing to grow your email list and engage subscribers.
AcyMailing Integration is available in Pro
There are three distinct methods to create a AcyMailing Optin Box with EngageBox. Each of them provides a different kind of flexibility and ease of use. Let's take a look.
1. Using Native Subcription Form
To use the Native Subscription Form method you should know first the AcyMailing's Subscription base URL which differs depending on the version you're using.
AcyMailing 5
https://www.site.com/index.php?option=com_acymailing&ctrl=sub&task=optin&hiddenlists=1,2,3AcyMailing 6, AcyMailing 7
https://www.site.com/index.php?option=com_acym&ctrl=frontusers&task=subscribe&hiddenlists=1,2,3In the base URL you will need to modify the hiddenlists parameter. The hiddenlists parameter is a comma separated list of AcyMailing list IDs you'd like to add the user to. Lastly, don't forget to replace site.com with your site's URL.
If you want to redirect the user to a specific page after the subscription, you will also need to include the redirect parameter in the URL.
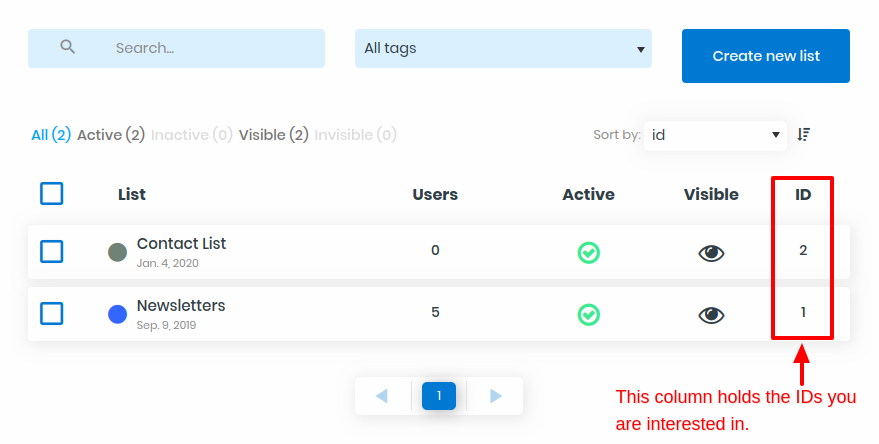
To find the list IDs, go to Components -> AcyMailing -> Lists. The List IDs can be found on the last column of the Lists table as you can see in the screenshot below.
To read more details about how the AcyMailing Subscription via URL works, visit the respective help page.
Of course you don't have to use ALL the list IDs. You only have to use at least one.
Now that we know how to find the Submit URL, let's move on to setting up the actual box.

As you can see from the screenshot above, there are 4 things you need to take care of.
- Select Email Subscription Form from the Box Type drop-down list
- Type your Submit URL (check below on how to find it)
- Type user[email] for the Email Field Name input box
- Type user[name] for the Field 1 Name input box
Go on and set all the other box options if you need to customize it further and then click "Save"! You are done!
2. Using AcyMailing Module
To follow this method you need to have an AcyMailing module published and configured. Follow Acyba's Guide on how to do that if you are not familiar with it.
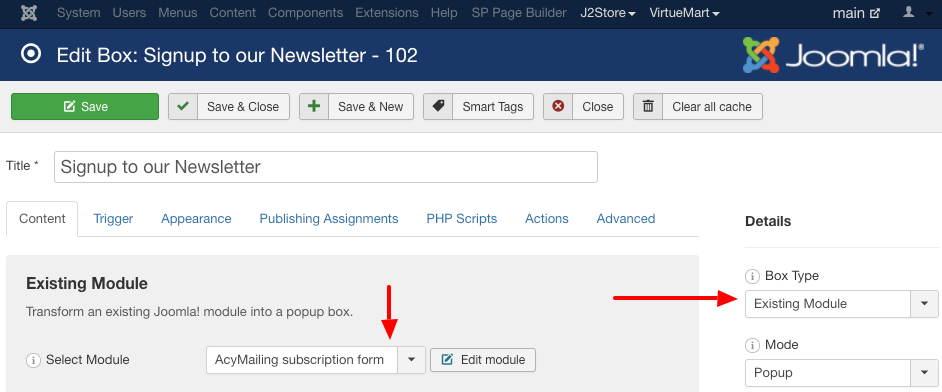
Then, as you can see in the screenshot below, create a new box with the type set to "Existing Module" and at the left side choose your AcyMailing module.
You can also write some text in the editor to appear right above the subscription form.
Finally, configure all the other options of your box you might be interested in and then click "Save"! You are done!
3. Using Convert Forms (Best Method)
Our Convert Forms extension makes creating an AcyMailing Opt-In Box an absolute breeze! This method is considered as the best of the three because of its use of AJAX for the form submission. By using AJAX the guest doesn't get disrupted from his current progress and therefore he stays as close as ever to his converting goal.
We have already created detailed documentation for each of the 3 needed steps. Take a look below!
AcyMailing Integration is available in Pro
Unlock this and dozens of other powerful features by upgrading to EngageBox Pro.
Unlock this feature
Last updated on Jul 7th 2025 09:07
Tassos offers a premium suite of Joomla extensions with 6 products and over 2.1 million downloads, providing reliable solutions since 2014.


 Rated:
Copyright © 2014 - 2026 - Smile Motive Development LP. All Rights Reserved.