

-
- Managing Form Submissions
- Searching and Filtering Submissions
- Display Form Submissions on the Front-End
- Submission Context Tracking
- Customizing Submission Columns
- Editing Submissions
- Deleting Submissions
- Importing Submissions
- Exporting Submissions
- Exporting Submissions with a Webhook URL
- Tracking the User's IP Address
- Tracking the User's Country
- Disable Submission Storage
- Auto-Delete Old Submissions
- Auto-Save Each Submission to a JSON file
- Increment a Count on Each Submission
- Add a Unique ID to Each Submission
-
- Checkboxes
- Color Picker
- Confirmation
- Country
- Currency
- Date & Time
- Dropdown
- Email Address Field
- File Upload
- Hidden Field
- Icon element
- Number
- Page Counter element
- Password
- Phone Number
- Radio & Checkbox Images
- Radio Buttons
- Range Slider
- Rating
- Rich Text Editor
- Signature
- Terms of Service
- Textarea
- Textbox
- Website / URL Field
-
- Email the Person Who Filled Out the Form
- Send an Email Only When a Checkbox Is Checked
- Attach the Submission PDF to Emails
- Send Email Based on Drop Down Selection
- Send Different Email Content Based on Form Responses
- Set up Auto-Responder Emails
- Styling Emails with CSS
- Sending Plain-Text Alternative Body Emails
- Troubleshooting Email Delivery
- Tracking Sent Emails
- Resending Emails
-
- Browser Autocomplete for Form Fields
- Customizing Submission Date Created and Modified Formats
- How to Create a Quiz Form
- Centering forms
- Show Confirmation Popup After Submission
- Redirect to a Menu Item After Form Submission
- Use custom Google Font in your form
- Embed a Form in an External Website
- Copy Value From One Field to Another
- Add Placeholder Text to Fields
- Show a Form Only to Logged-In Users
- Add Custom CSS
- Adding an “Other” Option
- Show or Hide Form Fields Based on User Joomla User Group
- Scroll the Page to the Top When a Long Form is Submitted
- Populate Fields Using Query String
- Display Submissions Count for a Specific Form
- Populate Drop Down, Radio Buttons or Checkboxes with a CSV File
- Silently POST Submitted Data to Any API or URL
- Create a Custom Login Form
- Auto-Populate Fields with Article Data
- Add a placeholder text to a Dropdown field
- Create Multilingual Forms in Joomla
- Redirect User to a URL After Form Submission
- Importing and Exporting Forms
- Display Convert Forms in a popup
-
- CSRF Token
- Does Convert Forms Use Cookies?
- Minimum Time to Submit
- Restrict Form Submissions Based on IP
- Enforcing a Custom Password Policy in Convert Forms
- Add ALTCHA Proof of Work to your Joomla form
- Add Cloudflare Turnstile to your Joomla Form
- Implement the Iubenda Consent Database in Joomla with Convert Forms
- Add Custom Validations to Fields and Forms
- Add Math Captcha to your Form
- Prevent a Field From Saving in the Database
- Add hCaptcha to your Form
- Enable Double Opt-in
- Allow Form Submissions in Specific Date Range
- Ensure a Unique Value is Entered Into a Field
- Block Form Submissions Containing Profanity (Bad Words)
- Block Email Addresses or Email Domains
- Honeypot
- Setting Up Google reCAPTCHA
- Create GDPR Compliant Forms
-
- Troubleshooting Spam Submissions
- Updating from Convert Forms 5 to 6
- Troubleshooting Form Submission Errors
- Troubleshooting Form Rendering Issues with Joomla Cache
- Frequently Asked Questions
- Troubleshooting Issues with the Joomla Email Cloak Plugin
- Campaigns Feature Is Deprecated: Migrate to Tasks
- Prevent Form from Getting Covered by a Sticky Menu Bar
- Troubleshooting Convert Forms
Ending pages
Show a thank-you page or redirect visitors after they submit your form, and pick a different ending for each visitor with rules.

Heads up: this feature is new in Convert Forms 6 and is only in the latest beta release. On Convert Forms 5, this page won't match your backend. Download the beta and back up your site first.
An ending is what visitors see after they submit your form. It either replaces the form with a thank-you page or sends visitors to another URL.
Every form has at least 1 ending. A new form starts with one that says "Thank you!". If you updated from Convert Forms 5, your old success message or redirect now lives in the form's ending.
Find your endings
- Log into your Joomla backend.
- Go to Components → Convert Forms → Forms.
- Open your form.
- Click Form in the left sidebar.
The Form tree lists your pages first, then your endings under the Endings heading. Click an ending to preview it and open its settings in the right sidebar.
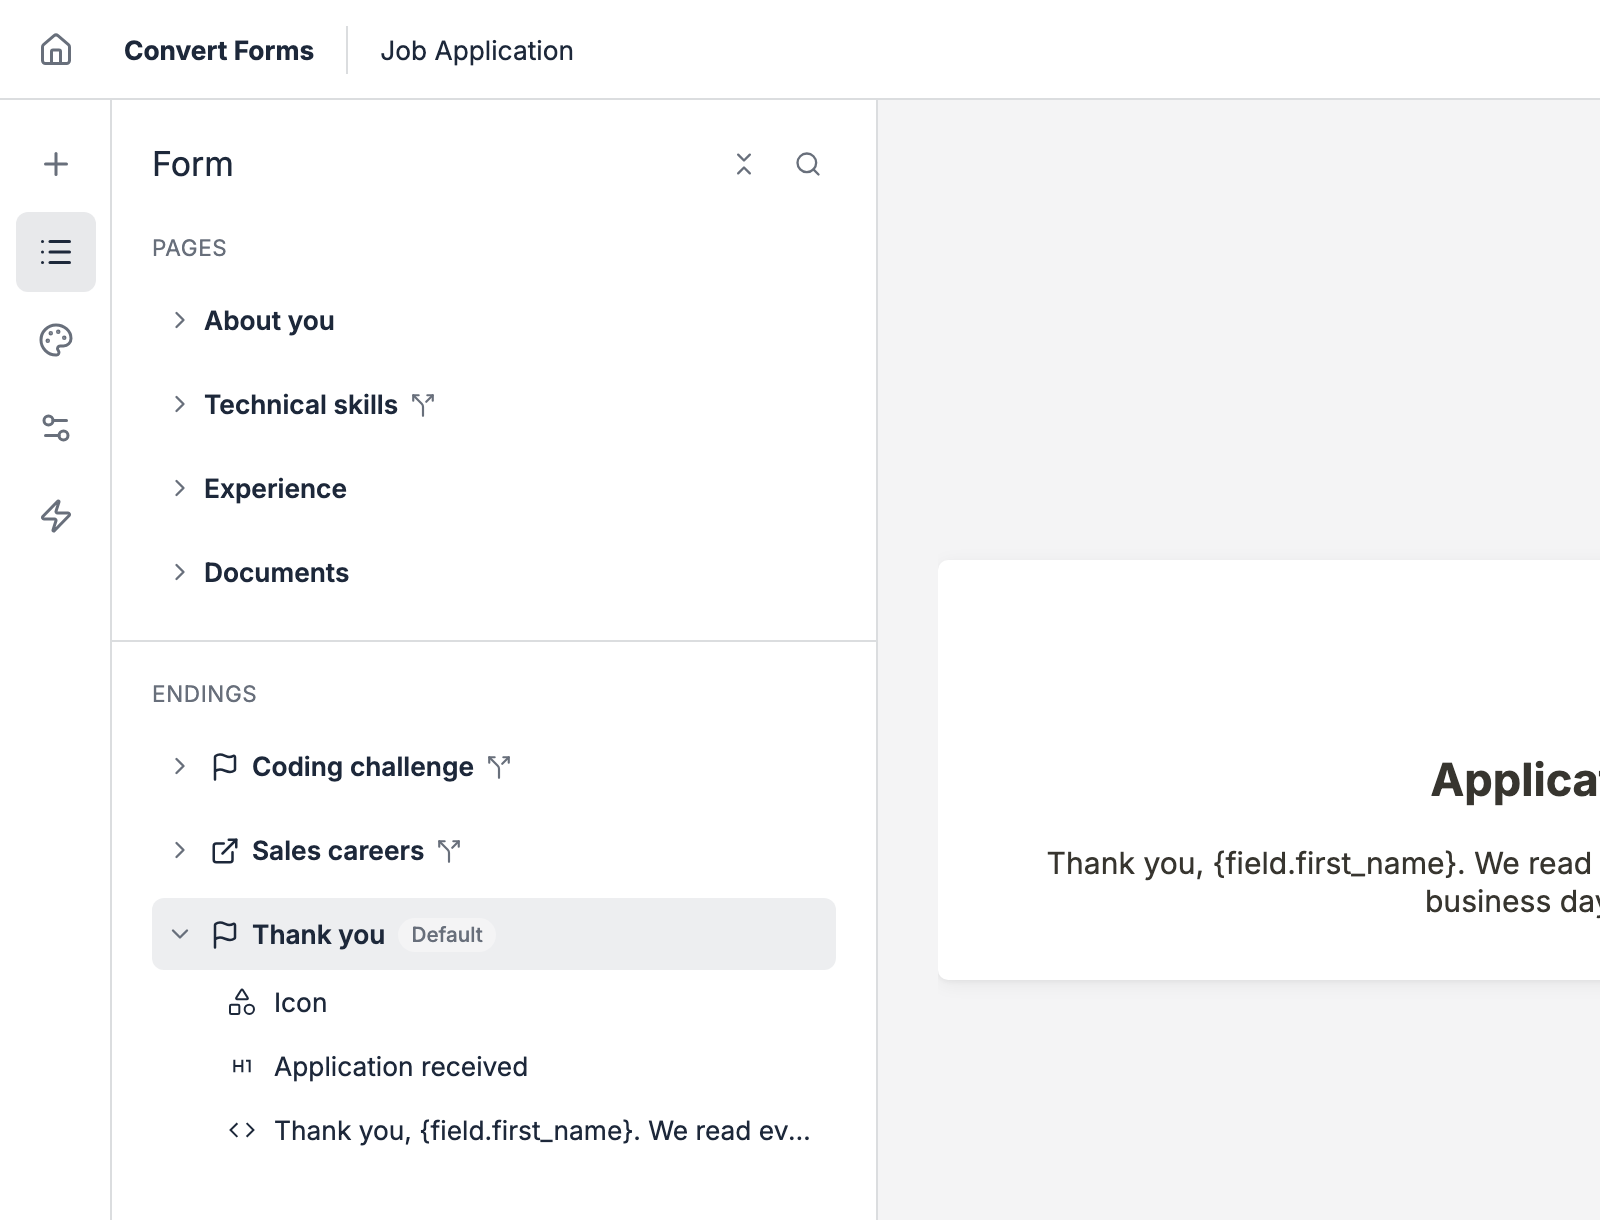
Build the ending page
An ending holds layout elements: Heading, HTML, Icon, Divider and Empty Space. To add one:
- Click the ending in the Form tree.
- Click the + on the ending's row.
- Pick an element.
Drag an element next to another to place them side by side, the same way you build columns on a form page. Use an HTML element for images and video.
Use the visitor's answers
Type Smart Tags into any ending element, and Convert Forms replaces them with the submitted values:
Thanks, {field.name}! Your reference number is {submission.id}.
To show a sentence only to some visitors, wrap it in the Conditional Content shortcode.
Ending settings
Click the ending in the Form tree to open its settings:
- Title: names the ending in the builder. Visitors never see it. An ending without a title shows in the Form tree as Ending, or Redirect for a redirect.
- Ending Type: Page shows the elements you added. Redirect sends visitors to a URL or a menu item instead, and the builder dims the ending's elements because they won't show. See Redirect users after form submission.
What visitors see
Once the submission goes through, the ending takes the form's place. The form's header, progress indicator, fields and footer hide, and only the ending shows.
Convert Forms also clears the form's fields, so the next submission starts empty.
Show different endings to different visitors
Add an ending for each group of visitors, and give each one a rule. A quiz can show "You passed" or "Try again", and a job application can send developers to a coding challenge and sales candidates to your careers page.
- Hover over the Endings heading in the Form tree.
- Click Add ending.
- Pick Page or Redirect under Ending Type.
- Set the rule under "Who gets this ending?", for example "Which role are you applying for?" equals Designer.
- Click Add ending.
- Add the ending's elements, or set its redirect.
- Save the form.
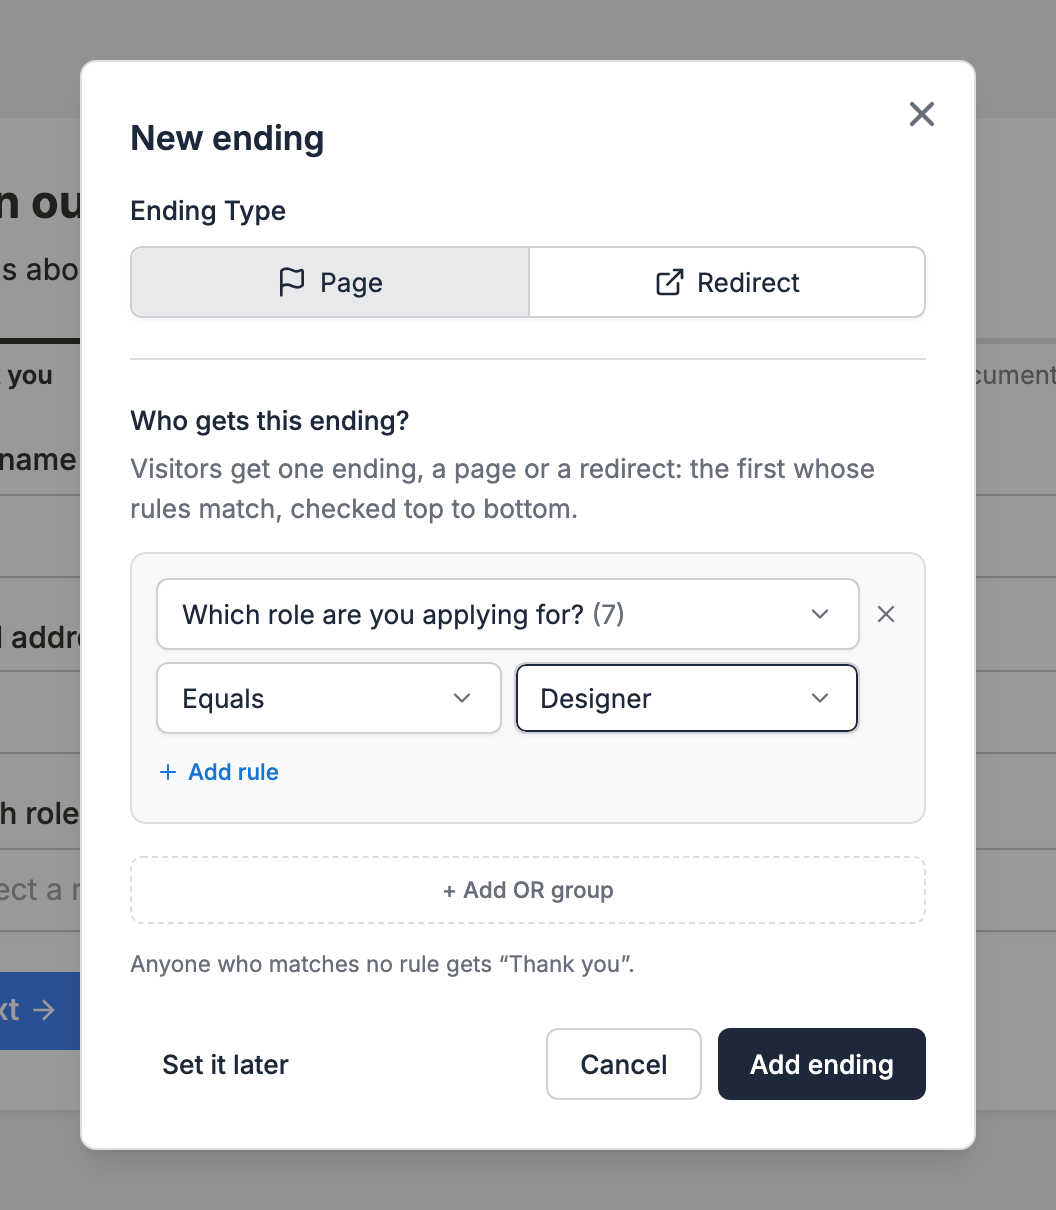
The new ending goes above your ending without rules, so its rule gets checked first. The note at the bottom of the dialog names the ending everyone else gets.
Not sure about the rule yet? Click Set it later. The ending gets added without a rule, and until it gets one, every visitor who reaches it sees it.
To change a rule later, click the ending in the Form tree. Its settings open on the Logic section, under "Use this ending when". In the Form tree, an ending with a rule shows a logic icon after its name: hover over it to read the rule.
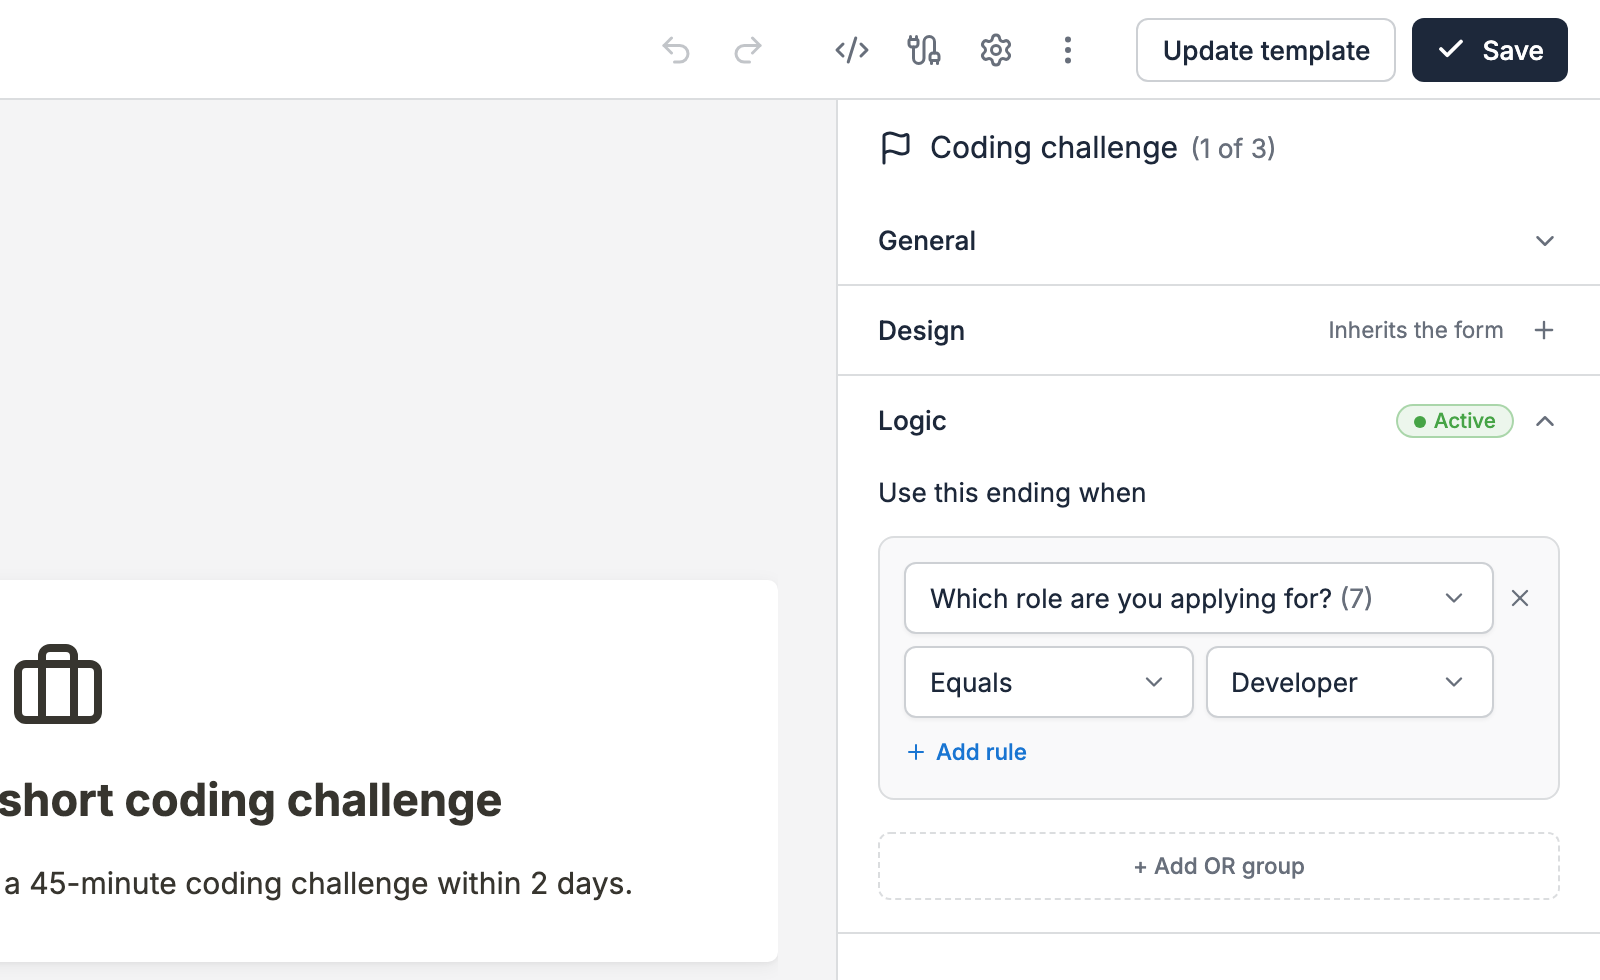
Multiple endings and ending rules need Convert Forms Pro. The free version has 1 ending, which can be a Page or a Redirect.
How Convert Forms picks the ending
- It checks your endings from top to bottom and uses the first one whose rule matches.
- An ending without rules always matches. Keep 1 at the bottom of the list, as the ending for everyone else. The Form tree marks it Default.
- If every ending has a rule and none of them matches, visitors get the first ending. The Default mark moves to it.
- Visitors see 1 ending only. Endings never play one after another.
- Rules can check any input element on any page of the form.
- Ending rules count only while Enable Conditional Logic is on, under Behavior → Conditional Logic.
Convert Forms checks the rules on the server after the visitor submits. Visitors can't read them in the page source or pick an ending themselves, which keeps quiz answers private. See How to create a quiz form.
Fix endings that never show
When an ending can't show, it turns grey in the Form tree, and a note under the Endings heading says why:
- An ending without rules sits above other endings, so they never get checked. Drag it to the bottom.
- An ending's rule is unfinished, so it never matches. Finish the rule in its Logic section.
- An ending has the same rule as an ending above it, so the one above always wins. Change one of the rules.
- No ending has a finished rule, so every visitor gets the same ending.
- Conditional Logic is off, so Convert Forms ignores the rules. Turn on Enable Conditional Logic under Behavior → Conditional Logic.
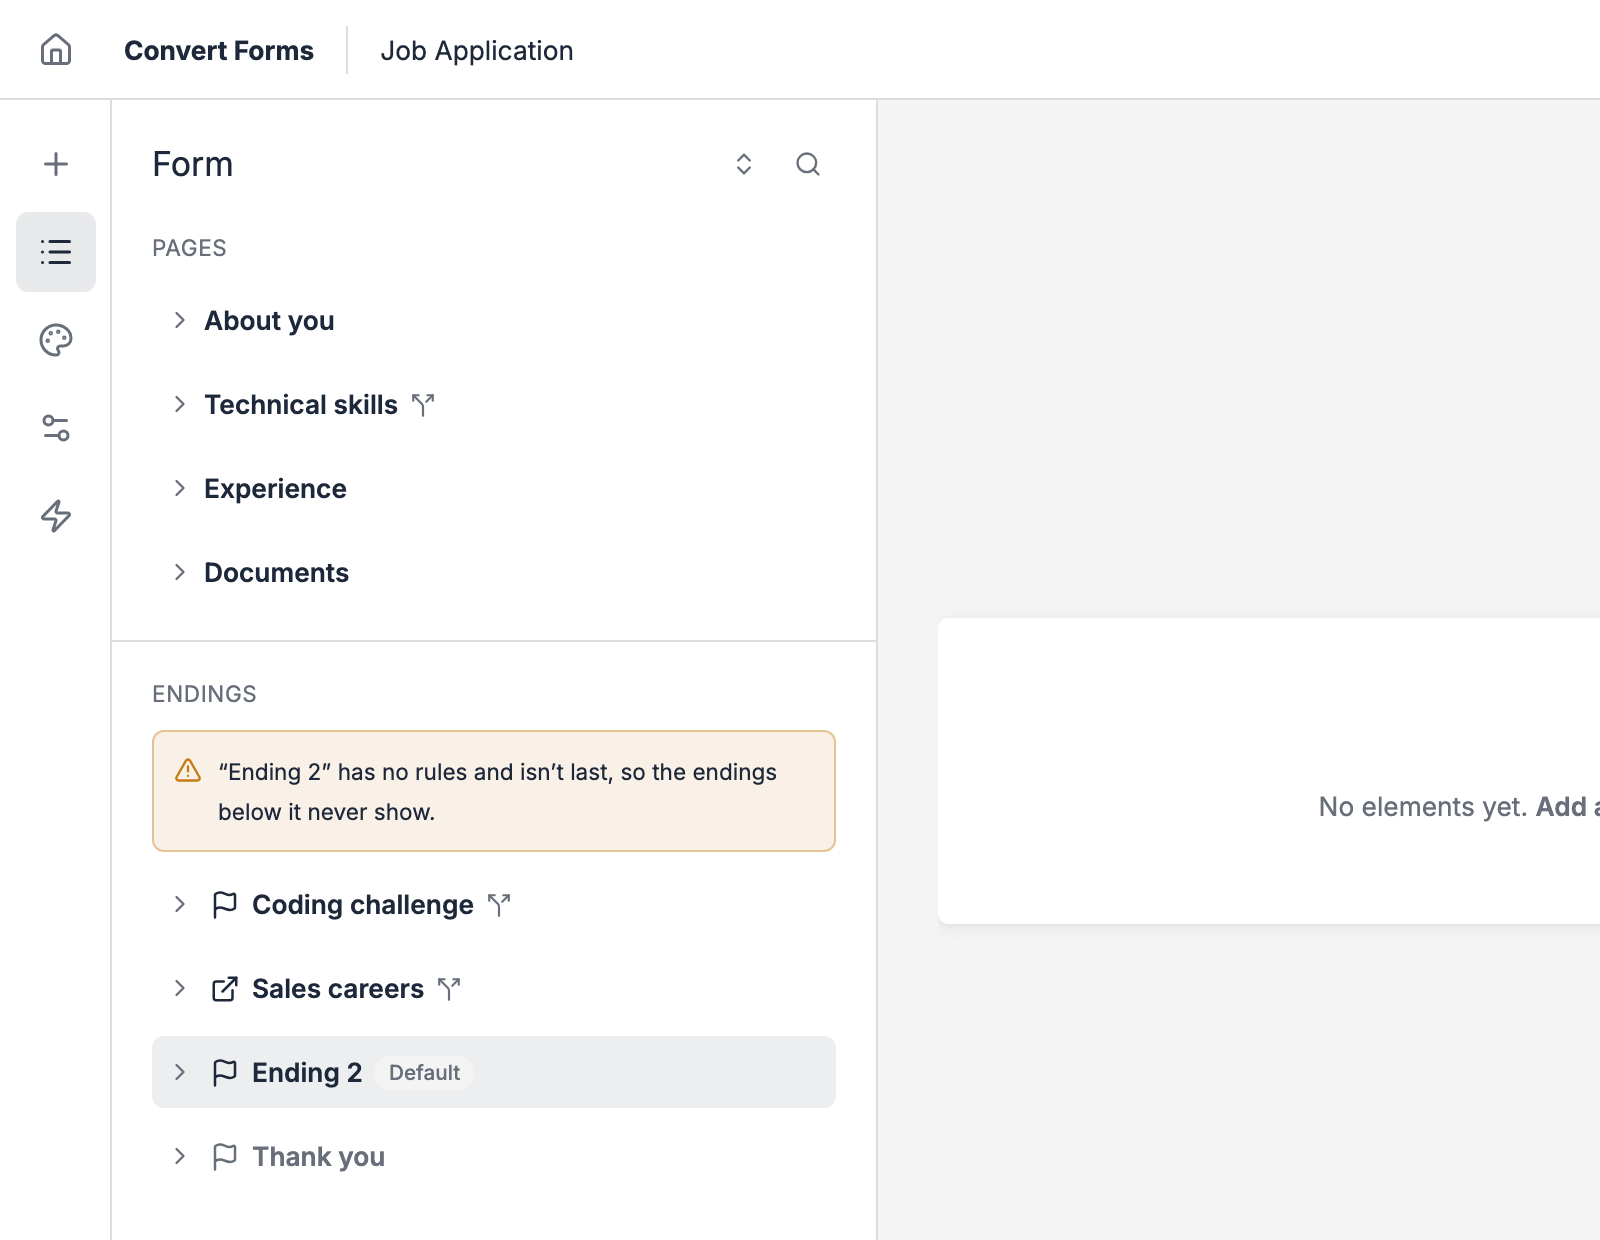
The note goes away once your endings are in order.
Give a page or an ending its own design
Each page and ending can override a few of the form's settings, while the rest of the form keeps its design. One page can have a green background, or the ending can use your brand color.
- Click Form in the left sidebar.
- Click the page or ending in the Form tree.
- Click the + next to Design in the right sidebar.
- Pick the setting to override.
- Set its value.
- Save the form.
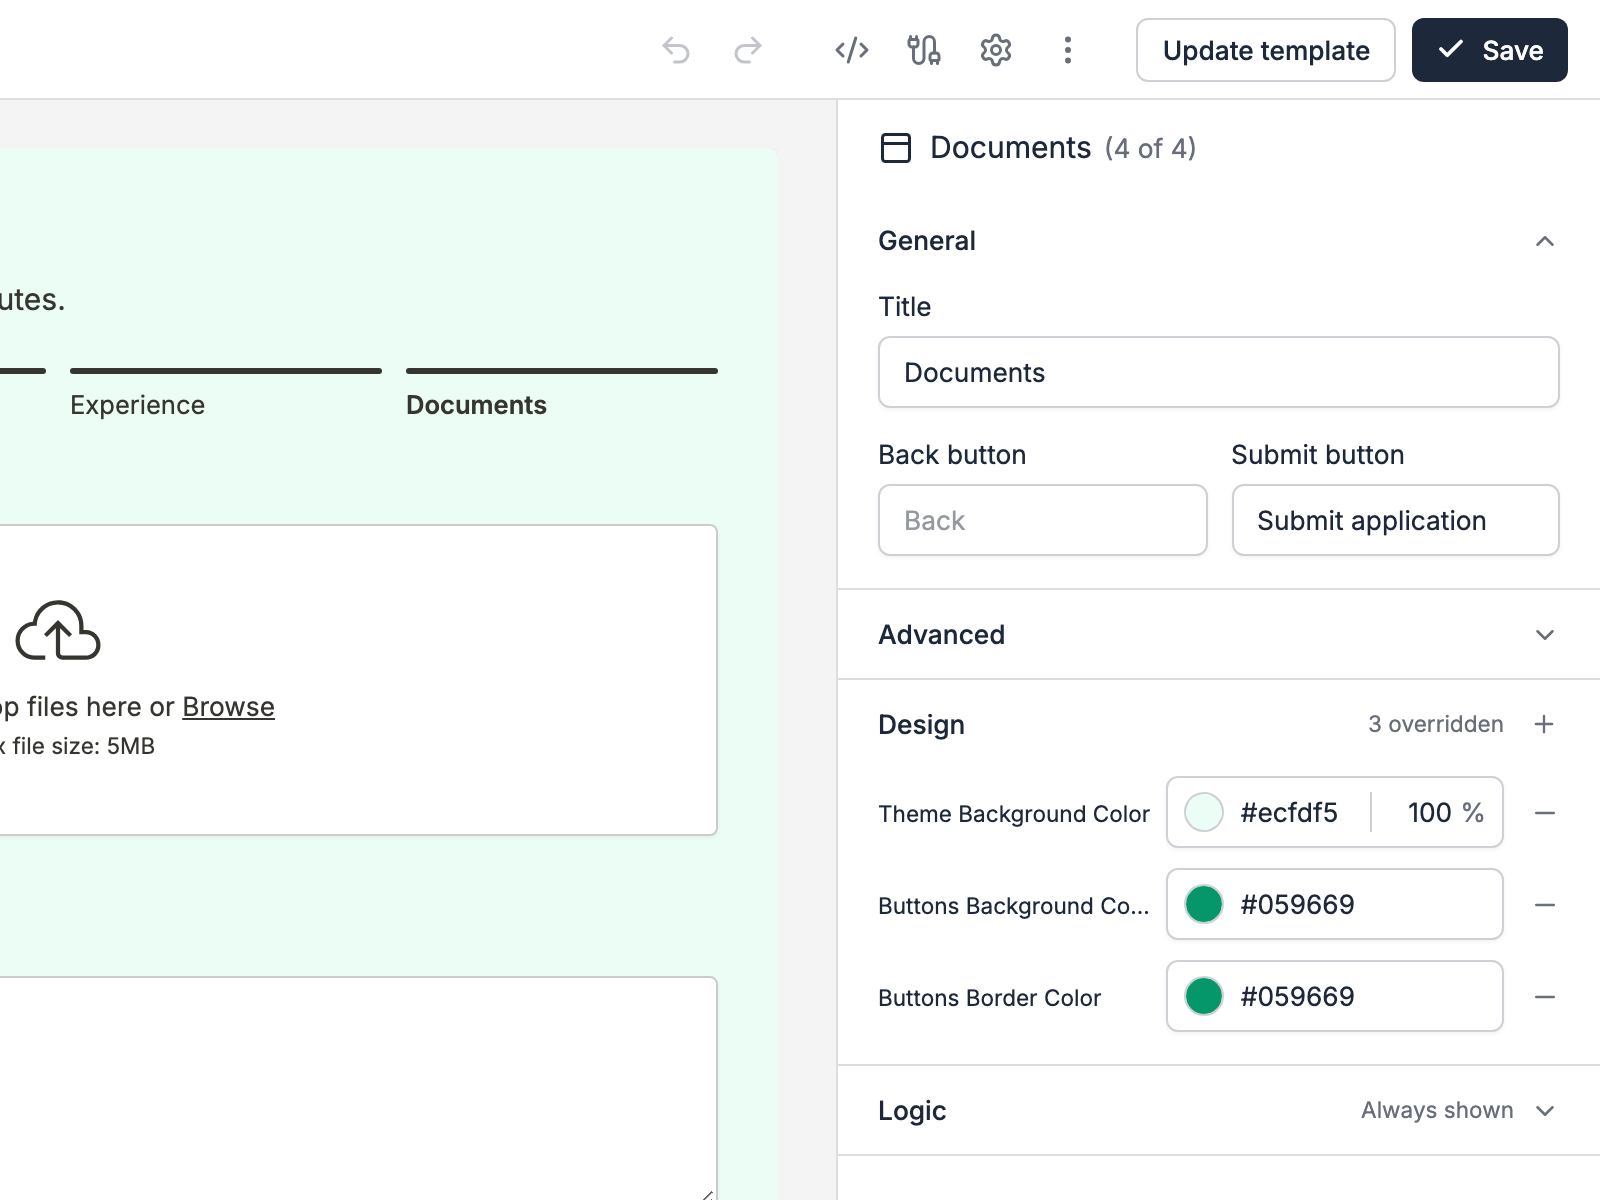
A form page can override these settings:
- Theme: Background Color, Text Color, Accent Color and Spacing
- Inputs: Text Color, Background Color and Border Color
- Buttons: Text Color, Background Color, Border Color and Alignment
An ending can override the Theme settings only, since it has no inputs or buttons. A Redirect ending has no Design section at all.
To drop an override, click the minus next to it, and the page goes back to the form's design. Page design overrides need Convert Forms Pro.
Rename, duplicate or delete an ending
Hover over the ending in the Form tree and click its menu (⋮). It holds Rename, Duplicate and Delete.
Duplicate copies the ending with its elements and asks for the copy's rule, the same way a new ending does.
Delete removes the ending and its elements. A form always keeps at least 1 ending, so you can't delete the last one.
Change the ending with PHP
A script in Behavior → PHP Scripts → After Form Submission can replace the ending's message through $ending:
$ending->set('Thanks, {field.name}! We got your order.');
See PHP Scripts. Most cases don't need code: multiple endings with rules cover them.
Last updated on Nov 10th 2026 14:11
The #1 Joomla Contact Form Builder Extension
Create contact forms, payment forms, registration forms, calculator forms with the most user-friendly Joomla contact form builder extension.

Tassos offers a premium suite of Joomla extensions with 7 products and over 2.5 million downloads, providing reliable solutions since 2014.


 Rated:

Copyright © 2014 - 2026 - Smile Motive Development LP. All Rights Reserved.